background image


VDP100BM 

V. 03 – 06/06/2013 

©Velleman nv 

4.


Installation 

Bubble Liquid 

1.


Put the liquid into the basin in the front. Do not overfill and respect the markings. 

2.


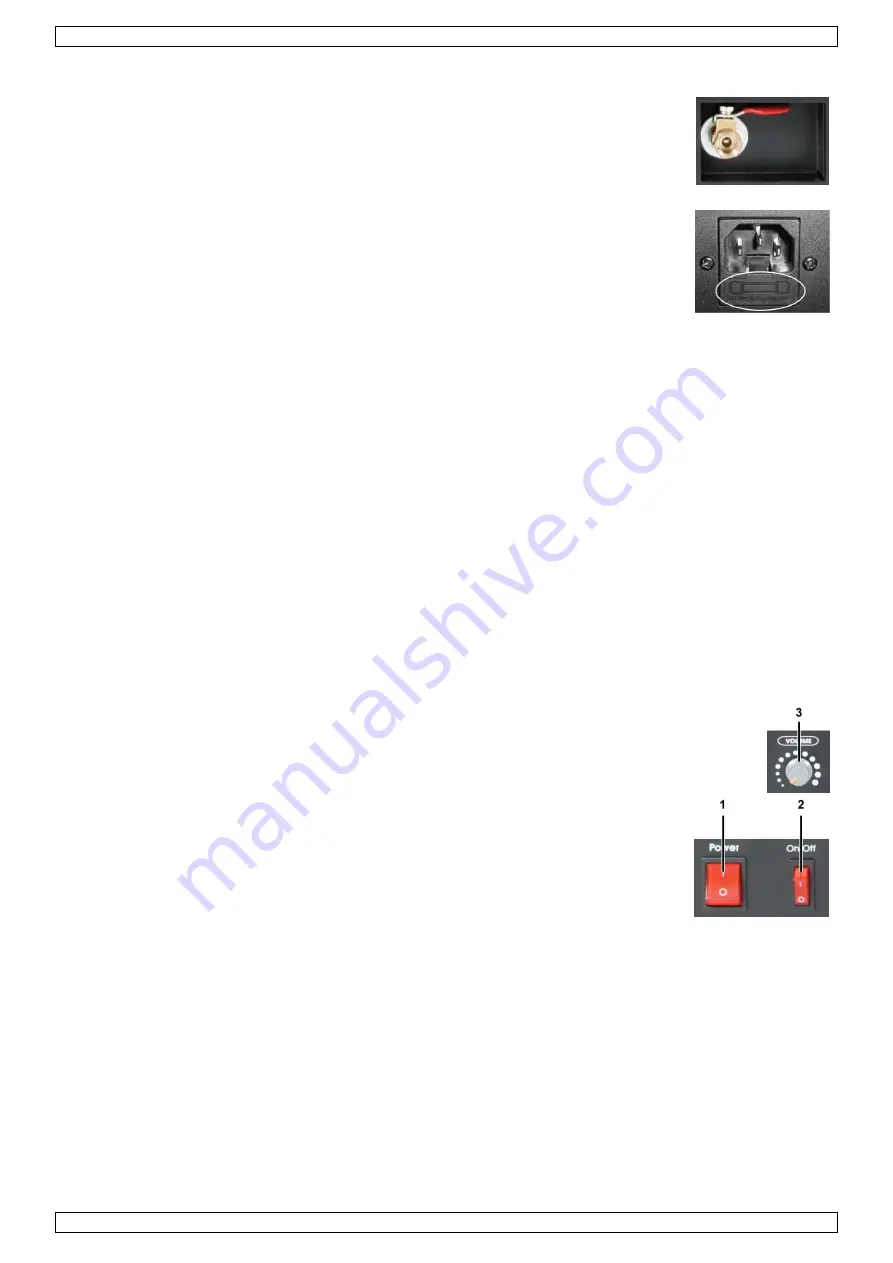
If the machine is not used for a long time, please let the liquid out through the pump 
(see picture) on the backside of the machine.  


Fuse 

Only fit or replace a fuse when the device is unplugged from the mains. 

Replace a blown fuse with a fuse of the same type and rating: 

1.


Remove the fuse holder at the back with an appropriate screwdriver (see picture). 

2.


Remove the old fuse and install a new one. 

3.


Place the fuse holder back. 


Mounting the Device 


Have the device installed by a qualified person, respecting EN 60598D2D17 and all other applicable norms. 


The carrying construction must be able to support 10 times the weight of the device for 1 hour without 
deforming. 


The installation must always be secured with a secondary attachment e.g. a safety cable. 


Never stand directly below the device when it is being mounted, removed or serviced. Have a qualified 
technician check the device once a year and once before you bring it into service. 


Install the device in a location with few passersDby that is inaccessible to unauthorised persons. 


Overhead mounting requires extensive experience: calculating workload limits, determining the installation 
material to be used… Have the material and the device itself checked regularly. Do not attempt to install 
the device yourself if you lack these qualifications as improper installation may result in injuries. 


Adjust the desired inclination angle via the mounting bracket and tighten the bracket screws. 


Make sure there is no flammable material within a 0.5 m radius of the device. 


Have a qualified electrician carry out the electric connection. 


Connect the device to the mains with the power plug. All devices must be powered directly off a grounded 
switched circuit and cannot be run off a rheostat or dimmer circuit, even if the rheostat or dimmer channel 
is used solely for 0 % to 100 % switching. 


The installation has to be approved by an expert before the device is taken into service. 

5.


Use 

Switch the device on and off by means of the power switch (1). Do not operate the device 
continuously. Adjust the output using the adjustment button (3). 


5.1


Stand Alone Mode 

Control the rotating wheels using the switch (2) on the backside of the device. Put the 
switch to I to rotate the wheels. 


5.2


DMX Mode 

DMX Channels 

CHANNEL 1: wheel rotation => bubble output 

DMX 512 Connection 

When applicable, connect an XLR cable to the female XLR output of a controller (not incl.) and the other side to 
the male XLR input of the device. Multiple devices can be linked through serial linking. The linking cable should 
be a dual core, screened cable with XLR input and output connectors. 

Summary of Contents for VDP100BM

Page 1: ...TROLLED BUBBLE MACHINE 100W DMX GESTUURDE BELLENMACHINE 100W MACHINE À BULLES À PILOTAGE DMX 100W MÁQUINA DE BURBUJAS CONTROLADA POR DMX 100W DMX GESTEURTE SEIFENBLASENMASCHINE 100W WYTWORNICA BANIEK MYDLANYCH DMX 100W ...

Page 2: ...ANUAL GEBRUIKERSHANDLEIDINGER NOT DEFINED MODE D EMPLOIERROR BOO DEFINED MANUAL DEL USUARIOERROR DEFINED BEDIENUNGSANLEITUNGERR DEFINED VDP100BM 2 2 ERROR BOOKMARK BOOKMARK NOT ROR BOOKMARK NOT ERROR BOOKMARK NOT Velleman nv ...

Page 3: ...e local environmental rule r local waste disposal authorities Please read the manual thoroughly before bringing it don t install or use it and contact your dealer installation touching live wires can cause lifeDthre uring operation as the housing heats up is device away from rain moisture splashing and s on top of or close to the device power when device not in use or when servicing or power cord ...

Page 4: ...mining the installation material to be used Have the material and the device itself checked regularly Do not attempt to install the device yourself if you lack these qualifications as improper installation may result in injuries Adjust the desired inclination angle via the mounting bracket and tighten the bracket screws Make sure there is no flammable material within a 0 5 m radius of the device H...

Page 5: ...f corrosion The housing visible parts mounting supports and the installation location e g ceiling suspension trussing should not be deformed modified or tampered with e g do not drill extra holes in mounting supports do not change the location of the connections Mechanically moving parts must not show any signs of wear and tear The electric power supply cables must not show any damage Have a quali...

Page 6: ...e się z instru zkodzone podczas transportu prosimy o nie korzyst czeństwa achować szczególną ostrożność dotknięcie przewo go życiu porażenia prądem elektrycznym dczas działania gdyż obudowa może być nagrzana ewnątrz pomieszczeń Chronić urządzenie przed i cieczami Nigdy nie stawiać przedmiotów wypełn użytkowane a także podczas serwisowania i konser asilający należy trzymać tylko za wtyczkę i i nieu...

Page 7: ...owadzanej przez wykwalifikowanego technika Należy zamontować urządzenie w mało uczęszczanym miejscu oraz w taki sposób aby było niedostępne dla nieupoważnionych użytkowników Instalacja na wysokości wymaga doświadczenia konieczne jest obliczenie wartości granicznych obciążenia oraz wybór materiału do instalacji Należy regularnie kontrolować materiał i urządzenie Nie próbować samodzielnie instalować...

Page 8: ...gnałów za pośrednictwem oddzielnego kanału Zmiana ustawień jednego kanału będzie miała więc wpływ tylko na dane urządzenie W przypadku trybu 1Dkanałowego należy ustawić adres startowy pierwszego urządzenia jako 1 CH1 drugiego urządzenia jako 2 CH2 trzeciego jako 3 CH3 itd Najwyższy adres startowy to 512 Wprowadzić właściwą liczbę przy użyciu przełączników DIP znajdujących się z tyłu urządzenia 6 C...

Page 9: ...dź naszą stronę internetową www hqpower eu Informacje zawarte w niniejszej instrukcji obsługi mogą ulec zmianie bez wcześniejszego powiadomienia INFORMACJA O PRAWACH WŁASNOŚCI Instrukcja ta jest własnością firmy Velleman NV i jest chroniona prawami autorskimi Wszystkie prawa są zastrzeżone na całym świecie Żadna część tej instrukcji nie może być kopiowana przedrukowywana tłumaczona lub konwertowan...

Reviews: