background image


VDPL310FC 

V. 01 – 29/04/2014 

©Velleman nv 

6.


Installation 

Choose a suitable mounting spot. Mount the device in the desired angle using the included bracket. 
Connect the power cord to the mains. Disconnect after use. 

Mounting the Device 


Have the device installed by a qualified person, respecting EN 60598-2-17 and all other applicable 
norms. 


The carrying construction must be able to support 10 times the weight of the device for 1 hour 
without deforming. 


For truss mounting, use an appropriate clamp (not incl.) and fit an M10 bolt through the centre of the 
(folded) bracket. 


Adjust the desired inclination angle via the mounting bracket and tighten the bracket screws. 


The installation must always be secured with a secondary attachment such as a safety cable 
(e.g. VDLSC7N or VDLSC8N). The secondary attachment shall be designed and mounted in such a 
way that no part of the device can fall if the primary attachment fails. 


Make sure that the safety cables can carry 10 times the weight of the device. Make sure that the 

maximum height of drop is limited so that no injuries can occur. If the safety cables are long, wrap 
them around the truss multiple times to reduce the height of drop to a safe level. 


Never stand directly below the device when it is being mounted, removed or serviced. Have a 
qualified technician check the device once a year and once before you bring it into service. 


Install the device in a location with few passers-by that is inaccessible to unauthorised persons. 


Overhead mounting requires extensive experience: calculating workload limits, determining the 

installation material to be used… Have the material and the device itself checked regularly. Do not 
attempt to install the device yourself if you lack these qualifications as improper installation may 
result in injuries. 


Make sure there is no flammable material within a 0.5 m radius of the device. 


Have a qualified electrician carry out the electric connection. 


Connect the device to the mains with the power plug. All devices must be powered directly off a 

grounded switched circuit and cannot be run off a rheostat or dimmer circuit, even if the rheostat or 
dimmer channel is used solely for 0 % to 100 % switching. 


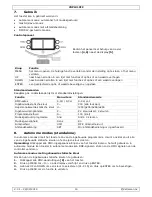
The device has a power output 

[10]

 to supply power to another device. When connecting several 

devices in a daisy chain via this output, make sure that the total current does not exceed the power 
line’s nominal current. Use power cables with an adequate section. 


The installation has to be approved by an expert before the device is taken into service. 

DMX-512 Connection 


When applicable, connect an XLR cable to the female XLR output of a controller (not incl.) and the 

other side to the male XLR input 

[8]

 of the device. Multiple devices can be linked through serial 

linking. The linking cable shall be a dual core, screened cable with XLR input and output connectors. 


Maximum recommended serial data link distance is 500 meters (1640 ft). Maximum recommended 
number of devices on a serial data link is 32 devices. 


A DMX terminator is recommended for installations where the DMX cable has to run a long distance 

or is in an electrically noisy environment (e.g. discos). The terminator prevents corruption of the 
digital control signal by electrical noise. The DMX terminator is simply an XLR plug with a 120 Ω 
resistor between pins 2 and 3, which is then plugged into the XLR output socket 

[11]

 of the last 

device in the chain. 

7.


Operation 

The device can be used in the following modes: 


stand-alone mode: automatic or sound-activated 


master/slave 


stand-alone with remote control 


with a DMX512 controller. 

Summary of Contents for VDPL310FC

Page 1: ...RGBW LED MET DMX STURING UNILED SUPERSLIM 4 3 X LED RGBW DE 8 W AVEC PILOTAGE DMX UNILED SUPERSLIM 4 3 X 8 W RGBW CON CONTROL DMX UNILED SUPERSLIM 4 3 X 8 W RGBW LED MIT DMX STEUERUNG USER MANUAL 3 G...

Page 2: ...VDPL310FC V 01 29 04 2014 2 Velleman nv...

Page 3: ...similarly qualified persons in order to avoid any hazard Make sure that the available voltage does not exceed the voltage stated in the specifications of this manual This device falls under protectio...

Page 4: ...after it has been exposed to changes in temperature Protect the device against damage by leaving it switched off until it has reached room temperature This device is designed for professional use on s...

Page 5: ...tall the device yourself if you lack these qualifications as improper installation may result in injuries Make sure there is no flammable material within a 0 5 m radius of the device Have a qualified...

Page 6: ...s one of the built in programs You can also select one of the built in static colours or define your own custom colour Note Make sure to unplug any connection from the DMX input of the device if you w...

Page 7: ...llows 1 Unplug any connection from the DMX input 8 of the device 2 Press MENU until Snd is displayed and press ENTER to confirm 3 Use UP and DOWN to select the desired setting o Snd1 4 colours changin...

Page 8: ...all brightness of the light output master dimmer add a strobe effect with adjustable speed switch off all LEDs Each function is described in detail below Built in Static Colour To use one of the built...

Page 9: ...ously If you set individual addresses each device will listen to a separate channel number Changing the settings of one channel will only affect the device in question In case of the 4 channel mode yo...

Page 10: ...ohol or solvents Do not immerse the device in any liquid There are no user serviceable parts apart from the fuse Contact your dealer for spare parts if necessary Replacing the Fuse Only replace the fu...

Page 11: ...diens servicedienst of een gelijkwaardig bekwaam persoon vervangen worden om gevaar te voorkomen De beschikbare netspanning mag niet hoger zijn dan de spanning in de specificaties beschreven in deze h...

Page 12: ...et aan onmiddellijk nadat het werd blootgesteld aan temperatuurschommelingen Om beschadiging te vermijden moet u wachten tot het toestel kamertemperatuur heeft bereikt Dit toestel is ontworpen voor pr...

Page 13: ...nstructiemateriaal u kunt gebruiken Laat het materiaal en het toestel regelmatig nakijken Monteer het toestel niet zelf indien u er geen ervaring mee heeft Een slechte montage kan leiden tot verwondin...

Page 14: ...sonaliseerde statische kleur U r255 g255 b255 w255 Ingebouwd programma P P1 kleurwissel 4 kleuren Programmasnelheid S 100 snel Muziekgestuurd programma Snd Snd1 4 kleuren Muziekgevoeligheid Sens 80 Di...

Page 15: ...k op ENTER om te bevestigen 7 Druk op MENU om de functie te verlaten Dimsnelheid Kies een dimsnelheid om de kleurovergang in de automatische programma s aan te sturen enkel kleurwissel De dimsnelheid...

Page 16: ...e plaatselijke milieuwetgeving Houd batterijen uit het bereik van kinderen Om de batterij in de afstandsbediening te plaatsen vervangen gaat u als volgt te werk 1 Druk op de batterijhouder A en trek B...

Page 17: ...a op of om in te stellen Master dimmer Om de helderheid van de lichtuitvoer te regelen druk op en daarna op of om de gewenste helderheid in te stellen Een stroboscoopeffect toevoegen Om een stroboscoo...

Page 18: ...100 voor vaste kleur met CH1 4 128 159 Kleurovergang 160 191 Kleurwissel 4 kleuren 192 223 Kleurwissel 15 kleuren 224 255 Muziekgestuurde modus 8 0 255 Master dimmer 0 100 9 0 51 Dimsnelheid zoals in...

Page 19: ...40 VAC 50 60 Hz verbruik 25 W IP norm IP44 leds 3 x 8 W RGBW FC vermogenled stralingshoek 25 hoek 44 afmetingen 187 x 152 x 187 mm gewicht 1 6 kg Gebruik dit toestel enkel met originele accessoires Ve...

Page 20: ...ation endommag doit tre remplac par le fabricant un technicien ou une autre personne qualifi e pour viter tout danger S assurer que la tension secteur ne d passe pas la tension indiqu e dans les sp ci...

Page 21: ...s sous la garantie Confier l installation et l entretien un technicien qualifi Ne pas brancher imm diatement l appareil apr s exposition des variations de temp rature Afin d viter des dommages mat rie...

Page 22: ...pas beaucoup de passage et inaccessible des personnes non autoris es L installation de cet appareil exige une solide exp rience pratique le calcul de la charge max de la construction les mat riaux d...

Page 23: ...se DMX 4 CH 9 CH 9 CH d 1 Couleur statique incorpor e C C15 toutes les LEDs allum es Couleur statique personnalis e U r255 g255 b255 w255 Programme incorpor P P1 changement de couleurs 4 couleurs Vite...

Page 24: ...100 et appuyer sur ENTER pour confirmer 7 Appuyer sur MENU pour quitter Vitesse variateur S lectionner une vitesse variateur pour contr ler la transition de couleurs dans les programmes automatiques...

Page 25: ...respectant la r glementation locale relative la protection de l environnement Garder les piles hors de la port e des enfants Pour installer remplacer la pile dans la t l commande proc der comme suit 1...

Page 26: ...u pour ajuster Variateur ma tre Pour ajuster la luminosit du flux lumineux appuyer sur et ensuite sur ou pour r gler la luminosit souhait e Ajouter un effet stroboscopique Pour ajouter un effet strobo...

Page 27: ...uleurs 4 couleurs 192 223 Changement de couleurs 15 couleurs 224 255 Mode pilot par la musique 8 0 255 Variateur ma tre 0 100 9 0 51 Vitesse variateur comme dans le menu 52 101 Vitesse variateur d sac...

Page 28: ...ds 1 6 kg N employer cet appareil qu avec des accessoires d origine La SA Velleman ne peut dans la mesure conforme au droit applicable tre tenue responsable des dommages ou l sions directs ou indirect...

Page 29: ...lo tanto es esencial que el aparato est puesto a tierra La conexi n el ctrica debe llevarla a cabo un t cnico cualificado Cuidado durante la instalaci n puede sufrir una peligrosa descarga el ctrica...

Page 30: ...pausa para prolongar la vida del aparato Guarde este manual del usuario para cuando necesite consultarlo 4 Caracter sticas UNILED 4 es una iluminaci n LED multifunci n para cualquier tipo de aconteci...

Page 31: ...ial inflamable en un radio de 0 5 m alrededor del aparato La conexi n el ctrica debe llevarla a cabo un electricista cualificado Enchufe el aparato a la red el ctrica Todos los aparatos deben estar co...

Page 32: ...nd alone transmita se ales DMX que puedan interferir con las se ales DMX del controlador Modo Stand Alone con color est tico incorporado Para utilizar uno de los colores est ticos preprogramados 1 Des...

Page 33: ...ce UP y DOWN para seleccionar el ajuste deseado o Snd1 cambio de color 4 colores controlados por la m sica o Snd2 cambio de color 15 colores controlados por la m sica 4 Para cambiar la sensibilidad de...

Page 34: ...ensibilidad regulable ajustar el brillo general de la salida de luz dimmer maestro a adir un efecto estrobosc pico con velocidad regulable apagar todos los LEDs Cada funci n se describe detalladamente...

Page 35: ...canal afecta a los ajustes de todos los canales Con varias direcciones iniciales cada aparato reaccionar independientemente Por lo tanto cambiar los ajustes de un solo canal s lo afecta al canal en cu...

Page 36: ...aparato en un l quido El usuario no habr de efectuar el mantenimiento de ninguna pieza salvo el fusible Contacte con su distribuidor si necesita piezas de recambio Reemplazar el fusible Reemplace el f...

Page 37: ...ann soll der Hersteller eine Fachkraft oder eine andere geeignete Person das Kabel ersetzen Vergewissern Sie sich dass die anzuschlie ende Netzspannung nicht h her ist als die Netzspannung beschrieben...

Page 38: ...r Garantieanspruch F r daraus resultierende Folgesch den bernimmt der Hersteller keine Haftung Die LEDs und mechanische Abnutzung fallen nicht unter die Garantie Lassen Sie dieses Ger t von einem Fach...

Page 39: ...ung oder Wartung nie direkt unter dem Ger t Lassen Sie das Ger t j hrlich und vor der Inbetriebnahme von einem Fachmann pr fen Montieren Sie das Ger t an einem Ort wo niemand es ber hren kann und wo w...

Page 40: ...crollen oder einen Wert zu verringern ENTER Um zu best tigen und eine Option oder einen Wert zu speichern Standardwerte Nachfolgende Liste beschreibt die Standardeinstellungen des Men s Eigenschaft Me...

Page 41: ...cken MENU bis S erscheint Bemerkung Dr cken Sie die Taste ENTER nicht 6 Verwenden Sie UP und DOWN um die Geschwindigkeit von langsam 1 auf schnell 100 einzustellen und dr cken Sie ENTER um zu best tig...

Page 42: ...chsel der Batterie Achtung Durchbohren Sie nie die Batterien und werfen Sie diese nicht ins Feuer Explosionsgefahr Laden Sie keine nicht wiederaufladbare Batterien Alkali Respektieren Sie die rtlichen...

Page 43: ...hlen Snd1 Snd2 2 Um die Empfindlichkeit des integrierten Mikrofons zu ndern dr cken Sie auf SENSITIVITY und dann auf oder Master Dimmer Um die allgemeine Helligkeit vom Lichtausgang zu regeln dr cken...

Page 44: ...ogrammgeschwindigkeit langsam auf schnell wenn Kanal 7 32 ist 7 0 31 Ohne Funktion 32 63 0 100 f r feste Farbe mit CH1 4 64 95 100 0 f r feste Farbe mit CH1 4 96 127 100 0 100 f r feste Farbe mit CH1...

Page 45: ...Geh use ein und verbinden Sie das Ger t wieder mit dem Netz 13 Technische Daten Stromversorgung 100 240 VAC 50 60 Hz Stromverbrauch 25 W IP Schutzart IP44 LEDs 3 x 8 W RGBW FC Hochleistungs LED Abstr...

Page 46: ...volledig terug te betalen In dat geval krijgt u een vervangend product of terugbetaling ter waarde van 100 van de aankoopsom bij ontdekking van een gebrek tot n jaar na aankoop en levering of een ver...

Page 47: ...de transporte de y a Velleman si el aparato ya no est cubierto por la garant a Cualquier art culo que tenga que ser reparado tendr que ser devuelto a su distribuidor Velleman Devuelva el aparato con l...

Reviews: