background image


VDPL310FC2 

V. 01 – 29/04/2014 

©Velleman nv 

3.


General Guidelines 

Refer to the 

Velleman® Service and Quality Warranty

 on the last pages of this manual. 


Keep this device away from dust and extreme temperatures. Make sure the ventilation 
openings are clear at all times. For sufficient air circulation, leave at least 1" (± 2.5 cm) 
in front of the openings. 


Protect this device from shocks and abuse. Avoid brute force when operating the 
device. 


Familiarise yourself with the functions of the device before actually using it. Do not allow operation 

by unqualified people. Any damage that may occur will most probably be due to unprofessional use 
of the device. 


All modifications of the device are forbidden for safety reasons. Damage caused by user modifications 
to the device is not covered by the warranty. 


Only use the device for its intended purpose. All other uses may lead to short circuits, burns, 
electroshocks, lamp explosion, crash, etc. Using the device in an unauthorised way will void the 
warranty. 


Damage caused by disregard of certain guidelines in this manual is not covered by the warranty and 
the dealer will not accept responsibility for any ensuing defects or problems. 


Mechanical wear and LEDs are not covered by warranty. 


A qualified technician shall install and service this device. 


Do not switch the device on immediately after it has been exposed to changes in temperature. 
Protect the device against damage by leaving it switched off until it has reached room temperature. 


This device is designed for professional use on stage, in discos, theatres, etc. The device shall only 
be used indoors with an alternating current of 100–240 VAC, 50/60 Hz. 


Lighting effects are not designed for permanent operation: regular operation breaks will prolong their 
lives. 


Keep this manual for future reference. 

4.


Features 

The UNILED 6 is a multi-purpose LED light for every kind of event and installation with powerful RGBWAP 
full-colour LEDs. It features a flat bottom and has signal and power connections on the side, so it is 
perfect to use as a wall lighter and other kinds of floor applications. 


3 x 8 W RGBWAP high-power LED, with white colour temperature pre-set (3200 – 10 000 K) 


DMX control via 6, 8, or 12 channels for simple or advanced controlling 

o


6 channel mode: RGBWAP 

o


8 channel mode: dimmer, RGBWAP, strobe 

o


12 channel mode: dimmer, RGBWAP, preset colour, auto program, auto program speed, dimmer 
curve 


built-in programs with speed adjustment 


sound activation via internal microphone with adjustable sensitivity 


static colour selection 


master/slave mode for synchronized operation of multiple units linked in a chain 


flicker-free operation (400 Hz) 


with IR remote control. 

5.


Overview 

Refer to the illustrations on page 2 of this manual. 


double bracket 

display 

power input + fuse holder 

hinge 

control buttons 

10 

power output 

IR receiver for remote control 

safety hook 

11 

DMX output 

control buttons 

DMX input 


Summary of Contents for VDPL310FC2

Page 1: ...GBWAP LED MET DMX STURING UNILED SUPERSLIM 6 3 X LED RGBWAP DE 8 W AVEC PILOTAGE DMX UNILED SUPERSLIM 6 3 X 8 W RGBWAP CON CONTROL DMX UNILED SUPERSLIM 6 3 X 8 W RGBW LED MIT DMX STEUERUNG USER MANUAL...

Page 2: ...VDPL310FC2 V 01 29 04 2014 2 Velleman nv...

Page 3: ...similarly qualified persons in order to avoid any hazard Make sure that the available voltage does not exceed the voltage stated in the specifications of this manual This device falls under protectio...

Page 4: ...hanges in temperature Protect the device against damage by leaving it switched off until it has reached room temperature This device is designed for professional use on stage in discos theatres etc Th...

Page 5: ...tall the device yourself if you lack these qualifications as improper installation may result in injuries Make sure there is no flammable material within a 0 5 m radius of the device Have a qualified...

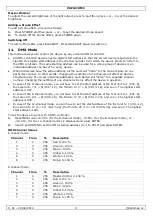
Page 6: ...ns one of the built in programs You can also select one of the built in static colours or define your own custom colour Note Make sure to unplug any connection from the DMX input of the device if you...

Page 7: ...llows 1 Unplug any connection from the DMX input 8 of the device 2 Press MENU until Snd is displayed and press ENTER to confirm 3 Use UP and DOWN to select the desired setting o Snd1 6 colours changin...

Page 8: ...ith adjustable speed switch off all LEDs Each function is described in detail below Built in Static Colour To use one of the built in static colours press one of the numbered buttons 0 9 on the remote...

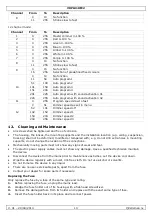
Page 9: ...rate channel number Changing the settings of one channel will only affect the device in question In case of the 6 channel mode you will have to set the start address of the first unit to 1 CH1 6 the s...

Page 10: ...ses the mounting supports and the installation location e g ceiling suspension trussing shall not be deformed modified or tampered with e g do not drill extra holes in mounting supports do not change...

Page 11: ...le in the event of damage or injury resulting from incorrect use of this device For more info concerning this product and the latest version of this manual please visit our website www hqpower eu The...

Page 12: ...diens servicedienst of een gelijkwaardig bekwaam persoon vervangen worden om gevaar te voorkomen De beschikbare netspanning mag niet hoger zijn dan de spanning in de specificaties beschreven in deze...

Page 13: ...lootgesteld aan temperatuurschommelingen Om beschadiging te vermijden moet u wachten tot het toestel kamertemperatuur heeft bereikt Dit toestel is ontworpen voor professioneel gebruik op podia in disc...

Page 14: ...nstructiemateriaal u kunt gebruiken Laat het materiaal en het toestel regelmatig nakijken Monteer het toestel niet zelf indien u er geen ervaring mee heeft Een slechte montage kan leiden tot verwondin...

Page 15: ...personaliseerde statische kleur U r255 g255 b255 w255 a255 p255 Ingebouwd programma P P1 kleurwissel 6 kleuren Programmasnelheid S 100 snel Muziekgestuurd programma Snd Snd1 6 kleuren Muziekgevoelighe...

Page 16: ...naar snel 100 en druk op ENTER om te bevestigen 7 Druk op MENU om de functie te verlaten Dimsnelheid Kies een dimsnelheid om de kleurovergang in de automatische programma s aan te sturen enkel kleurw...

Page 17: ...aatselijke milieuwetgeving Houd batterijen uit het bereik van kinderen Om de batterij in de afstandsbediening te plaatsen vervangen gaat u als volgt te werk 1 Druk op de batterijhouder A en trek B om...

Page 18: ...muzieksturing te gebruiken gaat u als volgt te werk 1 Druk op SOUND en daarna op of om het gewenste programma te selecteren Snd1 Snd2 2 Om de gevoeligheid van de ingebouwde microfoon te wijzigen druk...

Page 19: ...s Kanaal Van Tot Omschrijving 1 0 255 Rood 0 100 2 0 255 Groen 0 100 3 0 255 Blauw 0 100 4 0 255 Amber 0 100 5 0 255 Wit 0 100 6 0 255 Purper 0 100 8 kanaalsmodus Kanaal Van Tot Omschrijving 1 0 255 M...

Page 20: ...ing Bestel eventuele reserveonderdelen bij uw verdeler De zekering vervangen Vervang een gesprongen zekering enkel door een zekering van hetzelfde type 1 Ontkoppel het toestel van de netspanning voor...

Page 21: ...tation endommag doit tre remplac par le fabricant un technicien ou une autre personne qualifi e pour viter tout danger S assurer que la tension secteur ne d passe pas la tension indiqu e dans les sp c...

Page 22: ...et l entretien un technicien qualifi Ne pas brancher imm diatement l appareil apr s exposition des variations de temp rature Afin d viter des dommages mat riels attendre jusqu ce que l appareil ait at...

Page 23: ...a pas beaucoup de passage et inaccessible des personnes non autoris es L installation de cet appareil exige une solide exp rience pratique le calcul de la charge max de la construction les mat riaux d...

Page 24: ...e DMX 3 CH 8 CH 12 CH 12 CH d 1 Couleur statique incorpor e C C63 toutes les LEDs allum es Couleur statique personnalis e U r255 g255 b255 w255 a255 p255 Programme incorpor P P1 changement de couleurs...

Page 25: ...nt 1 rapide 100 et appuyer sur ENTER pour confirmer 7 Appuyer sur MENU pour quitter Vitesse variateur S lectionner une vitesse variateur pour contr ler la transition de couleurs dans les programmes au...

Page 26: ...ctant la r glementation locale relative la protection de l environnement Garder les piles hors de la port e des enfants Pour installer remplacer la pile dans la t l commande proc der comme suit 1 Enfo...

Page 27: ...it 1 Appuyer sur SOUND et ensuite sur ou pour s lectionner le programme souhait Snd1 Snd2 2 Pour changer la sensibilit du microphone incorpor appuyer sur SENSITIVITY et ensuite sur ou pour ajuster Var...

Page 28: ...1 0 255 Rouge 0 100 2 0 255 Vert 0 100 3 0 255 Bleu 0 100 4 0 255 Ambr 0 100 5 0 255 Blanc 0 100 6 0 255 Pourpre 0 100 Mode 8 canaux Canal De Description 1 0 255 Variateur ma tre 0 100 2 0 255 Rouge...

Page 29: ...d fectueux par un exemplaire identique 1 D brancher l appareil du r seau avant de remplacer le fusible 2 Retirer le porte fusible de son emplacement avec un tournevis lame plate 3 Retirer le fusible d...

Page 30: ...tar cualquier peligro Aseg rese de que la tensi n de red no sea mayor que la tensi n indicada en las especificaciones Este aparato pertenece a la clase de protecci n I Por lo tanto es esencial que el...

Page 31: ...ance la temperatura ambiente estando desactivado Este aparato ha sido dise ado para uso profesional en una discoteca un teatro etc El aparato s lo est permitido para el uso en interiores con una fuent...

Page 32: ...estructura y del aparato mismo debe ser llevada a cabo por un t cnico especializado No intente instalar este aparato si no tiene las cualificaciones requeridas una instalaci n incorrecta puede causar...

Page 33: ...dos Tambi n puede seleccionar uno de los colores est ticos preprogramados o crear su propio color Observaci n Desconecte cualquier conexi n de la entrada DMX del aparato si quiere utilizarlo en el mod...

Page 34: ...velocidad del dimmer vuelva a activar el programa autom tico de la forma siguiente 4 Pulse MENU hasta que P se visualice y pulse ENTER 5 Utilice UP y DOWN para seleccionar el programa adecuado y puls...

Page 35: ...ra seleccionar Off y pulse ENTER Ahora el mando a distancia est desactivado 3 Para volver a activar el mando a distancia seleccione On 10 3 Utilizar el mando a distancia El mando a distancia le permit...

Page 36: ...entre una sola direcci n inicial para toda una serie de aparatos o una direcci n inicial por aparato Con una sola direcci n inicial para una serie de aparatos todos los aparatos reaccionar n sincroniz...

Page 37: ...r la m sica 02 11 0 255 Velocidad del programa de lenta a r pida 12 0 51 Velocidad del dimmer como en el men 52 101 Velocidad del dimmer desactivada 102 152 Velocidad del dimmer 1 153 203 Velocidad de...

Page 38: ...el haz 25 ngulo 44 dimensiones 187 x 152 x 187 mm peso 1 6 kg Utilice este aparato s lo con los accesorios originales Velleman NV no ser responsable de da os ni lesiones causados por un uso indebido d...

Page 39: ...ann soll der Hersteller eine Fachkraft oder eine andere geeignete Person das Kabel ersetzen Vergewissern Sie sich dass die anzuschlie ende Netzspannung nicht h her ist als die Netzspannung beschrieben...

Page 40: ...s resultierende Folgesch den bernimmt der Hersteller keine Haftung Die LEDs und mechanische Abnutzung fallen nicht unter die Garantie Lassen Sie dieses Ger t von einem Fachmann installieren und warten...

Page 41: ...ung oder Wartung nie direkt unter dem Ger t Lassen Sie das Ger t j hrlich und vor der Inbetriebnahme von einem Fachmann pr fen Montieren Sie das Ger t an einem Ort wo niemand es ber hren kann und wo w...

Page 42: ...Wert zu verringern ENTER Um zu best tigen und eine Option oder einen Wert zu speichern Standardwerte Nachfolgende Liste beschreibt die Standardeinstellungen des Men s Eigenschaft Option im Men Standar...

Page 43: ...ms einzustellen dr cken MENU bis S erscheint Bemerkung Dr cken Sie die Taste ENTER nicht 6 Verwenden Sie UP und DOWN um die Geschwindigkeit von langsam 1 auf schnell 100 einzustellen und dr cken Sie E...

Page 44: ...echsel der Batterie Achtung Durchbohren Sie nie die Batterien und werfen Sie diese nicht ins Feuer Explosionsgefahr Laden Sie keine nicht wiederaufladbare Batterien Alkali Respektieren Sie die rtliche...

Page 45: ...ie folgt vor 1 Dr cken Sie auf SOUND und dann auf oder um das gew nschte Programm zu w hlen Snd1 Snd2 2 Um die Empfindlichkeit des integrierten Mikrofons zu ndern dr cken Sie auf SENSITIVITY und dann...

Page 46: ...R DMX Werte pro Kanal 6 Kanal Modus Kanal von bis Beschreibung 1 0 255 Rot 0 100 2 0 255 Gr n 0 100 3 0 255 Blau 0 100 4 0 255 Amber 0 100 5 0 255 Wei 0 100 6 0 255 Purpur 0 100 8 Kanal Modus Kanal vo...

Page 47: ...rsatzunterteile bei Ihrem Fachh ndler Die Sicherung ersetzen Ersetzen Sie die defekte Sicherung durch eine neue gleichen Typs und gleicher Leistung 1 Trennen Sie das Ger t vom Netz ehe Sie einen Siche...

Page 48: ...volledig terug te betalen In dat geval krijgt u een vervangend product of terugbetaling ter waarde van 100 van de aankoopsom bij ontdekking van een gebrek tot n jaar na aankoop en levering of een ver...

Page 49: ...de transporte de y a Velleman si el aparato ya no est cubierto por la garant a Cualquier art culo que tenga que ser reparado tendr que ser devuelto a su distribuidor Velleman Devuelva el aparato con l...

Reviews: