background image


VDPLP64SLB 

V. 02 – 30/06/2014 

©Velleman nv 

10.1


Inserting/Replacing the Battery 


Warning!

 Do not puncture batteries or throw them in fire as they may explode. Do not attempt to 

recharge non-rechargeable batteries (alkaline). Dispose of batteries in accordance with local 
regulations. Keep batteries away from children. 


To insert/replace the battery in the remote control, proceed as follows: 

1.


Press on the side of the battery holder 

[A]

 and pull 

[B]

 to slide it open. 

2.


Insert a new CR2025 lithium battery in accordance with the polarity markings on the remote control. 

3.


Push the battery holder back into the remote until it snaps into place. 

10.2


Enable/Disable Remote Control 

If you want to prevent (accidental) usage of the remote control, you can disable it via the menu. When 
disabled, pressing the buttons on the remote control has no effect. Proceed as follows: 

1.


Press MENU until <SET> is displayed and press ENTER. 

2.


Use UP and DOWN to select <Off> and press ENTER. 
The remote control is now disabled. 

3.


To enable the use of the remote control again, select <On>. 

10.3


Using the Remote Control 

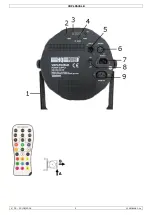
The remote control allows you to: 


choose a static colour (built-in or custom) 


choose an automatic program with speed adjustment 


choose an automatic program with fading colours 


run a sound-activated program with sensitivity adjustment 


set the overall brightness of the light output (master dimmer) 


add a strobe effect with adjustable speed 


switch off all LEDs. 

Each function is described in detail below. 

Built-in Static Colour 

To use one of the built-in static colours, press one of the numbered buttons (0–9) on the remote control. The 
button colour corresponds with the light colour. 

Custom Static Colour 

You can create a custom colour by adjusting the intensity of the red (R), green (G), blue (B), and amber (A) 
LEDs. To use a custom static colour: 

1.


To adjust the red LEDs, press R and then press + or – to set the desired intensity. 

2.


To adjust the green LEDs, press G and then press + or – to set the desired intensity. 

3.


To adjust the blue LEDs, press B and then press + or – to set the desired intensity. 

4.


To adjust the amber LEDs, press A and then press + or – to set the desired intensity. 

5.


To activate the custom colour, press MANUAL. 

Note: 

The W and UV buttons have no function. 

Automatic Program 

To use an automatic program, proceed as follows: 

1.


Press AUTO and then press + or – to select the desired program (P1–P4). 

2.


To set the speed of the program, press SPEED and then press + or – to adjust. 

Fading Colours 

To use an automatic program with fading colours, proceed as follows: 

1.


Press FADE and then press + or – to select the desired program (P2 or P4). 

Sound-Activated Program 

To use a program with sound activation, proceed as follows: 

1.


Press SOUND and then press + or – to select the desired program (P5/P6). 

2.


To change the sensitivity of the internal microphone, press SENSITIVITY and then press + or – to adjust. 

Summary of Contents for VDPLP64SLB

Page 1: ...LED PAR64 RGBA BATTERIJVOEDING SMART LED PAR64 RGBA ALIMENTATION PAR PILES SMART LED PAR64 RGBA FUNCIONA CON BATER A SMART LED PAR64 RGBA AKKUBETRIEBEN USER MANUAL 3 GEBRUIKERSHANDLEIDING 10 MODE D E...

Page 2: ...VDPLP64SLB V 02 30 06 2014 2 Velleman nv...

Page 3: ...out the electric connection Be very careful during the installation touching live wires can cause life threatening electroshocks Do not use the device when damage to housing or cables is noticed Do no...

Page 4: ...D PAR suitable for all kind of events easy to control without DMX with the included IR remote control built in automated and sound activated programs via DMX IR remote control or master slave no power...

Page 5: ...imum recommended serial data link distance is 500 meters 1640 ft Maximum recommended number of devices on a serial data link is 32 devices A DMX terminator is recommended for installations where the D...

Page 6: ...nput 5 of the device 2 Press MENU until P is displayed and press ENTER to confirm 3 Use UP and DOWN to select the desired setting o P5 4 colours changing responding to sound o P6 15 colours changing r...

Page 7: ...erall brightness of the light output master dimmer add a strobe effect with adjustable speed switch off all LEDs Each function is described in detail below Built in Static Colour To use one of the bui...

Page 8: ...ously If you set individual addresses each device will listen to a separate channel number Changing the settings of one channel will only affect the device in question In case of the 4 channel mode yo...

Page 9: ...age by deep discharge There are no user serviceable parts apart from the fuse Contact your dealer for spare parts if necessary Replacing the Fuse Only replace the fuse by a fuse of the same type and r...

Page 10: ...e netspanning mag niet hoger zijn dan de spanning in de specificaties beschreven in deze handleiding Dit toestel valt onder beschermingsklasse I Het toestel moet dus geaard zijn Een geschoolde technic...

Page 11: ...mag dit toestel enkel binnenshuis gebruiken met een wisselspanning van 230 VAC 50 Hz Het toestel is niet geschikt voor een continue werking regelmatige onderbrekingen verlengen de levensduur Bewaar de...

Page 12: ...e kan leiden tot verwondingen Verwijder alle brandbaar materiaal in een straal van 0 5 m rond het toestel Laat het toestel aansluiten door een geschoolde elektricien Sluit het toestel via de stekker a...

Page 13: ...n 4 Druk op MENU om de functie te verlaten Autonome modus met gepersonaliseerde statische kleur U kunt een eigen kleur cre ren door de lichtintensiteit van de rode r groene g blauwe b en amberkleurige...

Page 14: ...druk op MENU tot 8 CH op de display verschijnt en druk op ENTER 6 Gebruik UP en DOWN om het DMX adres in te stellen op d 1 en druk op ENTER 10 Gebruik met afstandsbediening Opmerking Ontkoppel alle D...

Page 15: ...snelheid van het programma te regelen druk op SPEED en daarna op of om in te stellen Kleurovergang Om een automatisch programma met kleurovergang te gebruiken gaat u als volgt te werk 1 Druk op FADE...

Page 16: ...lsmodus Kanaal Van Tot Omschrijving 1 0 255 Rood 0 100 2 0 255 Groen 0 100 3 0 255 Blauw 0 100 4 0 255 Amber 0 100 5 0 15 Geen functie 16 255 Voorgeprogrammeerde vaste kleuren selecteren 6 0 15 Geen f...

Page 17: ...laats de zekeringhouder terug in het toestel en schakel de stroom weer in 13 Technische specificaties voeding 230 VAC 50 Hz verbruik 35 W autonomie alle leds ingeschakeld 8 u n kleur 20 u volledig opg...

Page 18: ...il doit donc tre mis la terre La connexion lectrique doit tre effectu e par un technicien qualifi tre prudent lors de l installation toucher un c ble sous tension peut causer des lectrochocs mortels N...

Page 19: ...racas avec des c bles encombrants ce qui acc l re l installation La batterie au lithium ion rechargeable offre jusqu 20 heures d autonomie sur une seule charge et alimente les 180 LEDs rouges vertes b...

Page 20: ...laquelle un autre appareil peut tre branch En connectant plusieurs appareils en s rie via cette sortie il faut s assurer que le courant total ne d passe pas le courant nominal du circuit lectrique Uti...

Page 21: ...toute connexion de l entr e DMX 5 de l appareil 2 Enfoncer MENU jusqu ce que P s affiche et appuyer sur ENTER 3 Utiliser UP et DOWN pour s lectionner un programme incorpor o P1 Changement de couleurs...

Page 22: ...la t l commande jusqu au d clic 10 2 Allumer teindre la t l commande Afin d viter toute activation accidentelle de la t l commande il est possible de l teindre depuis le menu Lorsque la t l commande e...

Page 23: ...ACKOUT pour rallumer les LEDs 11 Mode de pilotage DMX Ce mode permet de piloter l appareil avec n importe quel contr leur DMX Tous les appareils pilot s par un signal DMX demandent une adresse de d pa...

Page 24: ...ent pas tre us es ou bouger de mani re irr guli re Les c bles d alimentation lectriques ne peuvent pas tre endommag s Un technicien qualifi doit r viser l appareil D brancher l appareil avant chaque e...

Page 25: ...ation de cet appareil Pour plus d informations concernant cet article et la derni re version de ce mode d emploi visiter notre site web www hqpower eu Toutes les informations pr sent es dans ce mode d...

Page 26: ...a a cabo un t cnico cualificado Cuidado durante la instalaci n puede sufrir una peligrosa descarga el ctrica al tocar un cable conectado a la red el ctrica No utilice el aparato si la caja o los cable...

Page 27: ...a de Li Ion recargable tiene una autonom a de m x 20 horas y alimenta los 180 LEDs rojos verdes azules y naranjas para una excelente reproducci n del color Combina con un controlador DMX inal mbrico p...

Page 28: ...esta salida Utilice cables de alimentaci n con un di metro adecuado Un experto debe probar la instalaci n antes de la puesta en marcha Conexi n DMX512 Si fuera necesario conecte un cable con conector...

Page 29: ...se ENTER para confirmar 5 Para ajustar la velocidad del programa pulse MENU hasta que S se visualice Observaci n No pulse ENTER 6 Utilice UP y DOWN para cambiar la velocidad de lento 1 a r pido 100 y...

Page 30: ...que se visualice SET y pulse ENTER 2 Utilice UP y DOWN para seleccionar Off y pulse ENTER Ahora el mando a distancia est desactivado 3 Para volver a activar el mando a distancia seleccione On 10 3 Ut...

Page 31: ...s DMX del controlador DMX Es posible elegir entre una sola direcci n inicial para toda una serie de aparatos o una direcci n inicial por aparato Con una sola direcci n inicial para una serie de aparat...

Page 32: ...nar el aparato Esto evitar que una gran descarga cause da os permanentes El usuario no habr de efectuar el mantenimiento de ninguna pieza salvo el fusible Contacte con su distribuidor si necesita piez...

Page 33: ...eser Bedienungsanleitung Der Aufbau des Ger tes entspricht der Schutzklasse I Gem den Vorschriften muss das Ger t geerdet sein Der elektrische Anschluss darf nur von einer Fachkraft durchgef hrt werde...

Page 34: ...n Discotheken Theatern usw entworfen Verwenden Sie das Ger t nur in Innenr umen und mit einer Wechselspannung von 230 Vac 50 Hz Das Ger t eignet sich nicht f r permanenten Betrieb eine regelm ige Paus...

Page 35: ...nn Sie damit keine Erfahrung haben Eine schlechte Montage kann Verletzungen verursachen Entfernen Sie alle entflammbaren Materialen in einem Abstand von 0 5 m Lassen Sie das Ger t von einem qualifizie...

Page 36: ...Taste MENU um diese Funktion zu verlassen Stand Alone Modus mit eigener statischer Farbe Kreieren Sie eine eigene Farbe indem Sie die Intensit t von den roten r gr nen g blauen b und gelben orangefar...

Page 37: ...dr cken Sie dann auf ENTER 6 Verwenden Sie UP und DOWN um die DMX Startadresse auf d 1 zu stellen und dr cken Sie ENTER 10 Bedienung ber Fernbedienung Bemerkung Trennen Sie alle Anschl sse vom DMX Ein...

Page 38: ...ehen Sie wie folgt vor 1 Dr cken Sie auf FADE und dann auf oder um das gew nschte Programm zu w hlen P2 oder P4 Musikgesteuertes Programm F r ein musikgesteuertes Programm gehen Sie wie folgt vor 1 Dr...

Page 39: ...5 Auswahl von festen vorprogrammierten Farben 6 0 15 Ohne Funktion wenn Kanal 7 31 ist 16 255 Stroboskop langsam auf schnell wenn Kanal 7 31 ist 0 255 Programmgeschwindigkeit langsam auf schnell wenn...

Page 40: ...e das Ger t wieder mit dem Netz 13 Technische Daten Stromversorgung 230 VAC 50 Hz Stromverbrauch 35 W Autonomie alle LEDs eingeschaltet 8 Std eine Farbe 20 Std v llig aufgeladen 6 Std LEDs 180 St 39 x...

Page 41: ...niet oplaadbare ingebouwd of vervangbaar lampen rubberen onderdelen aandrijfriemen onbeperkte lijst defecten ten gevolge van brand waterschade bliksem ongevallen natuurrampen enz defecten veroorzaakt...

Page 42: ...derechos La lista previamente mencionada puede ser adaptada seg n el tipo de art culo v ase el manual del usuario del art culo en cuesti n Velleman Service und Qualit tsgarantie Seit der Gr ndung in 1...

Reviews: