background image

- 2 -

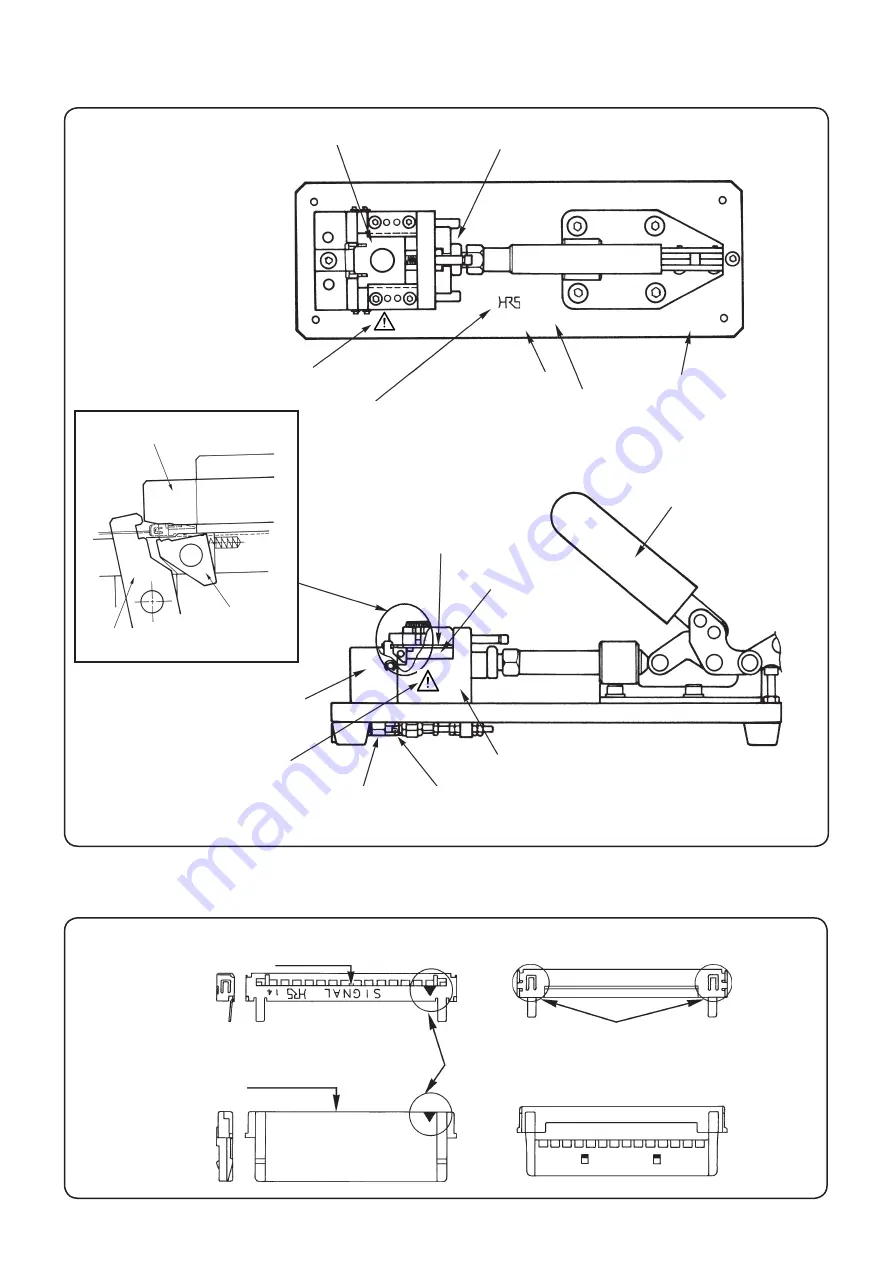
4. Configuration of desk jig components

Shank

Connector lamp

Connector holder

Connector guide

Clamp lever

Base plate

Ratchet

Ratchet release lever

Pressure block

5. Configuration of connector components

Preliminary insertion position

Ground plate

Polarization mark

Lock

Preliminary insertion reference 

Connector main body

DF19G-20S/PR-MD2

9E001

MADE IN JAPAN 

HRS No.

Country of origin display

Product name display

Manufacturing No. display

Warning label

Warning label

Connector lamp

 Lock punch

Press fitting punch

Jan.1.2020 Copyright 2020 HIROSE ELECTRIC CO., LTD. All Rights Reserved.

Summary of Contents for DF19G Series

Page 1: ... DF19G 30S PR MD2 INSTRUCTION MANUAL CAUTION Be sure to read this Instruction Manual carefully before using it to secure safety in operation In addition save this Instruction Manual so that it is available whenever necessary for review HIROSE ELECTRIC CO LTD Jan 1 2020 Copyright 2020 HIROSE ELECTRIC CO LTD All Rights Reserved ...

Page 2: ...the handle In addition use this machine putting on a place where children s hands cannot reach Application and modification 1 To prevent possible personal accidents this tool shall only be used for its originally intended purpose while following the instructions specified in this Instruction Manual We assume no responsibility resulting from the use other than the application 2 To prevent possible ...

Page 3: ...ems before operation 3 III Operating procedure 4 1 Mounting the ground plate 4 2 Inserting FPC 4 3 Preliminary insertion of the ground plate 5 4 Setting procedure of the connector 6 5 Connection work 7 6 Appearance inspection 8 7 Electrical test 8 IV Repairing procedure in case of failure of connection 9 V Precautions in handling the jig 10 VI Maintenance and inspection 10 Jan 1 2020 Copyright 202...

Page 4: ... GND DF19G 30S 1F GND Jig DF19G 14S PR MD2 DF19G 20S PR MD2 DF19G 30S PR MD2 3 Commendable standard of FPC dimensions Dimensions described below denote the standard of FPC dimensions which can be mounted on this jig For the detailed dimensions please contact our engineering division B 0 05 2 2 0 05 Straight section more than 7 5 mm 0 245mm Dimension mm A B DF19G 14S 1F 15 6 14 DF19G 20S 1F 21 6 20...

Page 5: ...or components Preliminary insertion position Ground plate Polarization mark Lock Preliminary insertion reference Connector main body DF19G 20S PR MD2 9E001 MADE IN JAPAN HRS No Country of origin display Product name display Manufacturing No display Warning label Warning label Connector lamp Lock punch Press fitting punch Jan 1 2020 Copyright 2020 HIROSE ELECTRIC CO LTD All Rights Reserved ...

Page 6: ...and connection is not correctly per formed Shut height is im proper and connection is not correctly per formed when pressure block does not come closely in contact with base plate face Connection is not cor rectly performed when press fitting punch or lock punch is de formed or broken Connection is not cor rectly performed when connector lamp does not come in contact with set position Connection i...

Page 7: ... direction 2 Insert FPC until it comes in contact with the inside of connector main body FPC Connector main body Insertion Connector main body FPC Cautions when inserting FPC 1 The connector main body and the ground plate will be broken at the time of connec tion unless the connector main body and the polarization mark of the ground plate are set in the same direction 2 Insertion may be difficult ...

Page 8: ...late is inserted into the connector main body should be less than 10 degrees B NG Ground plate is slantingly inserted Deformation of the ground plate will be caused C NG Lower click of the ground plate is widened rise of the ground plate occurs when setting the connector Connector main body Ground plate FPC Cautions when inserting the ground plate 1 Do not use a ground plate which has been excessi...

Page 9: ...s not properly performed due to the deformation of the ground plate or the like Do not perform the work by force Return again to the state of the preliminary insertion of the ground plate Slide to the right hand side 4 Setting procedure of the connector 1 Face upward polarization mark side and slide connector clamp to the right hand side to open it 2 Adjust connector main body to connector guide f...

Page 10: ... of the holder press FPC 2 Fully press down clamp lever until you obtain a feeling of clamping 3 Return upward clamp lever and release it 4 Connection work has been completed Ratchet release lever Fully press until it will go no further Connector main body FPC Press Enlarged drawing of ratchet section Please contact us when the connector cannot be taken out even when the clamp lever has been relea...

Page 11: ...form the appearance inspection whether the quality is satisfied when the connection work has been completed Check that lock is performed Check that lock is performed Connector main body Ground plate Rear side 7 Electrical test Perform the test of Contact resistance nsulation resistance and withstand voltage Fig 1 Fig 2 Fig 3 Item Test method Standard Contact resistance Measure at 100 m A DC or 100...

Page 12: ...ull out connector main body 5 Remove ground plate from the FPC Ground plate FPC Connector main body Pulling tool DF C PO B Optional FPC Ground plate Pull out Lock section 4 places right left 1 Do not perform re connection of the connector main body and ground plate for which repair has been performed Scrap them 2 Do not perform more than one time re connection to FPC for which repair has been perf...

Page 13: ...trouble 4 If the tool is defective do not disassemble it but contact us for repair while showing the detailed description of the defect VI Maintenance and inspection 1 Upon completion of works wipe the jig to remove stains and foreign materials with a piece of soft cloth and close the clamp lever to avoid any foreign material from entering the sliding parts Then store the jig in a dry place 2 Chec...

Page 14: ... 11 MEMO Jan 1 2020 Copyright 2020 HIROSE ELECTRIC CO LTD All Rights Reserved ...

Page 15: ...ity to any claim for loss or failure to earn profit resulting from the use of the machine 5 We assume no responsibility for any damage resulting from your improper use of the machine including your failure to follow the instructions given in this Instruction Manual This includes repair or modification conducted by any third party other than Hirose Electric Co Ltd 6 Please note that servicing of th...

Page 16: ...d in Japan HIROSE ELECTRIC CO LTD 5 23 OSAKI 5 CHOME SHINAGAWA KU TOKYO 141 8587 JAPAN PHONE 81 03 3491 9741 FAX 81 03 3493 2933 http www hirose com Jan 1 2020 Copyright 2020 HIROSE ELECTRIC CO LTD All Rights Reserved ...

Reviews: