background image


HRW HPD0440BNMR V401 Manual 111116.doc            E. & O. E. / Subject to change without notice  Page 38 of 43 

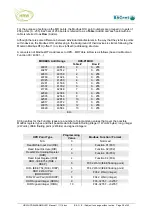
Active Sensor Scalings 

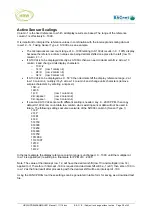
Column 1 is the fixed reference to which all display results are based. The range of the reference 
column 1 is effectively 0…1000. 
 
It is important to interpret the reference values in combination with the intercept and scaling data at 
rows 12…14. Taking Sensor Type 2, 0-10Vdc, as an example: 
 

  The microprocessor raw count range of 0…1000 relating to 0-10Vdc results in 0…100% display 

because the reference column values are being decimal shifted one place to the left (row 13 
column 4 = -1 

  If 0-10Vdc is to be displayed directly as 0-10Vdc then we need to decimal shift -2 at row 13 

column 4 and change Units display characters 

o

 134=-2 

o

  14=V  (row 1 column 4) 

o

  24=d  (row 2 column 4) 

o

  34=c 

(row 3 column 4) 

  If 0-10Vdc is to be displayed as 0…50°C then decimal shift the display reference range -2 at 

row 13 column 4, multiply it by 5 at row 14 column 4 and change units characters (remove 
surplus characters by entering a <space>) 

134=-2 
144=5 
14=C 


(row 1 column 4) 

24=<space> 

(row 2 column 4) 

34=<space> 

(row 3 column 4) 

  If a second 0-10Vdc sensor with different scaling is needed, say, 0…2000 PPM, then copy 

default 0-10Vdc raw count data to a column who’s existing sensor data will not be used in 
future. The following settings assume overwrite of the Ni1000 column 3 (Sensor Type 1) 

13=P 
23=P 
33=M 
43=0 
53=150 
63=300 
73=450 
83=600 
93=750 
103=900 
113=1007 
123=0 
133=0 
143=2 

 
In the last example the display reference column range is unchanged, 0…1000, until the multiplier at 
row 14 is applied (x2) resulting in a final scale for PPM of 0…2000. 
 
Note: The value at the intercept row, 12, will have the decimal shift (row 13) and multiplier (row 14) 
applied to it. Therefore, if intercept -10.0 is required and decimal shift will be -1 (x0.1) then enter -100 in 
row 12 as the final result after processing with the decimal shift will be an intercept of -10.0 
 
Using the FUNCPROG tool these settings can be generated in table form for saving as a download text 
file. 
 

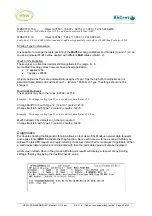
Summary of Contents for HPD0440BNMR

Page 1: ...r specific text and dynamic data points Data points may be adjusted directly at the LCD parameters such as set points fan speeds and manual overrides The text and dynamic values for each of the 32 user lines may be set as small font size or large font size The user push buttons indication LED s and an audible sounder may be independently programmed to suit the user application Physical I O points ...

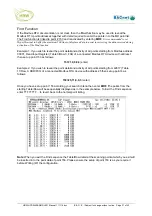
Page 2: ...ettable C F rH Pa kPa PPM etc Connected sensors may be calibrated and filtered by way of the UI configuration DO change of state delay timer short cycle timer 365 day time clock calendar 20 holidays recurring or one off event Summertime Wintertime 4 Channel time switch 4 Push buttons programmable to suit application DI1 DI2 DI3 DI4 4 Navigation buttons up down right left DI5 DI6 DI7 DI8 4 LED s in...

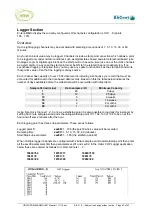
Page 3: ...NDS 17 BACnet General 17 Modbus Section 18 Logger Section 18 DISPLAY NAVIGATION 19 SUMMARY SCREEN LCD SETTING 19 MANUAL OVERRIDE RELEASE 20 OPERATIONAL DISPLAYS INSTRUCTION 21 USER SUMMARY SCREEN 21 DOWNLOAD TEXT FILE 22 MAIN PHYSICAL I O DISPLAY 23 POINT LIST 23 CONTROL LOOP CL 24 DIGITAL LOGIC DL ANALOGUE LOGIC AL 25 NETWORK INTERFACE OBJECTS NIO 26 MODBUS SECTION 27 Point Setting 27 Diagnostics...

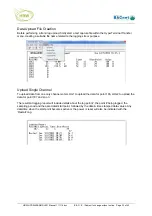
Page 4: ...401 Manual 111116 doc E O E Subject to change without notice Page 4 of 43 INSTALLATION COMMISSIONING 40 CONNECTIONS 41 DIMENSIONS 41 TECHNICAL DATA 42 ORDERING INFORMATION 43 ACCESSORIES 43 OTHER HP_BN SERIES DEVICES 43 ...

Page 5: ...l I O for connection of input switches sensors and output control devices Virtual inputs for taking over external commands and values from other network devices or for manual settings and overrides Logic blocks for event based reactions and influences PI Control Loop blocks for set point based control reactions In all cases points may be manually overridden for testing commissioning purposes or fo...

Page 6: ...nction BV53 Object Instance when Analogue function AV53 The common reference in all cases is the object therefore during device Object Discovery over the network the option of Input Output or Value is decided based on the programmed application use of the object in question BACnet Priority Array The BACnet protocol utilises a Priority Array for each object to enable various network devices to take...

Page 7: ...text characters per line small font Each display line may include a dynamic point The dynamic point s unit tag may be customised The time switch display above indicates 1 34 which tells us that switch channels 1 3 4 are ON 1 Button 1 LED 1 2 Button 2 LED 2 All LED s invisible unless active 3 Button 3 LED 3 4 Button 4 LED 4 5 LCD scroll UP adjust value UP 6 LCD scroll DOWN adjust value DOWN hold co...

Page 8: ... down buttons U D To save the change press and hold the right button R until a beep is heard To exit adjustment mode without saving the change press the left button L Exiting a set point adjustment without saving the change will result in the start up default being retained after a power reset If an output is being manualled via the LCD and the change is to be a start up default then after making ...

Page 9: ...tch Setting In versions with 365 day time clock four channel time switch Each time switch channel has two On times and two Off times available per day Twenty holidays either recurring annually or one off events may be programmed Each time switch channel may be applied to any days of the week combination and or exception day 8 which is active on holidays Wintertime Summertime shift may be set to oc...

Page 10: ...th year 0 will occur every year Holiday date setting with year 0 will occur once only in the set year To enter the clock setting mode press and hold the down button D until the display shown below is visible 15sec Scroll so that the line cursor is aligned with the desired setting line then press the right button R to select the value for adjustment Press the up or down buttons U D to adjust the se...

Page 11: ...AND PWM cycle time sec ON OFF Minimum ON time sec Minimum OFF time sec Maximum Run time sec Remember last state at power return Object Object Object 0 255 of control loop demand of control loop demand 0 255 0 255 0 1000 0 Disable 1 Enable Universal Input 1 17 1700 5 Fixed NTC 10k internal 5 10k NTC 10 90 C Ctx Universal Input 2 18 1800 Sensor type 5 10k NTC 10 90 C Ctx 7 DI D 14 DI n c DNC 15 Togg...

Page 12: ...ut relevant sensor type Input1 Input2 Input3 Input4 Offset Value In 1 Value Out 1 Value In 2 Value Out 2 Output OR Output AND Max Min Avg Signal Select or Eco Changeover Proportion VAV Volume Up Down counter Power Same as UI selection Object Object Object Object Relative value Shift input start value Shifted output minimum value Shift input stop value Shifted output maximum value Object Object 61 ...

Page 13: ...ec on 3sec and so on The minimum applied value for an output reaction is 20 1sec on 4sec off In HPD0460BN these outputs may be driven by peer to peer controllers on the network or via the internal NIO s reading in object values from other controllers on the network HPD0460BNC T or CT can control objects 25 27 directly using their own internal function blocks Modbus RTU Gateway Function Block Objec...

Page 14: ...tice Page 14 of 43 Data Logger Function Block Object Para Description Selection Options xxx00 1 185 The local point value to be logged Object xxx01 1 60 The sample period in minutes 1 5 10 15 30 60 LOG1 8 186 193 xxx02 1 185 The point that will start stop the logging Object ...

Page 15: ...minal program HyperTerminal is recommended A USB port Serial comm port DB9 converter may be required if the PC being used does not include a Com 1 serial port HyperTerminal Settings For successful communication between HyperTerminal and the device initial Properties setup of HyperTerminal should be as per the screen prints below Connect to Comm Configuration Settings General Settings ASCII Setup 9...

Page 16: ...rk operation Saving HyperTerminal Settings For ease of connection it is recommended to save the HyperTerminal setup for each baud rate you may wish to use with an easily recognised configuration name For example HPECOM 24 2400 HPECOM 48 4800 HPECOM 96 9600 HPECOM 19 2 19200 HPECOM 38 4 38400 HPECOM 57 6 57600 Break in to Terminal Mode When HyperTerminal is running and the HPECOM cable is connected...

Page 17: ...ssigned Example DI 401025 building 4 network 1 node 25 Set baud rate 99 Network comms speed is set 2400 4800 9600 19200 38400 57600 76800 Example 99 9600 After changing comm speed it will be necessary to reconnect with HyperTerminal at the new comm speed to save write the change Set Maximum Master address MM 1 127 Highest Master device address on the network is registered Next address searching li...

Page 18: ... a specified starting point Starting point is the register number and type as set at point 153 View Page MRP 1 2 Enter MRP 2 to display the second page of configured points if used To return to top of list enter MRP 1 IEEE Reverse IR 1 For IEEE Floating Point registers Reverse High Word Low Word order When activated IRev 1 will be displayed at the bottom of the MR screen When disabled IR 0 no stat...

Page 19: ...able 10 sec live update Display Control Commands SLLD Screen Line Logic Display Enable Disable display of object numbers and screen line numbers in the summary display Summary Screen LCD Setting Function Line Method Result Options Comments SL1 32 SL x x abc Assign Screen Line text as information or in relation to SP1 24 Alpha numeric 40 characters max SP1 32 SP x x nnn Assign Screen Point dynamic ...

Page 20: ...ing after a power reset if the Manual state is Written W before being released thereby making the Manual state the power up default state Function Enter Result Options Comments Manual a Digital Object 1 0 Digital on or off 1 On 0 Off Example 37 1 Manual an Analogue Object 0 n 0 100 block output Block range 0 max Example 25 50 AO1 50 output 5Vdc output Release Manual overrides back to Auto R R 1 19...

Page 21: ...listing of point values specific to the application running in the device Below is the factory default summary screen By entering SLLD Screen Line Logic Display the text line numbers the point numbers relating to the dynamic points assigned to each line and any SLL Screen Line Logic links are displayed On line 12 you can see a text entry that will not be seen when SLLD is off but will appear at th...

Page 22: ...ded you will briefly see a check of the number of lines expected versus the number of lines received If the two values are equal Restarting will be displayed at which point the new configuration is written to non volatile memory automatically Below is the user summary screen after download of a configuration for room temperature supply air temperature cascade with 100k NTC sensors on UI s 1 3 poin...

Page 23: ...s being used for instantaneous power calculation UI s display the linearized scaled value including calibration offset if any the units as set in the linearization table and to the right of the units the raw count as seen by the microprocessor prior to linearization and scaling being applied Point List Enter P to display the first 21 active points The listing will include any active logic connecti...

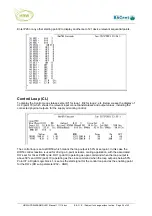
Page 24: ...ncluding the connected physical outputs for the supply air cooling control The control loop is set as DIR50 which means the loop output is 50 at set point In this case the DIR50 control reaction is used for driving a 3 point actuator cooling application with the associated DO s set for 10sec PWM cycle DO1 point 9 operating as open command when the loop output is above 50 and DO2 point 10 operating...

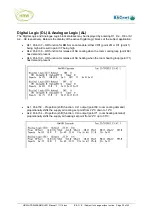
Page 25: ...nt 29 or DI1 point 1 being high will result in point 37 being high DL2 Point 38 OR function for release of SA cooling when the room cooling loop point 69 has demand present DL3 Point 39 OR function for release of SA heating when the room heating loop point 71 has demand present AL1 Point 53 Proportion shift function CL1 output point 69 room cooling demand proportionally shifts the supply air cooli...

Page 26: ...in the value of an NTC 100k sensor Ctc which is connected to UI 1 of controller 1 Object Instance 17 From controller 5 we are reading in the status of a Digital Input D which is connected to DI 1 of controller 5 Object Instance 1 When a NIO is used to read in data Input the value obtained from the remote controller may be applied to any internal function block by setting the function block s input...

Page 27: ...imitation analogue to the NIO output Modbus Section Enter MR to display the currently configured Modbus RTU register points 153 184 Point Setting Each Modbus register point must be configured including the Modbus device network address the data register address with in the device the scaling value to match the register s true reading and the register data format to ensure the data is properly deco...

Page 28: ...24 3 0 255 41025 41280 4 0 255 41281 41536 5 0 255 41537 41792 6 0 255 41793 42048 7 0 255 42049 42304 8 0 255 42305 42560 9 0 255 42561 42816 10 0 255 42817 43072 11 0 255 43073 43328 12 0 255 43329 43584 13 0 255 Etc String entries for the Function types are a number of programming values that cover the possible Modbus register types and their possible data formats including integer 1 Word 2 byt...

Page 29: ...ch point may be individually scaled and or combined with sequential points where Modbus registers are comprised of more than 1 Word and therefore use more than one MR point This is helpful when for example the 1st Word of a register may be units and the 2nd Word may require a multiplier of 65 536 or some other scaling before combining with the 1st Word In any case where two or more Words are combi...

Page 30: ...med that 2 Word pairs will be Word 1 Word 2 65536 so Type 15 settings should not be changed Mult Units Multiplier These values may be in the range 32768 32768 Example To change scaling type 12 so as to deliver a multiplier of 5 Change Mult10 to 0 with Type 12 column 1 matrix 121 0 Change Mult to 5 with Type 12 column 2 matrix 122 5 Example To change scaling type 13 so as to deliver a multiplier of...

Page 31: ...Read Input Register Table 0 Row 0 F04 of a connected Modbus RTU device with address 1 then set up point 153 as follows 153 1 0 0 0 4 enter Example 2 If you wish to reveal the point detail and activity of all points starting from 42817 Table 11 Row 0 RHR F03 of a connected Modbus RTU device with address 25 then set up point 4 as follows 153 25 11 0 0 3 enter Once you have set up point 153 according...

Page 32: ... sync record that must be accounted for additional to the time based data records Based on this the table below indicates the number of days available before the oldest data will be overwritten with latest data Sample Period mins Data samples Hr Minimum Capacity 1 60 5 days 5 12 25 days 10 6 6 weeks 15 4 10 weeks 30 2 4 months 60 1 6 months Using time clock channel 1 2 3 or 4 as a start stop point...

Page 33: ...ging site or purpose Upload Single Channel To upload data from one only channel enter LOG1 to upload the data for point 186 LOG2 to upload the data for point 187 and so on The resultant logging report will include details about the log point the point being logged the sampling period and the associated start point followed by the date time stamped data values Any date time when the start point bec...

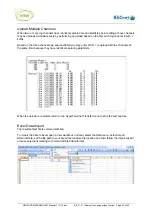
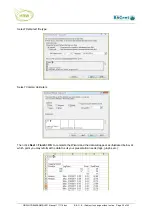
Page 34: ...ls we see illustrated you may enter LOG1 to upload all three channels at the same time because they have identical operating paramters When the upload is complete return to the HyperTerminal Transfer menu to stop the text capture Excel Data Import The resultant text file is comma delimited To import the data to Excel open a new workbook in Excel select the Data menu select Import External Data set...

Page 35: ... without notice Page 35 of 43 Select Delimited file type Select Comma delimiters Then click Next Finish OK to complete the Wizard and the data will appear as illustrated below at which point you may reformat the data to suit your presentation needs tags graphs etc ...

Page 36: ...gramming to ensure any old settings that are unwanted in the new program do not have any influence on the new application To perform a Factory Default reset enter FD 1 A device set at Factory Default settings will have FD displayed in the top line of the Main physical point summary screen M Note If using devices with firmware less than version 4 00 then you must download the Factory Default text f...

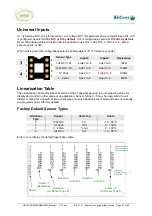
Page 37: ... 10Vdc Link 2 to 7 Link 4 to 5 100kΩ 4 20mA Link 1 to 2 Link 3 to 4 250Ω Linearisation Table The Linearisation Table provides conversion of the UI physical signal in to an engineering value for display and control in other areas of an application Sensor Types 0 5 may be customised to suit different scaling for a specific active sensor type or to suit a passive sensor element that is not already pr...

Page 38: ...mn 4 multiply it by 5 at row 14 column 4 and change units characters remove surplus characters by entering a space 134 2 144 5 14 C row 1 column 4 24 space row 2 column 4 34 space row 3 column 4 If a second 0 10Vdc sensor with different scaling is needed say 0 2000 PPM then copy default 0 10Vdc raw count data to a column who s existing sensor data will not be used in future The following settings ...

Page 39: ... Column 1 note that in the reference column 1 the reference value 150 is considered as 15 C once the decimal shift of 1 is applied at row 13 3 Assign an otherwise unused Sensor Type to the test UI 4 In the Main I O display read and record the raw count value as displayed to the right of the units for the UI to which the test resistance is connected 5 Enter the raw count in the table at the corresp...

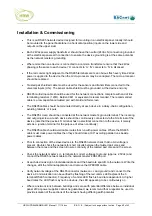
Page 40: ...onnected at the network master s ground terminal The incoming and outgoing screen at each device should be continuously connected via the S terminal of the device note that the device s S terminal has no electrical connection to the device it merely acts as a junction terminal for the purpose of screen continuity The RS485 cable should avoid cable routes that run with power cables Where the RS485 ...

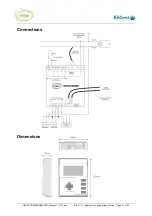
Page 41: ...HRW HPD0440BNMR V401 Manual 111116 doc E O E Subject to change without notice Page 41 of 43 Connections Dimensions ...

Page 42: ...20kΩ 100kΩ 0 5Vdc 0 10Vdc UI4 default 0 20Vdc 0 01 Volt resolution 0 20mA 4 20mA 0 016mA resolution requires external 18 28Vdc loop power supply AO1 AO2 Fixed functionality LED3 LED4 user programmable on off or flashing fixed PWM 5 second cycle time 100 command on continuous 20 command on 1sec off 4sec AO3 Fixed functionality Audible beeper user programmable on off or intermittent beep fixed PWM 5...

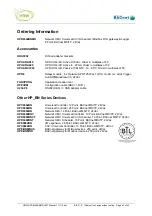
Page 43: ...l switch 24Vac FUNCPROG Application creation tool HPECOM Configuration cable DB9 RJ11 U232 P9 RS232 DB9 USB adapter cable Other HP_BN Series Devices HPC0662BN Universal Controller 12 Point BACnet MS TP 24Vac HPC8884BN Universal Controller 28 Point BACnet MS TP 24Vac HPD0460BN Network HMI 12 Point BACnet MS TP 24Vac HPD0460BNC Network HMI Universal Controller 10 Point BACnet MS TP 24Vac HPD0460BNCT...

Reviews: