For advice
on the safety and suitability of this equipment
contact your local HSS Hire Shop.
There is a
serious risk of personal injury
if you do not
follow all instructions
laid down in this guide.
The hirer has a responsibility to
ensure that all
necessary risk assessments have been completed
prior to the use of this equipment.
This equipment should only be used by an operator
who has been deemed competent to do so by
his/her employer.
This equipment should be used by an able bodied,
competent adult
who has read and understood these
instructions. Anyone with either a temporary or permanent
disability, should seek expert advice before using it.
Keep children, animals and bystanders away from
the work area.
Cordon off a NO GO area using cones
and either barriers or tape, available for hire from your
local HSS Hire Shop.
Never use this equipment if you are ill,
feeling tired, or under the influence of
alcohol or drugs.
Wear practical, protective clothing,
gloves, footwear and a hard hat.
Avoid loose garments and jewellery that could catch in
moving parts, tie back long hair.
Ensure the work area is well lit and ventilated,
if in
doubt, ask about lighting and ventilation equipment at
your local HSS Hire Shop.
Do not work near flammable gases or liquids,
petrol
or paint thinner fumes for example.
Keep combustible
materials at a safe distance
– at least 5m.
Never use this equipment near overhead power
lines or similar hazards.
Make sure that anyone in the immediate work area
is warned of what you are doing.
Check the condition of the equipment before use.
If it shows signs of damage or excessive wear, return it to
your local HSS Hire Shop.
It is essential to familiarise yourself with the
equipment before starting.
The HSS Span Access Platform must be assembled
before use;
it is recommended that two people
assemble the platform.
To assemble the platform, take all the components to the
work area.
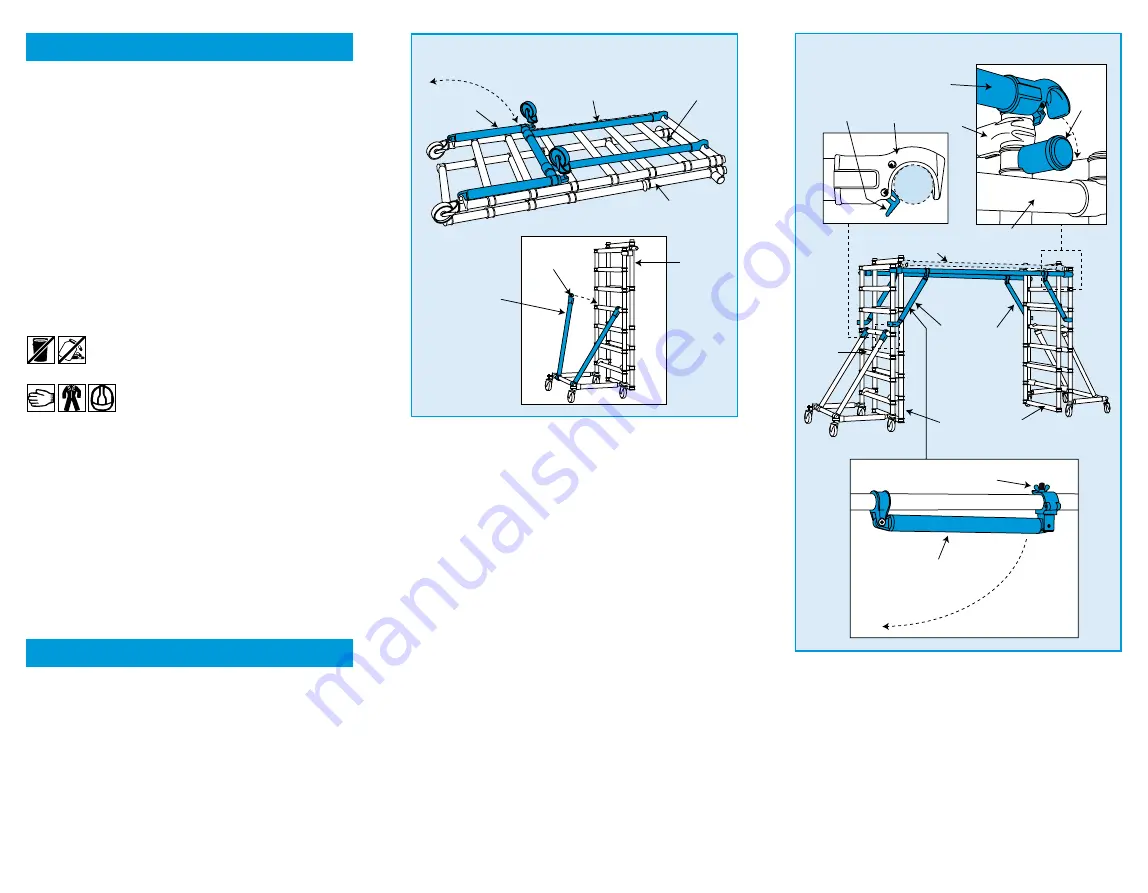
Lay the two end supports on the ground,
raise the end
support frame so that it is at a 90-degree angle to
the end frame tubes.
Lifting the end support base will
also lift the end support braces.
The end support braces have two brace hooks,
when the end support base is at 90 degrees to the
GETTING STARTED
GENERAL SAFETY
end support frame, these will align with one of the
rungs. Affix the hooks to this rung.
When the brace hooks have been fixed to the rungs,
raise the end frame so that it is vertical and stands on all
of its wheels.
Repeat the procedure for the other end support
and place them parallel facing each other.
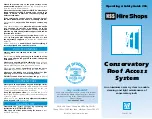
Fix the clearance brace to the tops of the outer
most set of vertical tubes on the end frame
using
the brace hooks. Loosen the coupler holding the
clearance brace diagonals back and secure this to the
vertical of the end frame tube.
Fix the brace hooks to the pivot points on the end
frames.
Raise the end frames to the required working
height,
to do this release the four hooks attached to the
end frames and lift the assembly up two rungs. Refit the
hooks to the rungs, repeat the procedure at the other
end support, then repeat at the other end moving the
assembly up in stages to the desired height.
The end support frame forms the guard rail for the
platform and allows you to install the guard rail
before you enter the platform,
once the safety rails
are at the required height.
Install the platform ensuring the hooks are secured
over the rungs.
The platform hook is equipped with a
spring-loaded pin, which self-locates under the rung.
Climb onto the platform, opening the swing brace(s) on
the end frame to gain access.
Install the middle guard
rails, from the inside, using the brace hooks to the
end frame verticals at either side.
Open and install
one-piece toeboard set so that it fits snugly around the
platform.
Push the Access Platform to the correct location and
brake all the wheels using the integral wheel
brakes,
(see illustration).
The Access Platform is ready to use.
The platform may be located on any rung to give the
optimum working height. The end frame assembly
should be re-located to rest on the same rung as the
platform and provide the correct guard heights.
DO NOT climb onto the platform until it has been
fully assembled.
ENSURE all brace hooks are secure.
End Support
Frame
End Support
Braces
Rungs
End Support
Braces
End Frame
Tubes
End
Frame
Brace
Hooks
Brace
Hook
Lever
Brace
Hook
Rung
Brace
Top
Safety Rail
Pivot
Clearance Brace
Rung
End Frames
Clearance
Brace
Diagonals
Coupler
End
Frame
Clearance
Brace Diagonal
End Supports
Safety Rails and Platform


