background image

TouchFLO™  59

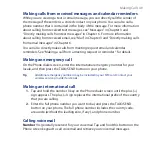
Home

The

 Home

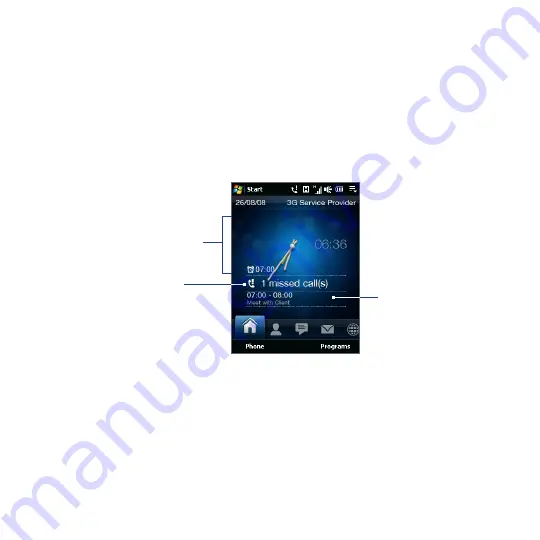
 tab displays the current date, an analog and digital clock, and a yellow 

alarm hand that indicates whether the alarm is on or off. Missed calls and your 

upcoming calendar appointment are also shown on the Home tab.

To select an item on the Home tab

Touch the item; or

• 

Press Navigation Up or Down first to navigate to the item you want to select 

• 

and then press ENTER.

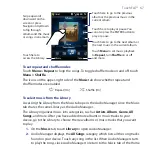
Touch this area to open 

the Clock & Alarms screen 

where you can set the date, 

time, and alarm. 

(See Chapter 13 for details.)
Touch this area to view 

details about missed calls 

in the Call History. 

(See Chapter 2 for details.)

Home tab

Touch this area to 

create, edit or view an 

appointment.

(See “Calendar” in 

Chapter 12 for details.)

Summary of Contents for Touch 3G

Page 1: ...www htc com User Manual ...

Page 2: ...ovation ExtUSB TouchFLO HTC Touch and HTC Care are trademarks and or service marks of HTC Corporation Microsoft Windows Windows Mobile Windows XP Windows Vista ActiveSync Windows Mobile Device Center Internet Explorer MSN Hotmail Windows Live Outlook Excel PowerPoint Word OneNote and Windows Media are either registered trademarks or trademarks of Microsoft Corporation in the United States and or o...

Page 3: ... 784 5 267 261 5 544 196 5 267 262 5 568 483 5 337 338 5 659 569 5 600 754 5 414 796 5 657 420 5 416 797 All other company product and service names mentioned herein are trademarks registered trademarks or service marks of their respective owners HTC shall not be liable for technical or editorial errors or omissions contained herein nor for incidental or consequential damages resulting from furnis...

Page 4: ...g or course of performance Without limiting the foregoing it is further understood that HTC and its Providers are not responsible for Your use or misuse of the Weather Information Data and or Documentation or the results from such use HTC and its Providers make no express or implied warranties guarantees or affirmations that weather information will occur or has occurred as the reports forecasts d...

Page 5: ...w must be taken to avoid possible legal liabilities and damages Retain and follow all product safety and operating instructions Observe all warnings in the operating instructions on the product To reduce the risk of bodily injury electric shock fire and damage to the equipment observe the following precautions ELECTRICAL SAFETY This product is intended for use when supplied with power from the des...

Page 6: ... the operating instructions that are included with the product Handle battery packs carefully This product contains a Li ion battery There is a risk of fire and burns if the battery pack is handled improperly Do not attempt to open or service the battery pack Do not disassemble crush puncture short external contacts or circuits dispose of in fire or water or expose a battery pack to temperatures h...

Page 7: ...tery leaks Do not allow the leaking fluid to come in contact with skin or clothing If already in contact flush the affected area immediately with clean water and seek medical advice Do not allow the leaking fluid to come in contact with eyes If already in contact DO NOT rub rinse with clean water immediately and seek medical advice Take extra precautions to keep a leaking battery away from fire as...

Page 8: ...STRICTIONS Do not use this product in gas stations fuel depots chemical plants or where blasting operations are in progress or in potentially explosive atmospheres such as fuelling areas fuel storehouses below deck on boats chemical plants fuel or chemical transfer or storage facilities and areas where the air contains chemicals or particles such as grain dust or metal powders Please be aware that...

Page 9: ...sources such as microwave ovens sound speakers TV and radio Use only original manufacturer approved accessories or accessories that do not contain any metal Use of non original manufacturer approved accessories may violate your local RF exposure guidelines and should be avoided INTERFERENCE WITH MEDICAL EQUIPMENT FUNCTIONS This product may cause medical equipment to malfunction The use of this dev...

Page 10: ...owed to come too close to the antenna during operation of the equipment Use only the supplied integral antenna Use of unauthorized or modified antennas may impair call quality and damage the phone causing loss of performance and SAR levels exceeding the recommended limits as well as result in non compliance with local regulatory requirements in your country To assure optimal phone performance and ...

Page 11: ...efore should not be interpreted as a problem with the device Heed service markings Except as explained elsewhere in the Operating or Service documentation do not service any product yourself Service needed on components inside the device should be done by an authorized service technician or provider Damage requiring service Unplug the product from the electrical outlet and refer servicing to an au...

Page 12: ...abinet slots or other openings in the product Slots and openings are provided for ventilation These openings must not be blocked or covered Mounting accessories Do not use the product on an unstable table cart stand tripod or bracket Any mounting of the product should follow the manufacturer s instructions and should use a mounting accessory recommended by the manufacturer Avoid unstable mounting ...

Page 13: ...M Card Battery and Storage Card 25 SIM card 26 Battery 27 Storage card 28 1 4 Charging the Battery 29 1 5 Starting Up 30 Turning the power on and off 30 Auto configuring data connection and importing SIM contacts 31 Switching to Sleep mode 31 1 6 Home Screen 32 1 7 Status Icons 33 1 8 Notifications 35 1 9 Start Screen 36 1 10 Quick Menu 37 1 11 Lock Screen 38 Locking your phone 38 Unlocking your p...

Page 14: ...ing a call from the Phone dialer screen 47 Making calls from received messages and calendar reminders 49 Making an emergency call 49 Making an international call 49 Calling voicemail 49 1 2 Answering and Ending Calls 50 Accepting or rejecting an incoming call 50 During a call 51 Check missed calls 53 1 3 Call History 54 1 4 Speed Dial 54 1 5 Turning the Phone Connection On and Off 55 Chapter 3 Tou...

Page 15: ... Multitap mode 82 T9 mode 82 4 6 Using Numeric and Symbol Mode 84 Chapter 5 Synchronizing Information 87 5 1 About Synchronization 87 5 2 Setting Up Windows Mobile Device Center on Windows Vista 88 Setting up synchronization in Windows Mobile Device Center 88 Using Windows Mobile Device Center 90 5 3 Setting Up ActiveSync on Windows XP 91 Setting up synchronization in ActiveSync 91 5 4 Synchronizi...

Page 16: ...ok e mail with your computer 108 Setting up an Internet e mail account 108 Creating and sending an e mail message 111 Viewing and replying to e mail messages 112 Directly making calls from an e mail 114 Synchronizing e mail messages 115 Customizing e mail settings 115 Chapter 7 Working With Company E mail and Meeting Appointments 117 7 1 Synchronizing with the Exchange Server 117 Setting up an Exc...

Page 17: ...t 127 Wi Fi 127 GPRS 3G 130 Dial up 131 Starting a data connection 131 8 2 Using Opera Mobile 132 The browser screen 132 Opera Mobile menu 133 Navigating web pages 134 8 3 Using YouTube 135 Searching videos 135 Using the Program Guide 136 Watching videos 137 Bookmarks 138 History 139 8 4 Using Streaming Media 139 8 5 Using Windows Live 141 The Windows Live screen 142 Using Windows Live Messenger 1...

Page 18: ... via Bluetooth 160 9 6 Connecting to Car Kit Phones 161 Chapter 10 Navigating on the Road 163 10 1 Google Maps Available by Country 163 Searching a place of interest 164 10 2 Guidelines and Preparation for Using GPS 165 10 3 Downloading Location Data via QuickGPS 167 Changing the download options 168 Chapter 11 Camera and Multimedia 169 11 1 Taking Photos and Videos 169 Changing the capture mode 1...

Page 19: ... program 189 Installing a program 189 12 2 Contacts 191 Adding new contacts 191 Organizing and searching contacts 192 Sharing contact information 193 12 3 JBlend 194 Installing and launching MIDlets MIDlet suites 194 Managing MIDlets MIDlet suites 195 12 4 Microsoft Office Mobile 196 12 5 SIM Manager 197 Chapter 13 Managing Your Device 199 13 1 Copying and Managing Files 199 13 2 Settings on Your ...

Page 20: ...10 13 7 Protecting Your Device 211 Protecting your SIM card with a PIN 211 Protecting your phone with a password 212 Encrypting files on your storage card 213 13 8 Resetting Your Phone 213 Performing a soft reset 213 Performing a hard reset 214 Using Clear Storage 215 13 9 Windows Update 216 Appendix 217 A 1 Specifications 217 A 2 Regulatory Notices 219 Index 225 ...

Page 21: ...roduct package includes HTC Touch 3G USB sync cable Battery AC adapter 3 5mm stereo headset Quick Start Guide Getting to Know Your Phone 1 2 Top panel 3 5mm Audio Jack Connect a 3 5mm wired headset for hands free conversation or for listening to music ...

Page 22: ... connected to the power adapter or a computer and the battery is fully charged Shows solid amber light when the battery is being charged Earpiece Listen to a phone call from here TALK SEND Press to answer a call or dial out During a call press and hold to turn the speakerphone on and off While viewing a text or email message press to open the Phone screen and call the sender ...

Page 23: ...d the call Press to turn the display on or off Press and hold to display the Quick List and choose whether to turn the power off lock your phone set your phone to vibrate or disconnect the data connection Zoom bar Use for zooming in and out See Using the Zoom Bar later in this chapter for details Back panel Strap Holder Attach a wrist strap neck lanyard or string accessory Back Cover 3 2 Megapixel...

Page 24: ...olume microSD Card Slot See Installing the microSD card later in this chapter for details Stylus Tap items write or draw on the screen Bottom panel Sync Connector Earphone Jack Connect the power adapter to recharge the battery Connect the supplied USB cable to synchronize your phone with your computer Connect the supplied USB stereo headset for hands free conversation or for listening to music Mic...

Page 25: ...remove the back cover Make sure your phone is turned off 1 Hold your phone securely with the front facing down 2 With your thumb or finger lift open the top of the back cover 3 To replace the back cover Secure the bottom part of the back cover first by aligning into the two 1 openings located at the bottom part of the back of the phone Press the sides and the top part of the back cover down to loc...

Page 26: ...tall the SIM card Make sure your phone is turned off 1 Locate the SIM card slot then insert 2 the SIM card with its gold contacts facing down and its cut off corner facing out Slide the SIM card completely into 3 the slot To remove the SIM card If the battery is installed remove 1 it to reveal the SIM card slot See To remove the battery for instructions With your left thumb or finger 2 press down ...

Page 27: ...mperatures above 60o C 140o F Replace only with the battery pack designated for this product Recycle or dispose of used battery as stipulated by local regulations To install the battery Align the battery s exposed 1 copper contacts with the battery connectors inside the battery compartment Insert the contacts side of the 2 battery first and then gently push the battery into place Replace the back ...

Page 28: ...he microSD card Remove the back cover See 1 To remove the back cover for instructions From the side of your phone open 2 the microSD slot cover Insert the microSD card into the 3 slot with its gold contacts facing down until it clicks into place Close the microSD slot cover and 4 replace the back cover To remove the microSD card Press the microSD card to eject it from the slot ...

Page 29: ...the AC adapter to an electrical 2 outlet to start charging the battery Note Only the AC adapter and USB sync cable provided with your phone must be used to charge the battery As the battery is being charged while the power is on a charging icon appears in the title bar of the Home screen After the battery has been fully charged a full battery icon appears in the title bar of the Home screen Warnin...

Page 30: ... time use When the preparation process is complete the subsequent screen then prompts you to choose whether to set up the data connection and import SIM contacts to your phone See Auto configuring data connection and importing SIM contacts in this chapter for details To turn off the power If the display is off press the END POWER button to turn the display back on 1 Unlock your phone if the Lock s...

Page 31: ... will be prompted to select the profile to use Switching to Sleep mode Briefly press the END POWER button to turn off the display temporarily and switch your phone to Sleep mode Sleep mode suspends your phone to a low power state while the display is off in order to save battery power Your phone automatically goes into Sleep mode when you leave the phone idle after a certain period of time You are...

Page 32: ...h as contacts text messages email Internet and more Start screen Notification Signal strength Volume status Battery status TouchFLO Home screen Connection status Open the Phone screen See Chapter 2 for details Use the Camera See Taking Photos and Videos in Chapter 11 for details Quick menu For more information about using the TouchFLO Home screen see Chapter 3 ...

Page 33: ...xt message SMS notification of voicemail Battery charging New email Full battery HSDPA available Very low battery HSDPA connected Sound on WCDMA UMTS available Silent WCDMA UMTS connected Vibrate EDGE available Maximum signal strength EDGE connected Phone connection is off GPRS available Searching for phone service GPRS connected No phone service Wi Fi on No signal Connected to a wireless network ...

Page 34: ...on MMS sent Bluetooth visible mode on Cannot send MMS Bluetooth stereo headset connected Connection is active Voice call in progress Connection is not active Speakerphone on Sync in progress Call on hold Roaming Calls are forwarded Alarm Dialing while no SIM card is inserted New Windows Live message No SIM card inserted ...

Page 35: ...ection status such as Wi Fi if your phone is connected to a Wi Fi network data connection usage if your data connection is on and other types of connections This screen also shows all your pending notifications including missed calls new SMS MMS messages and more Tap a status icon or item on the Notifications screen to open the related screen To close the Notifications screen tap Close or press th...

Page 36: ... Tap a program icon to open the corresponding program Tap the Settings icon to access the settings of your phone Tap Lock at the bottom left corner of the Start screen to lock your phone See Lock Screen for details Press the START button to close the Start screen To move an icon to the top of the Start screen You can move often used icons to the top of the Start screen for easy access Tap and hold...

Page 37: ... stop programs and see how much program memory is being used On the Quick menu To switch to a running program tap the program name To stop a running program tap Tap to stop all currently running programs Tap to customize Task Manager settings See Using Task Manager in Chapter 13 shows the total percentage of program memory in use Tap to view more information about memory and storage card usage ...

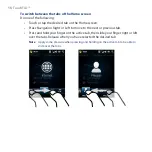
Page 38: ...omatically locks when one of the following occurs The display is turned off automatically or you have pressed the END POWER button and your phone goes to sleep mode See Switching to sleep mode earlier in this chapter for details The set idle time has elapsed Your phone locks itself and requires the correct password entry to unlock it You can also lock the phone manually Tap Start and then tap Lock...

Page 39: ...ws the next upcoming appointment and the Lock button shows the number of notifications To view the notifications 1 On the Lock screen tap the Lock button Notification buttons representing each type of received information such as missed calls new email and new text messages are then displayed below the Lock button 2 Slide a notification button right or left to view the respective information For i...

Page 40: ...r phone remains locked and the Lock screen is displayed You need to unlock to use your phone Adjusting the Volume 1 12 You can set a single volume for both the system notifications and audio video playback and the ring volume or set their volumes separately You can also separately control the phone volume of an ongoing call To set a single volume 1 Press the VOLUME UP DOWN button on the left panel...

Page 41: ...reen to close it To adjust the system and ring volumes separately On the Home screen slide to the 1 Settings tab and then tap Sound Turn off the 2 Single Volume option Press the VOLUME UP DOWN button 3 To switch between the Ring Volume and System Volume screens tap 4 Ring or System at the top of the screen To adjust the volume level follow steps 2 to 3 in To set a single volume 5 To adjust the pho...

Page 42: ... up swipe your finger downward on the touch screen To auto scroll flick your finger upward or downward on the touch screen Touch the screen to stop scrolling To scroll left and right To scroll towards the right swipe your finger to the left To scroll towards the left swipe your finger to the right To auto scroll flick your finger left or right Touch the screen to stop scrolling Finger panning You ...

Page 43: ...zoom in by sliding your finger from left to right across the Zoom bar or zoom out by sliding from right to left You can also instantly enlarge or shrink the text size when you open and read messages or Word documents Slide your finger from left to right across the Zoom bar to increase the text size or slide from right to left to decrease To increase or decrease the text size more slide across the ...

Page 44: ... your phone Select this mode when you want to use your storage card as a USB thumb drive and copy files between your phone s storage card and your computer faster When Disk Drive mode is enabled while your phone is connected to the computer You will not be able to use your phone to access files from the storage card or run applications that are installed on the storage card Your computer will only...

Page 45: ... select the Device Companion option a file list window automatically opens on your computer screen and gives you access to the files To view this user manual you need to copy and open the PDF file on your computer If additional applications are available you also need to copy them to your computer first and then install them to your phone from the computer ...

Page 46: ...46 Getting Started ...

Page 47: ...Phone dialer screen The Phone dialer s Smart Dial feature makes it quick and easy for you to place a call Simply enter the phone number or first few letters of the person you want to call Smart Dial automatically searches and filters your contacts list stored on your phone and SIM card and the phone numbers from the Call History From the filtered list select the number or contact you want to call ...

Page 48: ...l a number or contact do one of the following Tap the desired phone number or contact from the list To call a different phone number associated with the contact tap the contact card icon at the right side of the contact name On the contact details screen tap the number you want to call Tips During a call use the VOLUME UP DOWN button on the side of your phone to adjust the phone volume To save a p...

Page 49: ...eeting request or reminder for details Making an emergency call On the Phone dialer screen enter the international emergency number for your locale and then press the TALK SEND button on your phone Tip Additional emergency numbers may be included in your SIM card Contact your wireless service provider for details Making an international call 1 Tap and hold the number 0 key on the Phone dialer scre...

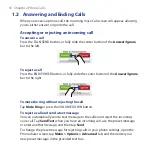
Page 50: ...lide the center button of the Answer Ignore bar to the right To mute the ring without rejecting the call Tap Mute Ring or press the VOLUME DOWN button To reject a call and send a text message You can automatically send a text message to the caller and reject the incoming voice call Tap Send Text when you have an incoming call use the preset message or enter another message and then tap Send To cha...

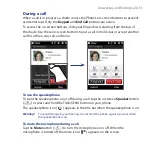
Page 51: ...t another call for a three way call and more To use the speakerphone To turn the speakerphone on or off during a call tap the on screen Speaker button or press and hold the TALK SEND button on your phone The speakerphone icon appears in the title bar when the speakerphone is on Warning To avoid damage to your hearing do not hold the phone against your ear when the speakerphone is on To mute the mi...

Page 52: ... Tap the Add Call button to dial a second call or accept a second call 3 While you are talking to one party the other party is put on hold To switch between the two parties tap the Swap button or tap the dim area that shows On Hold 4 To start the three way call tap the Conference button To end a call When a call is in progress tap End Call or press END To put a call on hold 1 Press the TALK SEND b...

Page 53: ...b 2 Select the Add new phone number to Contacts at end of call check box then tap OK When you enable this option a pop up message appears after you end the phone call and lets you add the phone number to Contacts Check missed calls When you have missed calls you will see the icon in the title bar and the number of missed calls on the TouchFLO Home tab To check who the caller was do one of the foll...

Page 54: ...r the list according to the type of call All Calls Missed Dialed Received Speed Dial 1 4 Use Speed Dial to call frequently used numbers with a single tap For example if you assign a contact to the location 2 in Speed Dial you can tap and hold the number 2 key on the Phone screen keypad to dial the contact s number To create a Speed Dial entry 1 On the Phone screen tap Menu Speed Dial 2 Tap Menu Ne...

Page 55: ...ble or disable the phone connection 1 Tap Start Programs Comm Manager 2 On the Comm Manager screen tap Phone to enable or disable the phone function When enabled the ON indicator is activated To enable or disable Airplane Mode Another way to turn off the phone function is to switch your device to Airplane Mode When you enable Airplane Mode all wireless radios on your device are turned off includin...

Page 56: ...56 Chapter 2 Phone Calls ...

Page 57: ... TouchFLO Using the TouchFLO 3 1 Home Screen The TouchFLO Home screen have the following tabs Home People Messages Mail Photos and Videos Music Internet Settings Programs Weather Maps Search available by country ...

Page 58: ...me screen Press Navigation Right or Left to move to the next or previous tab Press and hold your finger on the active tab then slide your finger right or left over the tabs Release when you have selected the desired tab Note Apply some pressure when pressing and holding on the active tab to be able to slide over the tabs ...

Page 59: ...item on the Home tab Touch the item or Press Navigation Up or Down first to navigate to the item you want to select and then press ENTER Touch this area to open the Clock Alarms screen where you can set the date time and alarm See Chapter 13 for details Touch this area to view details about missed calls in the Call History See Chapter 2 for details Home tab Touch this area to create edit or view a...

Page 60: ...n the Home screen slide your finger to the People tab 2 Touch an empty slot on the screen 3 On the Select a Contact screen touch the name of the desired contact Tips To create a new contact touch Menu New Contact See Contacts in Chapter 12 for details SIM contacts cannot be added as favorite contacts 4 Select a phone number or e mail address to associate to the favorite contact Note If there is no...

Page 61: ...p Touch the area below the contact picture to place a call send a text message or send an e mail to the favorite contact Touch the picture of a contact to access his or her contact card On the contact card you will see the last outgoing or incoming call as well as contact details such as phone numbers e mail address and more Tip On the People tab touch All People to access SIM contacts and all con...

Page 62: ...le indicates that there is a new message received To view the entire message thread from the sender and reply touch the message on the screen Touch All Messages to access all text messages in your inbox and other folders Touch this icon to create a new SMS text message To flip through received SMS MMS messages swipe your finger upward downward or press Navigation Up Down Touch Menu to access more ...

Page 63: ...rd to set up your account For detailed instructions on setting up e mail accounts using the E mail Setup wizard see Chapter 6 To check e mail When there are new e mails the icon on the Mail tab and the respective icons of the e mail accounts will show the number of newly received messages To browse through received e mail messages swipe up or down on the envelope image or press Navigation Up Down ...

Page 64: ...working with e mail messages see Chapter 6 and 7 Internet On the Internet tab you can open Opera Mobile to browse the web and add web favorites for one touch access to your favorite web sites Touch here to browse the web using Opera Mobile Touch All Bookmarks to open Opera Mobile and add view or delete web favorites Swipe upward or press Navigation Down to scroll down the screen and access more we...

Page 65: ...bum if preferred To set an album as a Favorite 1 On the Photos and Videos tab touch Album to open the Album program 2 Touch Albums and then select one of the listed favorite albums 3 Tap Menu Set Album as Favorite and then tap OK on the confirmation screen To view photos and videos Touch the photo or video on the screen to view or play it in full screen Touch here to open the Album program See Vie...

Page 66: ...visually browse through albums and music tracks and play music The albums and music tracks that you see on the Music tab are from a selected category or playlist in the Library Note Your device searches for all music files that have the following audio formats MP3 mp3 WMA wma AAC AAC eAAC aac and MPEG 4 m4a It searches for music from the following locations Device My Music including all subfolders...

Page 67: ...e icons on the upper right side of the Music tab show whether repeat and shuffle modes are enabled Repeat On Shuffle On To select music from the Library Accessing the Library from the Music tab opens the Audio Manager since the Music tab shares the same Library as the Audio Manager The Library organizes music into categories such as Artists Album Genre All Songs and more After you have added more ...

Page 68: ...have selected along with the other songs that are under the All Songs category will appear in the Music tab For more information about selecting other categories in the Library creating playlists and using the Audio Manager see Chapter 11 ...

Page 69: ...w letters of a country or city name and then tap the Search icon 3 Tap the desired city name and then tap Select To view weather information Your device automatically connects to the Internet via the data connection or Wi Fi to download and display weather information The current temperature highest and lowest temperature type of weather sunny cloudy showers or others and the time of day daytime o...

Page 70: ... three hours Weather data is also downloaded every time an ActiveSync connection is established through over the air or USB connections Clear this option if you prefer to manually download weather information Download when roaming Select this option only if you want to allow automatic download of weather data when roaming This may incur additional costs Temperature Scale Choose whether to display ...

Page 71: ...earch bar Tap this icon to perform the search Tip Every time you search for places they will be added to the history list and displayed on the Maps Search tab Next time you want to locate the same address or place of interest you can just choose it from the history list This list can store up to eight most recent entries To display a map that shows your current location On the Maps Search tab touc...

Page 72: ...t that determines how your device will alert you when there are incoming phone calls To select a profile touch Sounds on the Settings tab and then choose one of the following Normal Vibrate Silent or Automatic Notes Automatic sets your device to vibrate only when you receive phone calls during scheduled appointments in your Calendar If your device has been set with the alarm clock and you set the ...

Page 73: ...llowing these steps On the 1 Settings tab and then tap Wallpaper On the Select a Picture screen navigate to the folder where the image you 2 want to use is located When you have found the desired background image tap the image to select it Slide your finger to the 3 Home tab You will now see that the background image has changed Tips To reset the Home tab back to the default background tap Wallpap...

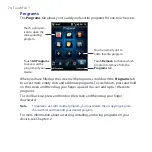
Page 74: ...ave filled up the screen with programs scroll down the Programs tab to access more empty slots and add more programs To scroll down press and hold on the screen and then drag your finger upward You can add up to 18 favorite programs To scroll back up press and hold on the screen and then drag your finger downward Note To replace a slot with another program you must delete the occupying program sho...

Page 75: ...e or flick your finger on the touch screen To scroll up and down To scroll down swipe your finger upward on the touch screen To scroll up swipe your finger downward on the touch screen To auto scroll flick your finger upward or downward on the touch screen Touch the screen to stop scrolling To scroll left and right To scroll towards the right swipe your finger to the left To scroll towards the lef...

Page 76: ...pe on the touch screen See Viewing Photos and Videos Using Album in Chapter 11 for details Finger panning You can use finger panning to move to and view other parts of a zoomed photo web page document or an e mail To pan touch and hold on the touch screen and then drag your finger in any direction Tip To enable or mute finger scrolling and panning sound touch Start Settings System tab TouchFLO and...

Reviews: