lp-790 Revision Date 1.3.22
12
Risk of scald injury increases as you increase water temperature.
STEP #5
- Replace the
insulation.
STEP #6
- Reattach the access
cover with the two screws.
STEP #7
- Restore power by
replacing the fuse or turning
on the circuit breaker.
STEP #8
-
a.
After resetting the ECO,
ensure the water heater is
operating properly before
leaving the installation.
b.
After adjusting the water
temperature, allow the water
heater enough time to heat
the water to temperature.
After the water heater has
stopped heating, use a
thermometer to measure the
water temperature at a hot
water outlet in the structure.
STEP #9
- If the water heater
is operating properly and
the water temperature is
satisfactory, adjustment is
complete.
Failure to replace insulation or access cover could result in property
damage, severe personal injury, or death.
Adjust the thermostat as described below to increase water heater
output and meet your comfort needs.
Thermostat
Setting
Replacement
Electric Water
Heater Size
Usable
Water
@ 105
o
F
Single
Shower
Length @
3 GPM
Consecutive
8 min
Showers @
3 GPM
125
o
F
Factory Default
55 gal
69 gal
23 mins
3
140
o
F
65 gal
85 gal
28 mins
3.5
150
o
F
80 gal
100 gal
33 mins
4
170
o
F
100 gal
115 gal
38 mins
5
Table 5 - Thermostat Adjustment to Meet Gallon Requirements
D. Heating Element Replacement Procedure
STEP #1
- Turn off power to the water heater. Use a Phillips Head
screwdriver to remove the wires from the element.
Failure to disconnect the power from the water heater before
attempting heating element replacement will result in property
damage, severe personal injury, or death due to electric shock.
STEP #2
- Run hot water at a faucet in the system. When it runs cold,
shut off the faucet. Then shut off water at the main cold water inlet
or, if possible, valve off the water heater from the system. Drain the
water from the system, or just the water heater if it can be isolated
from the system.
If heating elements need replacement, it is very important to use
the same voltage, wattage, and construction. DO NOT replace
heating element with a generic heating element. Only HTP heating
elements are approved for use with this water heater. Failure to
follow this warning will result in premature product failure and
VOID the warranty, and could result in severe personal injury or
death.
C. Adjusting the Tank Booster
Prior to setting the valve, fill and purge the water heater and
system. Ensure the system water valves are open. Power the
water heater ON. Wait for the water heater to heat to the design
temperature (set at the water heater thermostat). Only then
proceed to adjusting the tank booster.
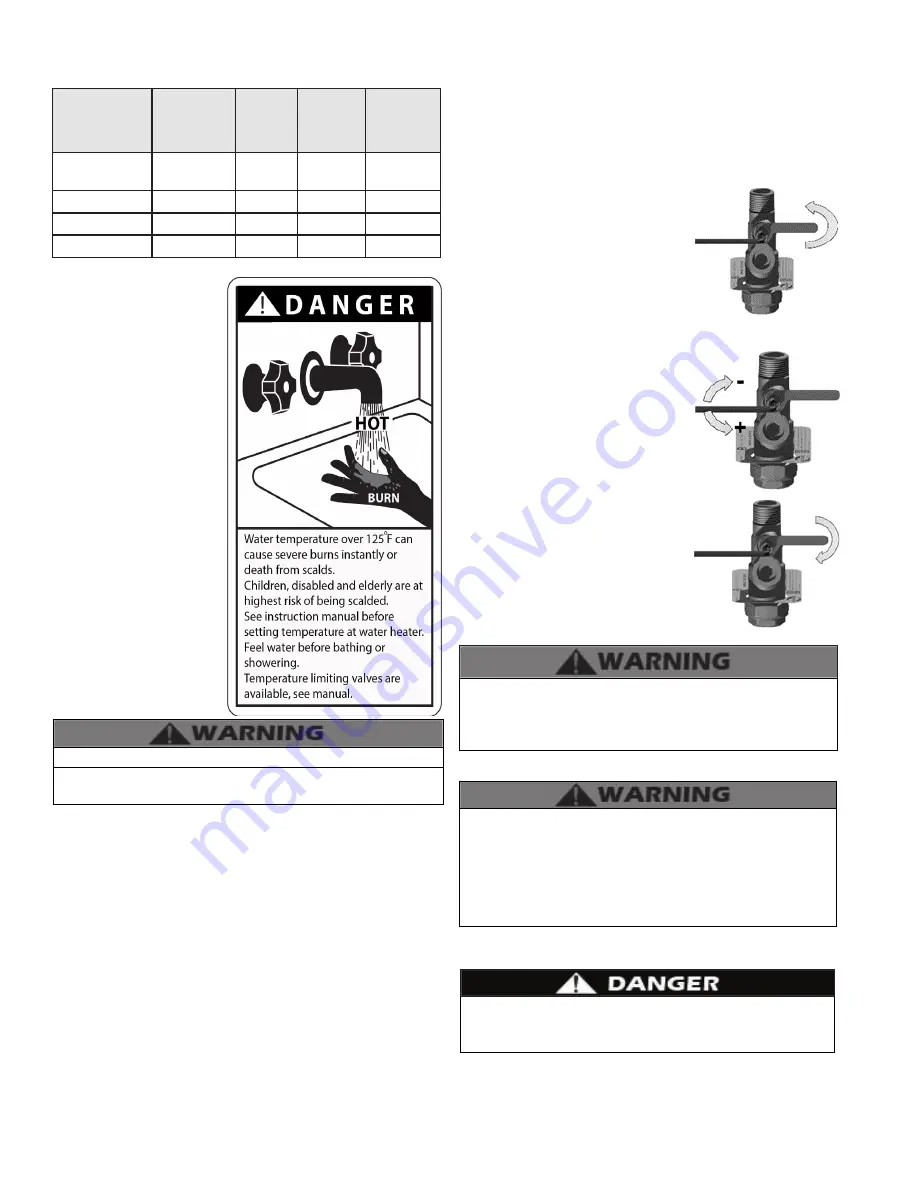
STEP #1
- Open a hot water faucet in the
system. Use a thermometer to measure
the water temperature at the faucet. If
the outlet water temperature needs to
be adjusted, use a 3/16” Allen key to hold
the mixing valve adjustment dial in place.
Then use a 7/16” wrench to loosen the
locking nut.
NOTE:
Water must be flowing from a hot
water faucet while adjusting the outlet
temperature.
STEP #2
- Use the wrench to support the
locking nut and prevent it from rotating.
Then turn the 3/16” Allen key clockwise
to reduce the temperature, or counter-
clockwise to increase the temperature.
Measure the outlet water temperature at
the hot water faucet. Adjust the valve as
described until the desired temperature is
reached.
STEP #3
- After reaching the desired
outlet temperature, use the 3/16” Allen
key to hold the mixing valve adjustment
dial in place. Then use a 7/16” wrench
to tighten the locking nut. Make note
of the set outlet temperature for future
reference.
Risk of scald injury increases as you increase water temperature.
Households with small children, disabled, or elderly persons may
require a 120
o
F or lower temperature setting to prevent severe
personal injury or death due to scalding.


