background image

25 


Fig. 39 

Fig. 40 

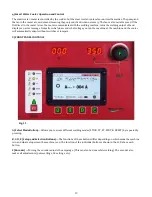
Fig. 41 


When setting post-gas flow, more is better—especially 

when in doubt. How much post-gas flow you need 
depends on the material you plan to weld, the cup you  
plan to use, the amperage you plan to weld at, and the 

amount of tungsten stick-out you use. Some people 
advocate that you never need more than 5 seconds of 
post-gas flow, claiming that more post-gas flow is just a 
waste of Argon. Well, let’s put it this way. At a bare 

minimum, you need to keep the tungsten electrode 
shielded until the tungsten is cold enough to where it 
does not react with the ambient air. What does that 

mean? If the shielding gas stops when the tungsten 
electrode is still too hot, you will most likely see gray or 
even black discoloration of the tungsten, which is very 

bad! After you finish welding, the tungsten should be the 
same shiny silver color that it is when it was brand new. 
If you weld stainless or even titanium, post-gas flow 
times of 30 or 60 seconds, and sometimes longer 

depending on the amperage, are not unheard of. During 
post-gas flow time, you also need to hold the torch in 
position to shield the metal from discoloring.  

 
By pressing button 

E

 (

Fig. 11

; the down arrow in this 

instance) you get deeper into the TIG - MAIN SETTINGS 

submenu. 


The Invertig 313/400 allows you to adjust TIG hot-start 
in both AC and DC. Most other TIG welding machines, 
and all other high-end, brand name welding machines, 

feature a hot-start function that delivers a factory pre-
set amount of hot-start, for a predetermined amount of 
time (typically in the range of several dozen or several 

hundred milliseconds). Some competitive machines 
allow you to preselect a tungsten diameter, which will, 
in some cases, change the hot-start parameters of the 

machine. The downside to this is that there is always  

hot-start, and, although all TIG machines have a 
minimum amperage listed in the literature, they never 

actually start an arc at that amperage since hot-start 
cannot be turned off. 
 

Why is this so important? 

On very thin material the 

ability to adjust hot-start way down, or even turn it off, 
can be a huge advantage. Some find it helpful to light the 
arc on a piece of filler rod resting on the work piece so 

they don’t burn through. Others use run in tabs. With the 
ability to adjust the hot-start parameters, those tricks 
become things of the past.  


If a low hot-start is such a great thing, then why did 
we make it adjustable from Off or from 4 to 130 

amps?  

 
Sometimes, depending on the size and type of tungsten 
you use (the Invertig welds best with 2% Ceriated 

tungsten), and, depending on whether you are welding in 
AC or DC and potentially collected a fair amount of 
aluminum oxide on the tungsten, you may find re-

striking an arc hard after welding for awhile. In this case, 
you might need a higher starting amperage all together. 
But, first and foremost, you need hot-start, and plenty of 

it, to initially ignite the arc. With that being said, most 
competitive machines with non-adjustable hot-start 
generally have too much hot-start rather than not 
enough, which can make welding thin materials 

challenging.  
 
As a good starting point for welding in DC, we suggest 

around 40 amps of hot-start for small diameter 
electrodes and around 70 amps of hot-start for large 
diameter electrodes. As a good starting point for welding 

in AC, we suggest around 60 amps of hot-start for small 
diameter electrodes and around 100 amps of hot-start 
for large diameter electrodes. 

 
Now, on an initial, freshly ground arc start, hot-start 
most likely can be turned off completely (

Fig. 41

). Also, 

clean tungsten electrodes require less hot-start than 

contaminated electrodes.  


Summary of Contents for Invertig 313

Page 1: ...Invertig 313 400 180 Joey Drive Elk Grove Village IL 60007 1304 Ph 847 357 0700 Fax 847 357 0744 Web www usaweld com ...

Page 2: ...13 14 i Pulse in AC TIG Square Wave Only 14 j Pulse in Stick Square Wave Only 15 17 k Hot Start for Stick 17 l Hot Start for TIG 17 m Hot Start vs Starting Amps in TIG 17 n HF Lift Scratch Start 17 18 o Pipe Mode 18 p Amperage Limitation in Single Phase 18 q Smart Cooler Operation Control 19 9 FRONT PANEL CONTROLS 19 10 HOW TO WELD STEP BY STEP 20 31 a STICK 20 22 b TIG 2T 22 27 c TIG 4T 28 29 d T...

Page 3: ...e and service for Three 3 Years after delivery to the original purchaser HTP America Inc will repair or replace at its factory any part or parts thereof Products should be returned to HTP America Inc with transportation charges prepaid and which its examination shall disclose to its satisfaction to have been thus defective This warranty being in lieu of all other warranties expressed or implied an...

Page 4: ... ventilation in the welding area at all times Do not weld on galvanized zinc cadmium or lead beryllium materials unless you are POSITIVE that sufficient ventilation is provided These materials produce toxic fumes Do no weld in areas close to degreasing or spraying operations Chlorinated hydrocarbon vapors may react with the ultra violet rays and form highly toxic phosphate gas If you develop eye n...

Page 5: ...erican National Standards Institute 1430 Broadway New York NY 10018 AWS Standard A6 0 WELDING AND CUTTING CONTAINERS WHICH HAVE HELD COMBUSTIBLES obtainable from the American Welding Society 2051 NW 7th St Miami FL 33125 4 NFPA Standard 51 OXYGEN FUEL GAS SYSTEMS FOR WELDING AND CUTTING obtainable from the National Fire Protection Association 470 Atlantic Ave Boston MA 02210 NFPA Standard 51B CUTT...

Page 6: ...6 Fig 1 ...

Page 7: ...10 to 90 Final Amps 10 to 90 10 to 90 Slope Up Seconds 0 1 to 10 0 0 1 to 10 0 Slope Down Seconds 0 1 to 10 0 0 1 to 10 0 Spot Time Seconds 0 1 to 10 0 0 1 to 10 0 Hot Start 0 to 50 0 to 50 Arc Force 0 to 500 0 to 500 Wave Forms Square Soft Square Triangular Square Soft Square Triangular EN Amperage 10 to 99 10 to 99 EP Amperage 10 to 99 10 to 99 Duty Cycle Single Phase TIG 40 300 Amps 60 250 Amps...

Page 8: ... or 3 phase input power and install the correct plug or wire the machine to a disconnect turn the main switch Fig 3 S on Position 1 As a normal part of the boot up process PFO appears in the Voltage display red numeric above LCD As the machine boots up please be patient The boot up process only takes about 10 seconds Please do not tap the foot pedal or attempt to adjust the front panel LCD until y...

Page 9: ... is 1 4 BSP NOTE 1 4 BSP is a 19 TPI thread and is NOT interchangeable with 1 4 NPT regular pipe thread which is an 18 TPI thread N Trigger Connector Typically not used as the Y connector also contains trigger wires Y 14 Pin Remote Control Connection Used to connect your remote amperage control or momentary switch to your Invertig Insert the connector into the machine and twist the lock ring until...

Page 10: ... turns your Invertig 313 400 on and off Set the switch to position 0 for off and set the switch to position 1 for on O Smart Water Cooler Power Connection If you purchased an HTP America smart water cooler this is where the cooler picks up the voltage to operate only available on HTP machines and with HTP smart water coolers T Input Power Cord Q Shield Gas Inlet Connection Attach the gas hose from...

Page 11: ... TigControl com TigButton b Torches A variety of air and water cooled torches can be used with our Invertig machines However all air and water cooled torches have their limits Running past the limit results in torch damage which is not covered under warranty We offer the following torches the amp ratings provided represent the max amp rating based on 100 duty cycle for each torch CK9 Air Cooled To...

Page 12: ...ar AC is selected and active Pulse functions are unavailable in Triangular AC d Nominal vs Average Amps AC welding contains a lot of variables compared to DC welding Those variables influence in some cases massively the welding arc and power output Very high frequencies result in lower amperage outputs Since the arc does not spend as much time on one side of the zero line and changes directions ve...

Page 13: ... to 200Hz at a material thickness of 1 4 1 2 or even higher it is not uncommon to see frequencies of 50Hz or less be used on a regular basis for best results g Asymmetric Arc Asymmetric arc determines the intensity of the current rather than the time the balance function determines the time Going back to our previously described example weld with 1Hz AC and a 50 balance at 100 amps this time limit...

Page 14: ...ng these settings during a high speed pulse application allows you to achieve penetration close to what 100 amps of straight DC gives but with significantly lower heat input and a much more controllable puddle Even though you only reach 100 amps 25 of the time and 25 amps 75 of the time in a high speed pulse scenario it is NOT safe to assume that the first quarter at 100 amps and the second throug...

Page 15: ...wever rod runs in all positions including vertical up and down Also forgiving for some contamination of the parent metal An excellent choice for root passes 6013 Rod with a titania potassium coating that runs on old and simple AC alternating current stick welders Typically referred to as the farmer s rod 7014 Rod with properties similar to 7018 but also designed to run on older simpler stick welde...

Page 16: ... so the Invertig sets the background current to 80 amps The amperage ratings essentially would be well within the specs then This is absolutely possible and a good setting However this setting is very hot and metal transfer occurs the entire time This paired with a 3 to 4Hz pulse frequency makes for a very high travel speed in the horizontal or flat position Plus the heat input into the work piece...

Page 17: ... 100 amps and you set the Initial Amps and Final Amps to 10 the Initial Amps and Final Amps would be 10 amps if you set the welding current to 150 amps and you set the Initial Amps and Final Amps to 10 the Initial Amps and Final Amps would be 15 amps n HF LIFT Scratch Start When welding near sensitive electronics for example in hospitals or assisted living homes or around computers or computer con...

Page 18: ...ld pipe in the oil and the food processing industries Procedure for TIG Welding with LIFT Start in PIPE Mode Start Welding Bring the TIG electrode tungsten into contact with the work piece Lift the torch from the side move slightly away from the work piece and start the welding process End Welding With the slope down function turned on you can end your weld by regulating the distance between the a...

Page 19: ... what voltage you run the machine at the machine and the cooler will automatically adapt without switches or jumpers 9 FRONT PANEL CONTROLS A Select Mode Button Allows you to access different welding modes STICK 2T 4T SPOT RESET by repeatedly pressing B C D E Setup and Selection Buttons The functions of these buttons differ depending on which mode the machine is in and what setup screen the machin...

Page 20: ...ig 17 The first adjustment you can make after activating AC mode is balance Fig 14 shows 70 EN Electrode Negative Using encoder F Fig 11 you can change the balance value from 10 to 90 Once you select the desired balance for your application press button C Fig 11 the green arrow in this instance to enter the next screen You can now adjust your AC frequency From 4 to 99 amps of welding current you c...

Page 21: ...ss than a second to ignite the arc In order to adjust the arc force setting press button C Fig 11 to move the arrow from the first line in the LCD to the second line in the LCD Now turning encoder F Fig 11 changes the arc force value For explanations of what Hot Start and Arc Force are and what they do please visit the glossary at the end of the manual To start welding either press button B Fig 11...

Page 22: ...pedal into the 14 pin remote control receptacle Fig 2 Y the LCD shows the starting amperage in the Amperage display red numeric above LCD that always shows the max pedal amperage Plug the TIG torch into the negative output receptacle Fig 2 Z All TIG welding uses DCEN which requires the ground clamp to be plugged into the positive output receptacle Fig 2 W and the TIG torch into the negative output...

Page 23: ...the EP Electrode Positive amperage here In Fig 30 the asymmetric arc value is set to 100 so EP is not limited in this instance however you can limit EP to increase penetration If you do not want to limit EP but would like to limit EN instead press button E Fig 11 to enter the submenu in Fig 31 When in the menu shown in Fig 31 press button C Fig 11 SELECT in this instance a few times to move the bl...

Page 24: ...oder F Fig 11 until you reach your desired pre gas flow duration In Fig 36 we set a pre gas flow duration of 0 4 seconds In order to adjust the next value of the sequencer in this case t1 slope up press button C Fig 11 the green arrow in this instance When using a remote control the t1 value is fixed not adjustable as you typically use the remote control to determine how fast the slope up should b...

Page 25: ...art parameters of the machine The downside to this is that there is always hot start and although all TIG machines have a minimum amperage listed in the literature they never actually start an arc at that amperage since hot start cannot be turned off Why is this so important On very thin material the ability to adjust hot start way down or even turn it off can be a huge advantage Some find it help...

Page 26: ...aterial especially aluminum a higher starting current gives you better arc ignition and arc stability To access pulse mode and the pulse mode settings press button C Fig 11 to enter the PULSE ACTIVATION screen Fig 44 Now press button D Fig 11 to turn pulse on and proceed to the PULSE MAIN SETTINGS menu Fig 45 Here you can adjust the background amps from 10 to 90 by turning encoder F Fig 11 After s...

Page 27: ...cooler and the pump and fan work on demand To ensure proper operation it is essential to not only turn the cooler on but to also activate the water cooler function in the software If you use an air cooled torch the water cooler function MUST BE turned off to avoid false alarms and interruption of the welding arc If you purchased an Invertig 313 with the Arctic Chill water cooler option where the c...

Page 28: ...s for Initial Initial amps refers to a small typically percentage of your amperage setting In the Fig 52 54 example we selected a welding amperage of 110 amps a pre gas flow value of 0 4 seconds and an Intl Amps value of 10 meaning that when you press and hold the momentary switch button the pre gas flow timer runs for 0 4 seconds followed by arc ignition at 11 amps When you let go of the momentar...

Page 29: ...depress the momentary switch button or foot pedal for more than 5 seconds no harm is done to the machine Your Invertig turns off automatically after the spot weld timer runs out PRO TIP Spot welding can be done in AC or DC in every wave form and with where applicable or without pulse If you plug a foot pedal in with TIG Spot activated the machine deactivates the remote control s amperage adjustmen...

Page 30: ...ramps up from 11 amps to 110 amps in 1 5 seconds Now you can weld as long as you want at 110 amps If you want to weld at a lower amperage a swift flick of the momentary switch button allows you to weld at your lower set amperage Fig 64 In our example we set the Rst Amps RESET Amps to 80 With this setting a swift flick of the momentary switch button allows you to weld at 88 amps From here you can f...

Page 31: ... welding mode How to Load Stored JOBs 1 Press the JOB button D to pull up the JOB LIST page 2 Use the button D the button E or the encoder F to select the JOB you want to recall 3 Press and hold the RECALL button B for about three 3 seconds until you hear a double beep 4 After recalling the JOB the LCD reverts back to the main page where you can see the JOB number above button D ATTENTION THE PARA...

Page 32: ...y few can keep track of welding time like this so we equipped the Invertig 313 400 AC DC with a highly sophisticated over heat protection The machine monitors the temperature of several vital internal components Just before temperatures venture outside of the safe operating range the machine displays a message to the operator the cooling fan continues to run and the welding output is shut down for...

Page 33: ...33 12 WIRING DIAGRAM Invertig 400 AC DC ONLY ...

Page 34: ...34 13 EXPLODED VIEW INVERTIG 400 AC DC ONLY ...

Page 35: ...613962 Primary Inverter PCB Group 42A 613993 Primary Inverter PCB 42B 613792 Driver PCB 43 614323 Boost Inductance 44 620839 Left Side Panel Pos Part Description 45 613308 Shield Logic PCB 46 613603 Primary Rectifiers Boost PCB 47 613606 Driver Boost PCB 48 613605 Power Boost PCB 49 613604 Logic Control Boost 50 613032 Input Power Cable 51 617030 Solenoid Valve 52 620851 Support 53 613602 Line Fil...

Page 36: ...nd set your welding machine to 100 amps a decrease in arc voltage will cause the amperage to increase auto matically up to 150 amps as needed and only when you meet certain voltage drop conditions you will NOT run at 150 amps continually Likewise if you weld at 100 amps and set arc force to 200 the amperage can increase under certain conditions up to 300 amps At a 200 setting drops in arc voltage ...

Reviews: