background image

Safety Precautions

Plasma Arc Cutting Hazards

▲  

The safety information given below is only a summary of 

the more complete safety information found in the Safety
Standards listed in Section M. Read and follow     
all Safety Standards.

▲  

Only qualified persons should install, operate,

maintain, and repair this unit.

▲  

During operation, keep everybody, especially children, away.

P

Plla

assm

ma

a  C

Cu

uttttiin

ng

g  cca

an

n  cca

au

ussee  ffiirree  o

orr  eexxp

pllo

ossiio

on

n..

Hot metal and sparks blow out from the plasma cutting
arc. The flying sparks and hot metal, hot work pieces,
and hot equipment can cause fires and burns. Check

and be sure the area is safe before doing any cutting.

Š

Protect yourself and others from flying sparks and hot metal.

Š

Do not cut where flying sparks can strike flammable material.

Š

Remove all flammables within 35 ft of the plasma cutting arc.
If this is not possible, tightly cover them with approved 
covers.

Š

Be alert that sparks and hot materials from cutting can easily 
go through small cracks and openings to adjacent areas.

Š

Watch for fire, and keep a fire extinguisher nearby.

Š

Be aware that cutting on ceiling, floor, bulkhead, or partition 
can cause fire on the opposite side.

Š

Connect ground cable to the work as close to cutting area as 
practical to prevent cutting current from traveling long, 
possibly unknown paths and causing electric shock and fire 
hazards.

Š

Do not cut pressurized cylinders, pipes, or vessels.

Š

Do not cut on closed containers such as tanks or drums.

Š

Never cut containers with potentially flammable materials 
inside- they must be emptied and properly cleaned first.

Š

Do not cut containers that have held combustibles.

Š

Do not cut in atmospheres containing explosive dust or 
vapors.

Š

Wear oil-free protective garments such as leather gloves, 
heavy shirt, cuffless trousers, high shoes, and a cap.

Š

Do not locate unit on or over combustible surfaces.

Š

Remove any combustibles, such as butane lighter or matches 
from your person before doing any cutting.

E

Elleeccttrriicc  S

Sh

ho

occkk  cca

an

n  kkiillll

Touching live electrical parts can cause fatal shocks or
severe burns. The plasma torch and circuit are

electrically live whenever the output is on. The input power
circuit and machine internal circuits are also live when power is

on. Plasma arc cutting requires higher voltages than welding to
start and maintain the arc (100 -300 volts dc are common), but
also uses torches designed with safety interlock systems which
turn off the machine when the shield cup is loosened or if tip
touches electrode inside the nozzle. Incorrectly installed or
improperly grounded equipment is a hazard.

Š

Do not touch live electrical parts.

Š

Wear dry, hole-free insulating gloves and body protection.

Š

Insulate yourself from work and ground using dry insulating 
mats or covers big enough to prevent any physical contact 
with work or ground.

Š

Do not touch torch parts if in contact with the work or ground.

Š

Turn off power before checking, cleaning, or changing torch parts.

Š

Disconnect input power before servicing this equipment. 
Lockout/tagout input power according to OSHA CFR 
1910.147

Š

Properly install and ground this equipment according to the 
Owner’s Manual and national, state, and local codes.

Š

Check and be sure that input power cord ground wire is 
properly connected to ground terminal in disconnect box or 
that cord plug is connected to properly grounded receptacle 
outlet-always verify the supply ground.

Š

When making input connections, attach proper grounding 
conductor first.

Š

Frequently inspect input power cord, plasma torch and ground
cable for damage or bare wiring. Replace cord immediately if 
damaged.  Bare wiring can kill.

Š

Turn off all equipment when not in use.

Š

Do not wrap torch cable around your body.

Š

Ground the work piece to a good electrical (earth) ground if 
required by codes.

Š

Use only well-maintained equipment. Repair or replace 
damaged parts at once.

Š

Wear a safety harness if working above floor level.

Š

Keep all panels and covers securely in place.

Š

Do not bypass or try to defeat the safety interlock systems.

Š

Use only the Plasma Torch specified in the Owner’s Manual.

Š

Keep away from torch tip and pilot arc when the plasma torch 
trigger is pressed.

Š

Clamp work cable with good metal-to-metal contact to work 
piece (not piece that will fall away) or worktable as near the 
cut as practical.

Š

Insulate work clamp when not connected to work piece to 
prevent contact with any metal object

.

S

SIIG

GN

NIIF

FIIC

CA

AN

NT

T  D

DC

C  V

VO

OL

LT

TA

AG

GE

E  eexxiissttss  o

on

n

iin

ntteerrn

na

all  p

pa

arrttss  o

off  iin

nvveerrtteerr  p

po

ow

weerr  sso

ou

urrcceess

A

AF

FT

TE

ER

R  tth

hee  rreem

mo

ovva

all  o

off  iin

np

pu

utt  p

po

ow

weerr

.

4

Summary of Contents for MicroCut 875S

Page 1: ...Mi c r o C u t 8 7 5 S ...

Page 2: ...you have purchased one of the most technologically advanced safest and economical plasma cutters available today The owner s manual has been designed to instruct you on the safe operation of your Micro Cut 875S If you read and follow the instructions in this manual your plasma cutter will provide you with years of trouble free operation If you fail to read and understand this manual as well as cor...

Page 3: ...ED BY HTP Limited Warranty Subject to the terms and conditions hereof HTP warrants to its Distributor Dealer that all MicroCut 875S Plasma Cuffers furnished by HTP are free from defect in workmanship and material as of the time and place of delivery by HTP No warranty is made by HTP with respect to trade accessories or other items manufactured by others Such trade accessories and other items are s...

Page 4: ...are also live when power is on Plasma arc cutting requires higher voltages than welding to start and maintain the arc 100 300 volts dc are common but also uses torches designed with safety interlock systems which turn off the machine when the shield cup is loosened or if tip touches electrode inside the nozzle Incorrectly installed or improperly grounded equipment is a hazard Do not touch live ele...

Page 5: ...f ventilation is poor use an approved air supplied respirator Read the Material Safety Data Sheet MSDS and the manufacturer s instruction for metals to be cut coating and cleaners Work in a confined space only if it is well ventilated or while wearing an air supplied respirator Fumes from cutting and oxygen depletion can alter air quality causing injury or death Be sure the breathing air is safe D...

Page 6: ...ece as close to the cut as possible About Pacemakers Pacemaker wearers consult your doctor first If cleared by your doctor then following the above procedures is recommended Never allow electrical contact between a plasma arc torch and cylinder Never cut on a pressurized cylinder Explosion will result Keep protective cap in place over valve except when cylinder is in use or connected for use Read ...

Page 7: ...the filter needs to be discarded If you do not have a drier on your compressor we strongly recommend the HTP Max Dry Part 25310 This is a 3 stage filter which completely removes all oil and water from the air The first stage of the Max Dry removes the water which is present in the air The second stage of the filter removes any oil which may be in the air along with particulate down to 03 microns T...

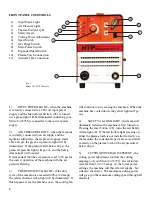
Page 8: ...hat the air pressure is set to 70 psi for the correct operation of the machine with the air pressure flowing 3 THERMO SWITCH LIGHT if the duty cycle of the machine is exceeded 40 at 60 amps the yellow thermo switch light will be illuminated If this happens leave the machine on so the cooling fan will continue to run cooling the machine When the machine has cooled down the yellow light will go out ...

Page 9: ...metal The Automatic mode is designated by the dashed line or the lower position We recommend leaving the machine in the manual setting unless there is some need to have the arc automatically ignite once contact is lost with the metal 10 PLASMA TORCH CONNECTION the central adapter block is where the plasma torch connects to the front of your Micro Cut 875S Your machine will not operate without the ...

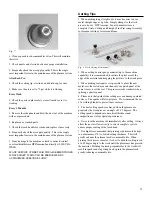
Page 10: ... cool the plasma torch When using the drag cutting tip the highest cutting efficiency is achieved by keeping the plasma cutting tip perpendicular and in contact with the work surface putting very little downforce on the plasma torch If you move too fast sparks will shoot up and you will not cut all the way through the work If you are cutting correctly all the plasma sparks will go beneath the pane...

Page 11: ...ent cutting of circles and lines Fig 8 Circle Cutting Attachement 2 When cutting heavier gauge material up to the machine capability it is recommended to initiate the pilot arc off the edge of the material and dragging the pilot arc to the work piece 3 When making rust repairs it is possible to place the new metal over the rusted area and then cut your patch panel at the same time you cut the rust...

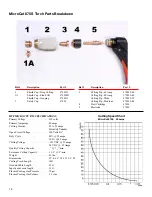
Page 12: ... Speed Chart MicroCut 875S 40 amps HTP MICROCUT 875S SPECIFICATIONS Primary Voltage 230 volts Primary Amperage 40 amps Cutting Current 30 to 55 amps Infinitely Variable Open Circuit Voltage 320 Volts DC Duty Cycle 40 55 amps 100 45 amps Cutting Voltage 102 VDC 55 amps 96 VDC 45 Amps Quality Cutting Capacity _ 7 _ min Severance Cutting Capacity 1 1 8 3 min Weight 40 lbs Dimensions 22 L x 8 W x 11 1...

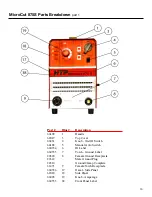
Page 13: ...o Switch 660554 6 ID Label 660555 7 Torch Ground Label 20320 8 Female Ground Receptacle 22312 Male Ground Plug 22310 Ground Clamp Complete 61471 9 Female Torch Receptacle 660556 17 Decal Side Panel 62020 18 Side Panel 66028 19 Knob Amperage 660553 38 Front Panel Label MicroCut 875S Parts Breakdown part 1 ...

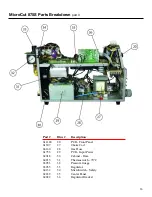
Page 14: ...Illus Description 610889 10 PCB Primary Power 64393 11 Gas Solenoid Valve 64032 12 Pressure Safety Switch 650193 13 Control Transformer 64180 14 Fuse Holder 203335 2 15 Fuse MicroCut 875S Parts Breakdown part 2 ...

Page 15: ...7 Choke Coil 66160 28 Gas Hose 61733 29 PCB Input Power 62018 30 Cabinet Base 64215 31 Thermoswitch 70 C 63053 32 Pressure Guage 63055 33 Regulator 64132 34 MicroSwitch Safety 62639 35 Center Panel 62022 36 Regulator Bracket MicroCut 875S Parts Breakdown part 3 ...

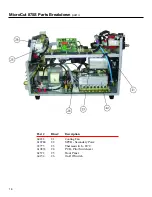
Page 16: ...lus Description 64182 21 Cooling Fan 610784 22 SPCB Secondary Powe 65775 23 Thermoswitch 80 C 610833 24 PCB Pilot Switchover 62572 25 Front Panel 64154 26 On Off Switch MicroCut 875S Parts Breakdown part 4 16 ...

Page 17: ...17 MicroCut 875S Wiring Diagram ...

Page 18: ...18 ...

Page 19: ...19 ...

Page 20: ...20 ...

Reviews: