background image

Configuring the display

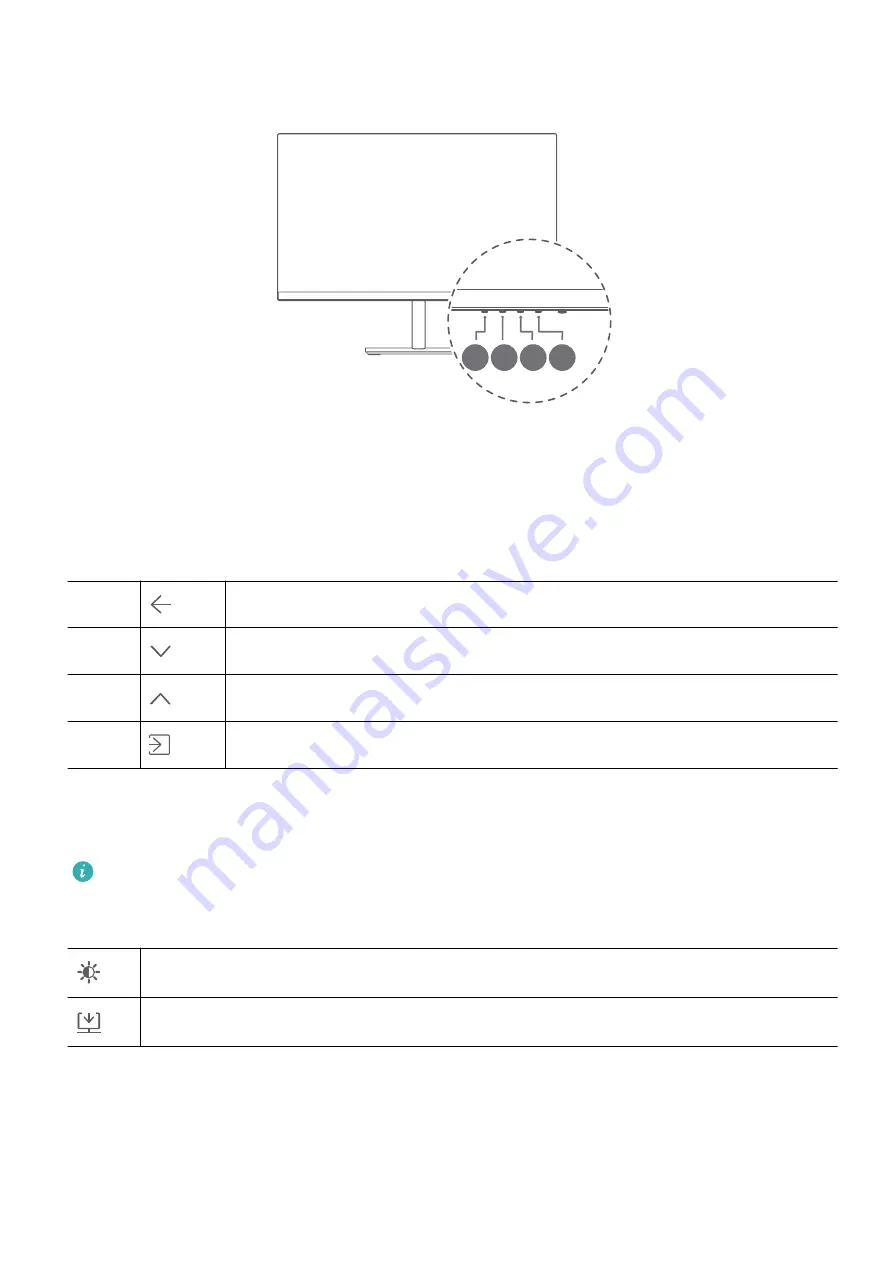
1 2 3 4

After the display and the tower are assembled and powered on, the system automatically
configures and optimizes the settings of the display. If you need to configure the display
settings, you can also open the settings menu of the display to adjust the settings.

1

Press any button from 1 to 4 to access the display settings menu.

2

On the settings menu screen, press buttons 1 to 4 to set the parameters.

1

Exit/Back

2

Downward/Leftward adjustment

3

Upward/Rightward adjustment

4

Confirm

The default language of the display is English. You can change the language in More
settings
 > Language, as well as configure other settings.

If you do not perform any operation within a period of time, the Settings menu is
automatically closed.

Functions in the Settings menu

Adjusts specifications such as screen brightness and contrast.

Selects a video input signal.

5

Summary of Contents for AD80

Page 1: ...User Guide ...

Page 2: ...Contents About this guide Appearance Installing the display Connects the display to the tower Configuring the display FAQs Safety information Legal Notice i ...

Page 3: ...hase them separately The functions described in this document can only be used when they are used together with other components The figures and UIs in this document may be different from the actual ones All figures are for reference only Symbols and definitions Highlights important information and tips and provides additional information Indicates potential problems that may arise such as damage ...

Page 4: ...cator Turns the display on and off The indicator is steady white when the device is powered on The indicator turns off when the device is powered off The indicator flashes white in sleep mode 6 Power port Connects the power adapter for turning on the display 7 HDMI port Connects to an HDMI input device such as a tower 8 VGA port Connects to a VGA input device such as a tower 2 ...

Page 5: ...ameplate on the rear side of the display panel 2 Use screws to connect the base to the support 3 Tilt and insert the upper end of the base support into the slot at the rear of the display and then press the base support downwards until you hear a clicking sound which indicates that the base support has been installed correctly To remove the base find the button above the port at the rear of the di...

Page 6: ...able to the display and connect the power supply 4 Power on the tower and display If images are displayed on the display it indicates that the installation is successful If no image is displayed on the display see the FAQs chapter 5 Adjust the pitch angle of the display as required To ensure the optimal performance of the display you are advised to turn off the display when it is not used for a lo...

Page 7: ...isplay settings menu 2 On the settings menu screen press buttons 1 to 4 to set the parameters 1 Exit Back 2 Downward Leftward adjustment 3 Upward Rightward adjustment 4 Confirm The default language of the display is English You can change the language in More settings Language as well as configure other settings If you do not perform any operation within a period of time the Settings menu is autom...

Page 8: ...screen color temperature to low blue light mode to prevent eye fatigue and make it easier on your eyes Once Blue light mode is enabled the screen will take on a mild yellow tint Adjusts the display settings such as the display mode Selects the display scenario More settings such as language menu transparency and reset settings Configuring the display 6 ...

Page 9: ...ble is damaged If the preceding issues do not occur restart the display and the tower then check whether the images can be properly displayed on the screen The screen is too dark or too bright Open the settings menu on the display and adjust the screen brightness and contrast If the keyboard comes with the and keys you can use them to adjust the screen brightness The screen color is abnormal Check...

Page 10: ...ur device and remove all cables connected to it to protect against lightning strikes Do not use your device during thunderstorms to protect your device against any danger caused by lightning Ideal operating temperatures are 0 C to 40 C Ideal storage temperatures are 20 C to 60 C Extreme heat or cold may damage your device or accessories To protect your device or accessories from fire or electrical...

Page 11: ...apter with wet hands Doing so may lead to short circuits malfunctions or electric shocks Cleaning and maintenance Keep the device and accessories dry Do not attempt to dry it with an external heat source such as a microwave oven or hair dryer Do not expose your device or accessories to extreme heat or cold These environments may interfere with proper function and may lead to fire or explosion Avoi...

Page 12: ...ice or visit the website https consumer huawei com en Reduction of hazardous substances This device and its electrical accessories comply with local applicable rules on the restriction of the use of certain hazardous substances in electrical and electronic equipment such as EU REACH regulation RoHS and Batteries where included directive For declarations of conformity about REACH and RoHS please vi...

Page 13: ...CONTENTS OF THIS MANUAL ARE PROVIDED AS IS EXCEPT AS REQUIRED BY APPLICABLE LAWS NO WARRANTIES OF ANY KIND EITHER EXPRESS OR IMPLIED INCLUDING BUT NOT LIMITED TO THE IMPLIED WARRANTIES OF MERCHANTABILITY AND FITNESS FOR A PARTICULAR PURPOSE ARE MADE IN RELATION TO THE ACCURACY RELIABILITY OR CONTENTS OF THIS MANUAL TO THE MAXIMUM EXTENT PERMITTED BY APPLICABLE LAW IN NO EVENT SHALL HUAWEI BE LIABL...

Page 14: ...nsumer huawei com privacy policy For More Help Visit https consumer huawei com en support for the most up to date contact information for your country or region ALL PICTURES AND ILLUSTRATIONS IN THIS GUIDE INCLUDING BUT NOT LIMITED TO THE DEVICE COLOR SIZE AND DISPLAY CONTENT ARE FOR YOUR REFERENCE ONLY THE ACTUAL DEVICE MAY VARY NOTHING IN THIS GUIDE CONSTITUTES A WARRANTY OF ANY KIND EXPRESS OR ...

Reviews: