AP7052DN&AP7152DN
Hardware Installation and Maintenance Guide
2 AP Installation
Issue 01 (2017-12-29)
Huawei Proprietary and Confidential
Copyright © Huawei Technologies Co., Ltd.
17
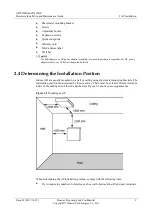
2.
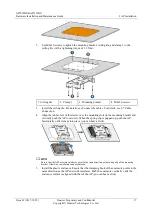
Use M4x30 screws to tighten the mounting bracket, ceiling tile, and clamp 1 to the
ceiling tile (with a tightening torque of 1.2 Nm).
1. Ceiling tile
2. Clamp 1
3. Mounting bracket
4. M4x30 screws
3.
Install the ceiling tile. For details, see Connect the cables. For details, see 2.7 Cable
Connection.
4.
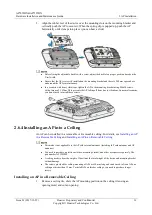
Align the rubber feet of the device over the mounting slots on the mounting bracket and
vertically push the AP to secure it. When the spring clip is popped up, push the AP
horizontally until it snaps into place (you can hear a click).
Ensure that the AP's network interfaces point to the same direction as the spring clip of the mounting
bracket. Otherwise, installation cannot continue.
5.
Install the plastic enclosure. Ensure that the clamping hook of the enclosure points to the
same direction as the AP's network interfaces. Push the enclosure vertically until the
enclosure surface is aligned with that of the AP (you can hear a click).

