background image

4


Configuring Network Access Parameters 

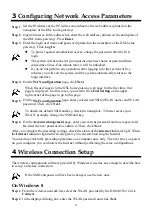
Step 1


Set the IP address of the PC in the same subnet as the web address (printed on the 

nameplate of the DSL home gateway). 

Step 2


Open a browser. In the address bar, enter the web address (printed on the nameplate of 

the DSL home gateway). Press 

Enter

Step 3


Enter the login user name and password (printed on the nameplate of the DSL home 

gateway). Click 

Log In


To protect against unauthorized access, change the password after the first 

login.  


The system will be locked if you input incorrect user name or password three 

consecutive times. One minute later, it will be unlocked. 


If you do not perform any operations after logging in to the system for five 

minutes you will exit the system and the system automatically returns to the 

login interface. 

Step 4


On the 

WAN configuration

 page, click 

Next


When the user logs in to the DSL home gateway web page for the first time, this 

page is displayed. In other cases, you need to click 

Fast Setting

 on the upper 

right corner of the page to go to this page. 

Step 5


On the 

Wi-Fi configuration

 page, enter your desired SSID (WLAN name) and WLAN 

password. Then, click 

Next


To obtain the default SSID and key, check the nameplate. To better secure your 

WLAN, promptly change the SSID and key. 

Step 6


On the 

Account management

 page, enter your current password and a new password. 

Re-enter the new password to confirm it. Then, click 

Next

After you complete the preceding settings, check the status of the 

Internet

 indicator light. When 

the 

Internet

 indicator light turns steady green, you can start browsing the Internet.  

You need to perform the preceding operations on a computer once only. The next time you power 

on your computer, you can browse the Internet without performing the same configurations. 

Wireless Connection Setup 

The wireless configuration software provided by Windows is used as an example to describe how 

to set up a wireless connection. 


If the SSID and password have been changed, use the new ones.


On Windows 8 

Step 1


From the wireless network list, select the WLAN provided by the DG8245W2. Click 

Connect

Step 2


In the displayed dialog box, enter the WLAN password and click 

Next

Summary of Contents for DG8245W2

Page 1: ...DG8245W2 Home Gateway Pika aloitusopas 96725991_01 ...

Page 2: ...imellä varustettu datarasia RJ 11 Perinteiseen puhelinrasiaan kytkettäessä käytä mukana tullutta kolmipiikkistä sovitinta Kytke laitteet seuraavan kuvan osoittamassa järjestyksessä 1 Modeemi 2 Puhelimen seinäpistoke 3 Pöytätietokone 4 Verkkolaite 5 Älypuhelin 6 Taulutietokone 7 Kannettava tietokone Huomautus Jos käytät lankapuhelinta tarvitset DSL ylätaajuussuotimen Kaikki asunnossa olevat lankapu...

Page 3: ...jakamon internet datapistorasiasta verkkokaapelilla laitteen WAN liittimeen Laite voidaan sijoittaa asunnon kotijakamoon tai vaihtoehtoisesti huoneeseen jos kotijakamossa yhteys on jatkettu verkkokaapelilla huonerasiaan Ota tarvittaessa yhteys isännöitsijään 1 Modeemi 2 Nousukaapelin liitin kotijakamossa tai datapistorasia huoneessa 3 Pöytätietokone 4 Verkkolaite 5 Älypuhelin 6 Taulutietokone 7 Ka...

Page 4: ...orttiin ei ole kytketty verkkokaapelia DSL linjaa ei ole aktivoitu Modeemi on siltaavassa tilassa WLAN Vihreä valo WLAN on aktiivinen mutta dataa ei siirretä Vilkkuva vihreä valo WLAN on aktiivinen ja dataa siirretään Vilkkuu 2 kertaa sekunnissa Modeemi yrittää yhdistää laitteeseen WLAN lla käyttäen WPS toimintoa WLAN valo vilkkuu 120s Vilkkuu yhden kerran sekunnissa Valo ei pala WLAN on poistettu...

Page 5: ... Lähiverkon kautta tulevalle liikenteelle laite suorittaa NAT muunnoksen IPv4 NAT muunnoksen vuoksi jotkin palvelut kuten laitteeseen kytketyt valvontakamerat tai pelikonsolit voivat vaatia porttiohjausten tekemistä Tarkista vaatimukset kytkemäsi tuotteen oppaasta 4 Langattoman yhteyden asetukset Laite luo oletuksena kaksi WLAN verkkoa jotka ovat salausavaimella suojattuja Verkkojen tiedot löydät ...

Page 6: ...lle ensimmäistä kertaa näet ohjattu määritys sivun Muissa tapauksissa sinun tulee painaa Nopea asetus sivun oikeassa yläreunassa päästäksesi tälle sivulle 5 Laitteen hallinta Hallintasivun salasanan vaihtaminen Hallintasivulle kirjautumiseen vaaditaan käyttäjätunnus ja salasana Hallintasivun salasanan vaihtaminen säännöllisesti auttaa tehokkaasti estämään luvattomia käyttäjiä kirjautumasta ja muut...

Page 7: ...DG8245W2 Home Gateway Quick Start ...

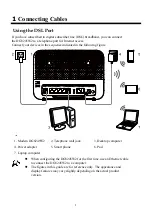
Page 8: ...equence indicated in the following figure 1 Modem DG8245W2 2 Telephone wall jack 3 Desktop computer 4 Power adapter 5 Smart phone 6 Pad 7 Laptop computer When configuring the DG8245W2 for the first time use an Ethernet cable to connect the DG8245W2 to a computer The figures in this guide are for reference only The appearance and display features may vary slightly depending on the actual product ve...

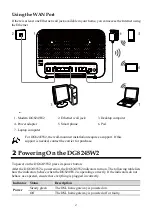
Page 9: ...this support is needed contact the carrier for purchase 2 Powering On the DG8245W2 To power on the DG8245W2 press its power button After the DG8245W2 is powered on the DG8245W2 indicators turn on The following table lists how the indicators behave when the DG8245W2 is operating correctly If the indicators do not behave as expected ensure that everything is plugged in correctly Indicator Status Des...

Page 10: ...e WPS function The WLAN indicator blinks for 120s Blinks once per second Off The WLAN function is disabled WAN Steady green The WAN port is connected to a network cable Off The WAN port is not connected to a network cable LAN1 LAN4 Steady green The LAN port is connected to an Ethernet device such as a computer with a network cable but no data is being transmitted Green blinking The LAN port is con...

Page 11: ...n the upper right corner of the page to go to this page Step 5 On the Wi Fi configuration page enter your desired SSID WLAN name and WLAN password Then click Next To obtain the default SSID and key check the nameplate To better secure your WLAN promptly change the SSID and key Step 6 On the Account management page enter your current password and a new password Re enter the new password to confirm ...

Page 12: ...utton for more than 6 seconds then the user name and password of the web management page will back to factory value This operation will make your own configuration data lost please perform this operation with caution Changing Your WLAN Name and Password WLAN access requires the WLAN name and password When the DG8245W2 is delivered the wireless network name and password are preset To improve your W...

Reviews: