background image


HUAWEI


EC306


User


Guide


Summary of Contents for EC306

Page 1: ...HUAWEI EC306 User Guide ...

Page 2: ...cations 5 Inserting a microSD Card 6 Using the device Installation Procedure for Windows XP Installation Procedure for Mac OS Installation Procedure for Linux 25 7 Activation of Tata Photon Max Services 34 8 Services that you can enjoy with Tata Photon Max 9 Troubleshooting 10 Care and Maintenance 11 Warnings and Precautions ...

Page 3: ...operation of your SB Data Modem We recommend that you read this user manual carefully to ensure optimal erformance U p 2 System Requirements Laptops as well as Desktops Tat Modem works with Th ents are as follows a Photon Max USB e system requirem PC with USB Port Hardware configur ing systems ation should satisfy the demand of any of the following operat o Windows XP SP2 SP3 Windows Vista SP1 SP2...

Page 4: ... GHz or faster 1GB Windows 7 1GHz or faster 1 GB 32 bit or 2 GB 64 bit MAC OS 10 4 PowerPC G3 G4 or G5 256 MB MAC OS 10 5 Intel PowerPC G4 or G5 aster 867 MHz and f 512 MB MAC OS 1 6 0 Intel Processor 1GB Note If your PC has lower configuration the performance of your device may be lower ...

Page 5: ...d on Green blinking once every 0 2s The software of the USB Stick is being upgraded ing Green blinking once every 2s The USB Stick is register with a Tata Photon Whiz network Green solid The USB Stick is transmitting data on Tata Photon Whiz network ing Blue blinking once every 2s The USB Stick is register with a Tata Photon Plus or Tata Photon Max network nsmitting data on Tata Blue solid The USB...

Page 6: ...iz 153 6 Kbps 153 6 Kbps Actual internet speed would depend on multiple factors like time of day number of simultaneous users web pages accessed etc This connection will work on speeds up to 6 2 Mbps wherever Tata Photon Max coverage is available In regions where Tata Photon Max coverage is not available the connection will work on Tata Photon Plus speeds 3 1 Mbps depending on the availability of ...

Page 7: ...USB Stick y wing figure 2 Slide the card holder down to unlock it and then lift it up gentl t as shown in the follo up to lock it in place 3 Insert the microSD card into the card slo 4 Close the card holder and slide the holder 5 Replace the cover and slide it into place ...

Page 8: ...t operating systems the installation process is different Please note the process for the following Operating Systems Installation Procedure for Windows XP 1 Connect the USB Modem with PC Connect the USB Modem with your PC via USB port ...

Page 9: ... it will pop up an installation interface If not please go to the CD as shown in the figure below and open it and double click the AutoRun exe file or right click and click on Auto play Please refer to the following screenshots for the further steps of installation ...

Page 10: ...license agreement click I Agree Click Next and then choose a location path for installation and click Install In case you do not have any specific location preference you may choose to continue with the default location and click Install 8 ...

Page 11: ...9 ...

Page 12: ...o install an application called Tata Photon TV is an application which will enable you to watch Live TV Online anytime anywhere Y This o subscribe please visit the website Setup will only install the application on your system T http www tataphoton com tata photon photontv aspx 10 ...

Page 13: ...ick on the icon Tata Photon Max As soon as the installation is complete the default dialer will appear as follows 1 Please click on the Continue button On clicking the button the dialer appears as follows Click on the Activate button as shown in the below figure ...

Page 14: ...he services th O Prepaid Postpaid option depending o at you wish to opt for ently scratch the silver strip on the Activation card you have received with the kit to t PIN En digit PIN number in text box below Enter PIN G reveal your 14 digi ter your 14 Please click on the Activate button ...

Page 15: ...13 3 On clicking the Activate button the following screen appears The moving bars indicate that the activation is in progress ...

Page 16: ...activation is successful you will see the following screen 5 Once activation is successful and OK button is pressed the following screen appears Please enter your 10 digit TATA Photon Number which will be available on the Activation card in the Starter Kit ...

Page 17: ...6 15 Click on the Connect button and start surfing ...

Page 18: ...ps needs t 1 In case activation is unsuccessful you will see the following prompt 2 Please click on the OK button The following screen will appear Please click on the Activate button as shown in the below figure Please repeat the same sequence as stated above to continue 16 ...

Page 19: ...edures ull it out ol panel 2 Remove the device from the system then p 3 Open Add Remove program in the contr 4 Accord the prompt finish un installation Installation Procedure for Mac OS 1 Connect the USB Modem with PC Connect the USB Modem with your PC via the USB port ...

Page 20: ...18 2 Install the Dialer Driver Insert the device into computer Double click icon of Tata Photon Max Please click Continue to start the installation ...

Page 21: ...19 Read the Software License Agreement then click Continue Click Agree to accept the license agreement ...

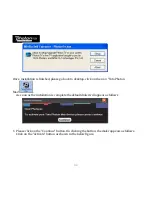
Page 22: ...Click Install 20 Then enter your laptop s password when pop up window appears ...

Page 23: ...When installation is successful click on the Close button 21 ...

Page 24: ...n is complete the following dialer appears 1 As soon as the installation is complete the following screen appears Please enter your 10 digit TATA Photon Number which will be available on the Activation Card in the Starter Kit ...

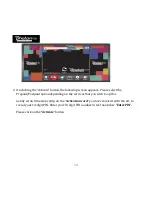
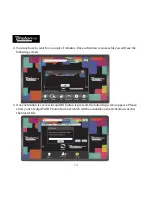
Page 25: ...2 23 The default dialer will appear as follows ...

Page 26: ...3 24 Click on the Connect button and start surfing U 1 n oftware installation of Application S Exit Management procedures Open uninstall Mobile Partner click OK OK 2 ...

Page 27: ...25 Installation Procedure for Linux 1 C Connect the USB Modem with PC onnect the USB Modem with your PC via USB port ...

Page 28: ...26 2 Install the Dialer Driver On inserting the modem double click Tata Photon Max and open the folder ...

Page 29: ...Open new terminal go to the path cd media Tata Photn Max Type the command sh install to install Tata Photon dialer and press enter 27 ...

Page 30: ...After pressing the Enter key you will get the below new terminal as shown below Please press E nter key again 28 ...

Page 31: ...on is complete the following dialer appears As soon as the installation is complete the following screen appears Please enter your 10 digit TATA Photon Number which will be available on the Activation Card in the Starter Kit ...

Page 32: ...The default dialer will appear as follows 30 ...

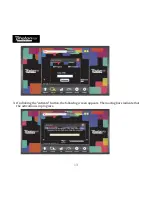
Page 33: ...Click on the Connect button and start surfing 31 ...

Page 34: ...32 U s n in tware tallation of Application Sof a Go to the installed path eg usr local Tata_Photon_Max as shown below ...

Page 35: ...33 b Type UninstallMobilePartner and press enter key will uninstall Tata Photon Max ...

Page 36: ...age limit of 100 MB Download Upload will be provided This usage will be adjusted against your bundled usage in subsequent bills and will be not free After 72 hours activation of connection will be subject to verification of completed CAF Customer Application Form TEF Tariff Enrollment Form and other ddress and credit verification failing refund will be made necessary documents as well as satisfact...

Page 37: ...es of Photon customers A to b My Account Self Care Portal ton com myaccount aspx URL www tatapho as email id and contact number Update profi View usage le details such details se Session wi Peak Off peak View Unbilled amount Previous usage history Make online payments Maintain e bill for 6 months for quick reference c Website www tataphoton com et access to all the information re wnload User Manua...

Page 38: ... If not please check whether you can see the CD Tata Photon Max from My Computer If so then eject the CD Cannot search signal from Dialer tool Please check whether the number you used is activated or not Please contact operator whether the parameters are configured correctly Cannot connect to internet by Dialer tool Please check whether it can search signal by whether the Modem Dialer first Please...

Page 39: ... card and make sure the capacity and format is correct PC not able to detect Device Change to another USB Port or if the prob still exists please contact local Operator lem Firewall Security Alert appears during Connection Device must be allowed to connect through your firewall Please contact the vendor of your firewall software In order to work correctly After restarting the computer there is no ...

Page 40: ...ture Do not store the radio card in cold areas When it warms up to its normal te moisture can form inside which may damage electronic circuit boards rds Do not attempt to open the radio card Non expert handling may damage it break internal circuit boa Do not drop knock or shake the radio card Rough handling can Do not use harsh chemicals cleaning solvents or strong detergents to clean the radio ca...

Page 41: ...ot use your device in any area with a potentially explosive atmosphere and comply with all signs and instructions Areas that may have potentially explosive atmospheres include the areas where you would normally be advised to turn off your vehicle engine Triggering of sparks in such areas could cause an explosion or a fire resulting in bodily injuries or even deaths Do not use your device at refuel...

Page 42: ...laces with magnetic fields Otherwise it may result in malfunction of the circuit ny On a stormy day with thunder do not use your device when it is being charged to prevent a danger caused by lightning s a la ers privacy While using the device observe the local law nd regu tions and respect oth and legal rights Keep the ambient temperature between 10 to 45 for using the device Safety of Children Co...

Page 43: ...ansmitter and receiver It is designed not to exceed the limits for exposure to radio waves recommended by international guidelines These guidelines are developed by the independent scientific organization International Commission on Non Ionizing Radiation Protection ICNIRP and include safety margins designed to assure the protection of all persons regardless of age and health The guidelines use a ...

Page 44: ...U Registration Evaluation Authorisation and Restriction of Chemicals REACH Regulation Regulation No 1907 2006 EC of the European Parliament and of the Council and the EU Restriction of Hazardous Substances RoHS Directive Directive 2002 95 EC of the European Parliament and of the Council For more information about the REACH compliance of the device visit the Web site www huaweidevice com certificat...

Page 45: ...len nyilatkozaton keresztül a Huawei Technologies Co Ltd kijelenti hog megfelel az EC 5 1999 Irányelv összes lényeges követelményének és vonatkozó előírásá Gaeilge Fograíonn Huawei Technologies Co Ltd leis seo go bhfuil an fheiste seo i gcomhlíonadh leis na fíor riachtanais agus na forálacha eile maidir le Treoir 1999 5 AE Italiano o Col presente documento Huawei Technologies Co Ltd dichiara che q...

Page 46: ...ugimi ustreznimi določbami Direktive 1999 5 ES Español Europeo Con el presente documento Huawei Technologies Co Ltd declara que este dispositivo cumple con los requisitos esenciales y con las demás disposiciones correspondientes de la Directiva 1999 5 CE enska Huawei Technologies Co Ltd förklarar härmed att denna produkt överensstämmer Sv med de grundläggande kraven och andra relevanta föreskrifte...

Reviews: