11
Installing HS8245W
Quick Installation HS8245W
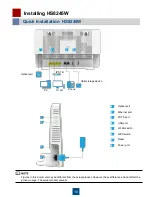
Step 1:
Use an optical fiber to connect the optical port on the ONT and the optical port on the wall.
Step 2:
Use a network cable to connect the
LAN
port to a PC or the Ethernet port on the IP STB.
Step 3:
Use a phone line to connect the
TEL
port to a phone or fax machine.
Step 4:
Use a power adapter to connect the
POWER
port to the power socket.
Step 5:
Use a USB data cable to connect the
USB
port to the USB storage device.
Step 6:
Press the
ON/OFF
power switch.
Step 7:
Press the
WLAN
switch to enable the Wi-Fi access function. By default, this function is enabled.
Step 8:
Press the
WPS
switch to enable the WPS encryption function.
1.The type of the optical connector connected to the optical port in the all is determined by practical conditions.
2.To ensure normal use of fibers, make sure that the fiber bend radius is larger than 30 mm.
The preceding figure connects the power adapter as an example. When connecting the backup battery unit,
please see the usage guide to the backup battery for details
.
Configuring Wi-Fi Parameters
Step 1:
Choose the
WLAN
tab and choose
2.4G Basic Network Settings
. (If you want to configure 5G Wi-Fi,
choose
5G Basic Network Settings
.)
Step 2:
In the pane, select
the Enable WLAN option
box. In the dialog box that is displayed, set the basic
Wi-Fi parameters, including the SSID, authentication mode, and encryption mode.
Step 3:
Click
Apply.
-SSID: See the nameplate on the device. SSID indicates the name of a wireless network searched
by the Wi-Fi terminal.
-WPA PreSharedKey: See the nameplate on the device. WPA PreSharedKey indicates the
authentication password for the Wi-Fi terminal to access a wireless network
.


