background image

5.


Click 

OK

 to close the dialog box, and then close the 

Computer 

Management

 window. 

Step 3


Configure the wireless network connection on your computer. 
1.


Choose 

Start

 > 

All Programs

 > 

Accessories

 > 

Communications

 > 

Network Connections

2.


In the 

Network Connections

 window, right-click 

Wireless Network 

Connection

 to display a shortcut menu, and then select 

View Available 

Wireless Networks

 from the shortcut menu. 

3.


In the 

Wireless Network Connection Properties

 dialog box, select 

Wireless Networks

4.


Select 

Use Windows to configure my wireless network settings

5.


Click 

View Wireless Networks

6.


In the Wireless Network Connection dialog box, select the WLAN with 
the same name that is configured in Step 1, and then click 

Connect

 in the 

lower right corner of the window. 

7.


In the displayed dialog box, enter the access password that is preset in 
Step 1, and then click 

Connect

After the password is authenticated, Connected is displayed in the upper right 
corner of the WLAN icon in the WLAN list, indicating that a wireless 
connection is set up between you PC and the HG622. 
8.


Close the 

Wireless Network Connection

 dialog box. 

9.


In the

 Wireless Network Connection


Properties

 dialog box, click 

OK

Basic Configuration 

5.1 

 Changing the Administrator Password 

For safety reasons or to make the password easy to remember, you can change the 
administrator password for login after logging in to the Web-based configuration 
utility. 
To change the password, do as follows: 

Step 1


Log in to the Web-based configuration utility. 

Step 2


Choose 

Maintenance

 > 

Account

 in the navigation tree to display the system 

management page. 

Step 3


Select 

admin

 from the 

User name

 drop-down combo box. 

Step 4


Enter the 

Current password

 and the 

New password

. Then enter the new 

password again in the 

Confirm password

 text box for confirmation. 

12 

Summary of Contents for HG622

Page 1: ...HUAWEI HG622 Home Gateway User Guide HUAWEI TECHNOLOGIES CO LTD ...

Page 2: ... Ltd provides customers with comprehensive technical support and service Please feel free to contact our local office or company headquarters Huawei Technologies Co Ltd Address Huawei Industrial Base Bantian Longgang Shenzhen 518129 People s Republic of China Website http www huawei com Email terminal huawei com ...

Page 3: ...ted or may be limited by local network operators or network service providers Thus the descriptions herein may not exactly match the product or its accessories you purchase Huawei Technologies Co Ltd reserves the right to change or modify any information or specifications contained in this manual without prior notice or obligation NO WARRANTY THE CONTENTS OF THIS MANUAL ARE PROVIDED AS IS EXCEPT A...

Page 4: ...he HSPA uplink 7 3 2 Configuring the DSL uplink 8 4 Configuring the Wireless Network Connection 10 5 Basic Configuration 12 5 1 Changing the Administrator Password 12 5 2 Enabling or Disabling the Wireless Network Function 13 5 3 Changing the Wireless Network Name and the Access Password 13 5 4 Changing the Login IP Address 14 5 5 Downloading Files Through the USB Port 14 5 6 Restoring Default Set...

Page 5: ...7 2 Interfaces and Buttons 21 7 3 Default Settings 22 7 4 Technical Specifications 22 ii ...

Page 6: ...onnect it from the power supply Ensure that your hands are dry during operation z Keep the device far from sources of heat and fire such as a heater or a candle z Keep the device far from electronic appliances that generate strong magnetic or electric fields such as a microwave oven or a refrigerator z Place the device on a stable surface z Place the device in a cool and well ventilated indoor are...

Page 7: ...t or symbols z Do not store or transport the device in the same box as inflammable liquids gases or explosives Accessory Requirements z Use only the accessories supplied or authorized by the device manufacturer Otherwise the performance of the device may get affected the warranty for the device or the laws and regulations related to telecommunications terminals may become null and void or an injur...

Page 8: ...ly power it off remove all the cables connected to it and then contact an authorized service center z Do not trample pull or overbend any cable Otherwise the cable may get damaged causing malfunction of the device z Before cleaning the device stop using it power it off and then remove all the cables connected to it z Use a clean soft and dry cloth to clean the device shell Do not use any cleaning ...

Page 9: ...only and if you do not need to use the cables a telephone take the following figure as a reference for connecting 1 2 3 DSL LAN4 LAN3 LAN2 LAN1 RESET POWER 1 Telephone jack on the wall 2 Computer 3 Power adapter If the wireless network function is used on the HG622 for the network access you do not need to connect the cables 4 ...

Page 10: ...h the broadband network access and a telephone connection take the following figure as a reference for connecting the cables 1 4 5 PHONE MODEM LINE 2 3 DSL LAN4 LAN3 LAN2 LAN1 RESET POWER 1 Telephone jack on the wall 2 Splitter 3 Telephone 4 Computer 5 Power adapter 5 ...

Page 11: ...ephone connections and fax connections take the following figure as a reference for connecting the cables 1 4 5 PHONE MODEM LINE 2 3 DSL LAN4 LAN3 LAN2 LAN1 RESET POWER 1 6 7 7 8 3 1 Telephone jack on the wall 2 Splitter 3 Telephone 4 Computer 5 Power adapter 6 T connector 7 Microfilter 8 Fax machine 6 ...

Page 12: ...k To create a HSPA uplink connection do as follows Step 1 Log in to the Web based configuration utility 1 Launch the Internet Explorer on your computer Enter http 192 168 1 1 in the address bar and then press Enter 2 In the displayed dialog box enter the user name and the password and then click Login By default both the user name and the password are admin After the user name and the password are...

Page 13: ...install any special dial up software on your computer or perform dial up operations on your computer To configure the HG622 and your computer for the network access do as follows Step 1 Log in to the Web based configuration utility of the HG622 Step 2 Configure the ATM PVC 1 In the navigation tree choose Basic ATM 2 Enter VPI VCI provided by the Internet Service Provider ISP 3 Select EoA from the ...

Page 14: ...p Software on the HG622 Note that Bridge is selected from the Connection mode drop down list box Step 2 Install and configure the PPP dial up software on your computer The PPP dial up software is pre installed on certain computer operating systems To create a dial up connection do as follows taking the Windows XP operating system as an example 1 Choose Start All Programs Accessories Communications...

Page 15: ... you can use the WPS function to set up a wireless connection between your PC and the HG622 quickly To set up a wireless connection do as follows Step 1 Enable the wireless network function and set the wireless network name and access password of the HG622 do as follows taking the authentication type WPA PSK as an example 1 Log in to the Web based configuration utility of the HG622 2 In the naviga...

Page 16: ...less connection between your PC and the HG622 manually do as follows Step 1 Enable the wireless network function and set the wireless network name and access password of the HG622 1 Log in to the Web based configuration utility 2 In the navigation tree on the left of the Web based configuration utility choose Basic WLAN 3 Select the Enable WLAN option 4 Enter a wireless network name in the SSID te...

Page 17: ...ccess password that is preset in Step 1 and then click Connect After the password is authenticated Connected is displayed in the upper right corner of the WLAN icon in the WLAN list indicating that a wireless connection is set up between you PC and the HG622 8 Close the Wireless Network Connection dialog box 9 In the Wireless Network Connection Properties dialog box click OK 5 Basic Configuration ...

Page 18: ... the wireless network function press and hold the WLAN button for over one second and then release the button You can disable the wireless network function in the same way The WLAN indicator shows whether the wireless network function is enabled In addition you can enable or disable the wireless network function through the Web based configuration utility To enable or disable the wireless network ...

Page 19: ...re that the IP address of the computer is in the same network segment as that of the HG622 so that the computer can access the Web based configuration utility 5 5 Downloading Files Through the USB Port After a portable storage device is connected to the USB port on the rear panel of the HG622 you can configure the HG622 as a File Transfer Protocol FTP client Through the HG622 the files on the FTP ...

Page 20: ...assword that are admin 6 FAQs How can I quickly enable or disable the wireless network function Press and hold the WLAN button for over one second and then release the button to enable or disable the wireless network function The WLAN indicator shows whether the wireless network function is enabled How can I quickly restore the default settings of the terminal To restore the default settings press...

Page 21: ...ato network operator Check whether the LAN indicator of the terminal is on If the LAN indicator is off perform further checks as follows 1 Ensure that the network adapter of the computer is enabled Ensure that the network cable between the terminal and the computer is properly connected Remove and then in replace the network cable when necessary If the LAN indicator is still off contact an authori...

Page 22: ...3 In the Internet Options dialog box click the Connections tab 4 In the Local Area Network LAN settings group box click LAN Settings In the Proxy server group box of the Local Area Network LAN Settings dialog box ensure that the Use a proxy server for your LAN These settings will not connections check box is cleared Try to access multipl these Web sites If the term provider What can I do if Web pa...

Page 23: ...e affected if radio si too many obstacles such as cement or woode Place your computer close to your terminal If your co affected Step 4 Place your terminal and computer in another direction Step 5 Do not use your terminal to access the WLAN during thunderstorms After a broadband terminal is installed does Internet access degrade call quality or do telephone calls lower the Internet access rate No ...

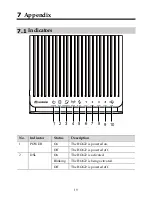
Page 24: ...AN WPS LAN1 LAN2 LAN3 LAN4 USB 2 3 4 5 6 7 8 9 10 1 No Indicator Status Description On The HG622 is powered on 1 POWER Off The HG622 is powered off On The HG622 is activated Blinking The HG622 is being activated 2 DSL Off The HG622 is powered off 19 ...

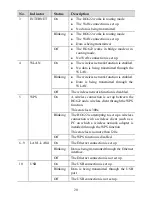
Page 25: ...AN 4 WLAN Off The wireless network function is disabled On A wireless connection is set up between the HG622 and a wireless client through the WPS function This state lasts 300s Blinking The HG622 is attempting to set up a wireless connection with a wireless client such as a PC on which a wireless network adapter is installed through the WPS function This state lasts no more than 120s 5 WPS Off Th...

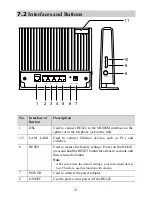
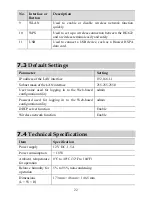
Page 26: ...the wall 2 5 LAN1 LAN4 Used to connect Ethernet devices such as PCs and switches 6 RESET Used to restore the factory settings Power on the HG622 press and hold the RESET button for at least 6 seconds and then release the button Note After you restore the default settings your customized data is lost Therefore use this function with caution 7 POWER Used to connect the power adapter 8 ON OFF Used to...

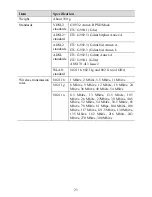
Page 27: ...N interface 192 168 1 1 Subnet mask of the LAN interface 255 255 255 0 User name used for logging in to the Web based configuration utility admin Password used for logging in to the Web based configuration utility admin DHCP server function Enable Wireless network function Enable 7 4 Technical Specifications Item Specification Power supply 12 V DC 1 5 A Power consumption 18 W Ambient temperature f...

Page 28: ... Standards WLAN standard 802 11b 802 11g and 802 11n 2 4 GHz 802 11b 1 Mbit s 2 Mbit s 5 5 Mbit s 11 Mbit s 802 11g 6 Mbit s 9 Mbit s 12 Mbit s 18 Mbit s 24 Mbit s 36 Mbit s 48 Mbit s 54 Mbit s Wireless transmission rates 802 11n 6 5 Mbit s 13 Mbit s 13 5 Mbit s 19 5 Mbit s 26 Mbit s 27Mbit s 39 Mbit s 40 5 Mbit s 52 Mbit s 54 Mbit s 58 5 Mbit s 65 Mbit s 78 Mbit s 81 Mbps 104 Mbit s 108 Mbit s 11...

Page 29: ...HUAWEI TECHNOLOGIES CO LTD Huawei Industrial Base Bantian Longgang Shenzhen 518129 People s Republic of China www huawei com Part Number 202193 ...

Reviews: