background image


HUAWEI RP Series Telepresence Systems


V100R001C04


Install Guide


Issue 

01 

Date 

2013-10-18 


HUAWEI TECHNOLOGIES CO., LTD. 


Summary of Contents for RP Series

Page 1: ...HUAWEI RP Series Telepresence Systems V100R001C04 Install Guide Issue 01 Date 2013 10 18 HUAWEI TECHNOLOGIES CO LTD ...

Page 2: ...oducts services and features described in this document may not be within the purchase scope or the usage scope Unless otherwise specified in the contract all statements information and recommendations in this document are provided AS IS without warranties guarantees or representations of any kind either express or implied The information in this document is subject to change without notice Every ...

Page 3: ...mpetitors must bear full responsibility for all the consequences arising therefrom Symbol Conventions The symbols that may be found in this document are defined as follows Symbol Description Indicates a hazard with a high level or medium level of risk which if not avoided could result in death or serious injury Indicates a hazard with a low level of risk which if not avoided could result in minor ...

Page 4: ...ory Version Date Changed Section Description Author V1 0 2013 06 18 Released the first version Liu Guangxing Add new TCL TV boot delay mode setting instructions Maweifen Version Mapping Table RP system version Component Version TE30 TEX0 V100R001C01B013SP04 Distribution History Copy No Owner and Role Date 1 R D Test SERVICE 2013 05 06 ...

Page 5: ...1 3 1 Appearance 9 1 3 2 System Components 10 1 3 3 Product Features 10 1 4 RP200 55S 10 1 4 1 Appearance 10 1 4 2 System Components 11 1 4 3 Product Features 11 2 Deployment Preparation 12 2 1 Planning 12 2 2 Tools 13 2 3 Checking Devices 14 2 3 1 RP100 46S Device List 14 2 3 2 RP200 46S Device List 14 2 3 3 RP100 55S Device List 15 2 3 4 RP200 55S Device List 16 2 4 Checking Cables 16 2 5 Poweri...

Page 6: ... the Camera s Power Adapter 52 3 8 Troubleshooting 52 3 8 1 Unbalanced Rack 52 3 8 2 Tilted HD Display 53 3 8 3 Noise From the Power Adapter Bracket 54 4 Cable Connection 56 4 1 Cables 56 4 1 1 Attaching Cable Labels 56 4 1 2 Cable Connectors 57 4 2 Cabling 59 4 2 1 Cabling Rules 60 4 2 2 Cabling Connection Illustration 62 5 Soft Upgrade 63 5 1 Preparing for the Upgrade 63 5 1 1 Obtaining and Chec...

Page 7: ...ameters 88 7 5 1 Configuring Common Settings 88 7 5 2 Configuring Advanced Settings 89 7 6 Setting Network Parameters 90 7 6 1 Setting GK and SIP Parameters 90 7 6 2 Setting Network Address Book Parameters 93 7 7 Configuring Security Settings 95 7 8 Device Control 96 7 8 1 Setting Video Control Parameters 96 7 8 2 Setting Audio Control Parameters 96 7 9 Configuring the Address Book 98 7 9 1 Import...

Page 8: ...sue 01 Huawei Confidential 7 1 Product Overview 1 1 RP100 46S 1 1 1 Appearance Figure 1 1 shows the RP100 46S Figure 1 1 RP100 46S 1 1 2 System Components l TE30 HD videoconferencing endpoint l 46 inch display with speakers l Integrated support TV rack and equipment cabinet l M220 microphone ...

Page 9: ... the SiteCall function for conference initiation and conference control using a remote control on the UI designed by Frog l Support one presentation input and display the presentation in Picture in Picture PiP mode or split screen mode l Provide a physical button to mute the microphone 1 2 RP200 46S 1 2 1 Appearance Figure 1 2 shows the RP200 46S Figure 1 2 RP200 46S 1 2 2 System Components l TE30...

Page 10: ...for round table conferences with four to six participants l Provide a camera that supports PTZ l Support the SiteCall function and conference control using a remote control on the UI designed by Frog l Support one presentation input and display the presentation in PiP mode or split screen mode l Provide a physical button to mute the microphone 1 3 RP100 55S 1 3 1 Appearance Figure 1 3 shows the RP...

Page 11: ...ocket PDU 1 3 3 Product Features l Be highly integrated neat and movable l Support for round table conferences with four to six participants l Provide a camera that supports PTZ l Support the SiteCall function and conference control using a remote control on the UI designed by Frog l Support one presentation input and display the presentation in PiP mode or split screen mode l Provide a physical b...

Page 12: ...equipment cabinet l M220 microphone l 5 socket PDU 1 4 3 Product Features l Be highly integrated neat and movable l Support for round table conferences with four to six participants l Provide a camera that supports PTZ l Support the SiteCall function and conference control using a remote control on the UI designed by Frog l Support one presentation input and display the presentation in PiP mode or...

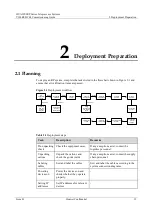
Page 13: ...ing feedback to the supply chain Setting IP addresses Installing devices Placing devices Connecting devices Configuring system settings Upgrading the system Adjusting video quality Verifying the system Table 2 1 Deployment steps Task Description Remarks Pre unpacking check Check the equipment cases If any exceptions exist contact the logistics personnel Unpacking cartons Unpack the cartons and che...

Page 14: ...ables System upgrade Upgrade relevant devices Configuring system settings Setting parameters according to relevant chapters Adjusting video quality Configure video devices 2 2 Tools Table 2 2 Tools Tool Illustration Model and Specifications Function Phillips screwdriver PH2 Used to install mechanical parts Flat head screwdriver Used to secure cables connected to the videoconferencing endpoint Alle...

Page 15: ... W 1 45 W 2 HD display H46F3500G AC 100 240 V 50 60 Hz 100 W 1 100 W 3 Micropho ne VPM220 2 W 1 2 W 4 Integrated support The display rack and equipment cabinet are included Total power consumption of the RP100 46S under standard configuration 147 W 2 3 2 RP200 46S Device List Table 2 4 Devices of the RP200 46S No Device Model Power Supply Single Device Power Consumption Quantity Total Power Consum...

Page 16: ...0 46S under standard configuration 247 W 2 3 3 RP100 55S Device List Table 2 5 Devices of the RP100 55S No Device Model Power Supply Single Device Power Consumption Quantity Total Power Consumption Remarks 1 HD videoconf erencing endpoint TE30 AC 100 240 V 50 60 Hz 45 W 1 45 W 2 HD display H55F3500 G AC 100 240 V 50 60 Hz 130 W 1 130 W 3 Micropho ne VPM 220 2 W 1 2 W 4 Integrated support The displ...

Page 17: ...grated support The display rack and equipment cabinet are included Total power consumption of the RP200 55S under standard configuration 307 W standard components 2 4 Checking Cables Table 2 7 Cables of an RP system Type Description Part Number Quantity Remarks Customized cable TE30 composite cable 04050656 1 Standard cable provided with the TE30 Video cable VGA VGA cable 04050165 2 One piece is p...

Page 18: ... chain personnel Table 2 8 describes the devices need to be powered on for inspection and their qualification criteria Table 2 8 Devices to be powered on Device Qualification Criteria HD display The HD displays are powered on properly and HDMI and VGA video sources are displayed without artifacts HD videoconferencing endpoint The remote control UI of the videoconferencing endpoint is displayed on ...

Page 19: ... power switch on the videoconference endpoint to ON so that the videoconferencing endpoint automatically starts after it is powered on Step 3 Log in to the videoconferencing endpoint s web interface By default both the user name and password are admin Figure 2 3 Login page Step 4 Choose System Settings Network IP and set the parameters The TE30 supports IPv4 and IPv6 Choose one based on the actual...

Page 20: ...ess Set this parameter based on the actual network environment Alternate DNS server IP address Set this parameter based on the actual network environment WAN LAN Network interface mode Auto detection Recommended value PPPoE Disable Recommended value IPv4 Connection type Static IP Recommended value Local IP address 200 51 25 55 Set this parameter based on the actual network environment Subnet mask ...

Page 21: ... one HD display as standard The RP200 46S comes with two HD displays as standard 46 indicates the size of an HD display in inches Table 3 1 HUAWEI RP C04 series telepresence systems Telepresence System Model Short Name HD Display ID Number of HD Displays HUAWEI RP100 46S RP100 46S or telepresence system 1 1 HUAWEI RP100 55S RP100 55S or telepresence system 2 1 HUAWEI RP200 46S RP200 46S or telepre...

Page 22: ...ods for the other telepresence system components remain similar You can find the mapping table for the HD display sizes and IDs on the horizontal bars of the mounting support Figure 3 2 Mapping table for HD display models and their IDs Unless otherwise specified the left and right sides mentioned in this document are the directions as you face the HD display Figure 3 3 and Figure 3 4 show the devi...

Page 23: ...ference only l The pre packaged installation tools can be found in the support packing case Table 3 2 Installation tools Name Illustration Quantity Specifications and Functions M10 open end wrench 1 Pre packaged with the telepresence system This wrench is used to adjust the wheel height M6 Allen wrench 1 Pre packaged with the telepresence system M8 Allen wrench 1 Pre packaged with the telepresence...

Page 24: ...re advised to prepare it for safety purposes 3 3 Installing the Rack There are two types of racks wheel and free standing The wheel rack is delivered for all models This document uses the wheel rack as an example 3 3 1 Removing Fasteners from the Packing Case Before unpacking the cartons clean up the installation site to protect the devices from being scratched Step 1 Remove the packing straps usi...

Page 25: ...ing Guide 3 Installation Issue 01 Huawei Confidential 24 Figure 3 5 Carton Step 4 Unpack the carton Then use an H6 Allen wrench to remove the four M8 hex socket screws from the top of the fasteners on the left and right of the packing case as shown in Figure 3 6 ...

Page 26: ... see the Standard Document to the Decoration of Huawei RP Series Telepresence Conference Room The rack is heavy At least two persons are required to hold and move it When lifting or moving the rack pay special attention to your safety Use one hand to hold the rack base and the other hand to hold one side of the rack as shown in Figure 3 7 Ask your partner to hold the rack in the same way on the ot...

Page 27: ...sue 01 Huawei Confidential 26 Figure 3 7 Holding and moving the rack End 3 3 2 Wheel Rack If the wheel rack is to be used you do not need to make any preparation for the installation The wheels are locked before delivery To move the rack toggle the wheel lock upward as shown in Figure 3 8 ...

Page 28: ...ide 3 Installation Issue 01 Huawei Confidential 27 Figure 3 8 Toggling the pulley lock 3 3 3 Free Standing Rack Step 1 Loosen the four wheels from the rack Step 2 Remove the wheels using an open end wrench Figure 3 9 Wheel End 3 4 Adjusting the Camera Mounting Bracket ...

Page 29: ... holes corresponding to the HD display size with the rack fixing holes l If you are using a 46 inch HD display align the holes silk screened with 1 and 1 2 T with the rack fixing holes as shown in Figure 3 10 l If you are using a 55 inch HD display align the holes silk screened with 1 2 T and 2 T with the rack fixing holes Figure 3 10 Adjusting the rack Step 2 Tighten the screws using a Phillips s...

Page 30: ...e that there are no obstacles or sharp items around the HD display l Assemble the HD display support first Then install the HD display on the support The HD display is too large for one person to lift When lifting the HD display ensure that you are doing so safely and with a correct lifting technique 3 5 1 Types of HD Display Supports Table 3 3 lists two types of HD display supports each supportin...

Page 31: ...UAWEI RP Series Telepresence Systems V100R001C04 Commissioning Guide 3 Installation Issue 01 Huawei Confidential 30 Figure 3 11 Single screen HD display support Figure 3 12 Dual screen HD display support ...

Page 32: ...d with 3 When using HD display 3 you do not need to adjust the support l The left and right sides of the dual screen HD display support are symmetrical Therefore the methods for adjusting the two sides are the same The following section uses the left side of the support as an example Step 1 Remove the screws and washers using an H5 Allen wrench Step 2 Partially tighten the screws at the HD display...

Page 33: ...n Issue 01 Huawei Confidential 32 Figure 3 13 Adjusting the HD display support End 3 5 3 Installing the RP100 HD Display Before installing the RP100 HD display remove the cables temporarily from the locations marked with a red circle shown in Figure 3 14 Keep the cables for later use ...

Page 34: ...ace the HD display on the cushion with its screen facing down Step 3 Remove the four screws on the back of the HD display using a Phillips screwdriver Step 4 Keep the direction of the arrows on the support pointing towards the top of the HD display Place the support on the rear of the HD display Step 5 Align the HD display holes with the holes silk screened with the number that matches the HD disp...

Page 35: ...les silk screened with 2 on the L and R bars Step 6 Fasten the four M6 x 20 socket head cap screws using an H5 Allen wrench to securely attach the support to the rear of the HD display as shown in Figure 3 15 Figure 3 15 Installing the support Before you move and lift an HD display ensure that all the screws on its support are securely fastened Step 7 Attach the HD display to the rack by fastening...

Page 36: ...able connections see the HUAWEI RP V100R001C04 Series Telepresence System Connection Diagrams End If the HD display tilts remove the HD display from the rack and place it on the cushion with its screen facing down Loosen the screws and adjust the horizontal bars If the HD display tilts to the left when you are facing the screen drag the right side of the horizontal bars downward as shown in Figure...

Page 37: ...es of the HD displays and set the power switches on the HD displays to ON l Before installing the RP200 HD displays temporarily remove the cables from the locations marked with a red circle shown in Figure 3 18 Keep the cables for later use Figure 3 18 Locations from which cables must be removed temporarily Step 2 Lay a soft cushion on the ground Place the two HD displays on the cushion in the sam...

Page 38: ... the screws at the joints of the HD displays based on the following If you are using 46 inch HD displays remove the six screws at the top joints of the HD displays as shown in Figure 3 19 If you are using 55 inch HD displays remove the eight screws at the top joints of the HD displays as shown in Figure 3 20 Figure 3 19 Installation positions of the connecting plates for 46 inch HD displays Figure...

Page 39: ...nce Systems V100R001C04 Commissioning Guide 3 Installation Issue 01 Huawei Confidential 38 Figure 3 21 Installing the connecting plates for 46 inch HD displays Figure 3 22 Installing the connecting plates for 55 inch HD displays ...

Page 40: ...with the holes silk screened with the number that matches the HD display model on the L and R bars as shown in Figure 3 24 l If you are using 46 inch HD displays align the HD display holes with the holes silk screened with 1 on the L and R bars l If you are using 55 inch HD displays align the HD display holes with the holes silk screened with 2 on the L and R bars Figure 3 24 Aligning supports Ste...

Page 41: ...nstalling the mounting components Step 10 Install the connecting bars on the left and right HD display supports as shown in Figure 3 26 Figure 3 26 Installing the connecting bars Step 11 Align the holes on the connecting bar with the holes on the horizontal bars of the supports Fasten the screws and washers as shown in Figure 3 27 ...

Page 42: ...R001C04 Commissioning Guide 3 Installation Issue 01 Huawei Confidential 41 Figure 3 27 Adjusting the connecting bars Step 12 Fasten the screws and washers to the connecting bars as shown in Figure 3 28 Figure 3 28 Fastening the connecting bars ...

Page 43: ...cable to the right HD display shown in Figure 3 29 For details about cable connections see the HUAWEI RP V100R001C04 Series Telepresence System Connection Diagrams Step 16 Mount the screws on the back of the HD displays into the corresponding holes on the rack as shown in Figure 3 29 Figure 3 29 Mounting the HD displays Step 17 Connect cables to the HD display For details about cable connections s...

Page 44: ...pad Step 2 Remove the cable clamp from the pad as shown in Figure 3 31 Figure 3 31 Removing the cable clamp Step 3 Connect the composite cable to the TE30 and use a flat head screwdriver to fasten the screws as shown in Figure 3 32 For details about cable connections see the HUAWEI RP V100R001C04 Series Telepresence System Connection Diagrams ...

Page 45: ...E30 Step 4 Install the pad to the camera base as shown in Figure 3 33 The composite cable connected to the TE30 must be placed in the groove of the cable trough on the pad 1 Align the screws protruding from the pad with the holes at the bottom of the TE30 as shown in step 1 in Figure 3 33 2 Fasten the recessed pan head screws as shown in step 2 in Figure 3 33 CAUTION ...

Page 46: ...33 Installing the pad l When installing the TE30 push the pad to the front most and then fasten the screws l To remove the HD display loosen the camera pad push the TE30 to the back and then take off the HD display Step 5 Keep the camera lens facing the front and install the TE30 on the rack top as shown in Figure 3 34 CAUTION ...

Page 47: ...al 46 Figure 3 34 Installing the TE30 videoconferencing endpoint Step 6 Connect cables to the TE30 For details about cable connections see the HUAWEI RP V100R001C04 Series Telepresence System Connection Diagrams Step 7 Align the cable clamp with the holes on the pad and fasten the screws as shown in Figure 3 35 ...

Page 48: ...100R001C04 Commissioning Guide 3 Installation Issue 01 Huawei Confidential 47 Figure 3 35 Installing the cable clamp Step 8 Strap the two VGA cables connected to the TE30 using cable ties as shown in Figure 3 36 Figure 3 36 Strapping cables ...

Page 49: ...decorative component behind the camera on the rack and clip it in place as shown in Figure 3 37 Figure 3 37 Install the decorative component behind the camera Step 10 Fasten five M6 x 12 flat head screws to securely install the decorative component as shown in Figure 3 38 Figure 3 38 Tightening the decorative component behind the camera ...

Page 50: ...Installation Issue 01 Huawei Confidential 49 Step 11 Fasten the TE30 composite cable 1 Remove the screws on the two sides of the rack as shown in Figure 3 39 Figure 3 39 Removing rack screws 2 Remove the rack cover as shown in Figure 3 40 Figure 3 40 Removing the rack cover ...

Page 51: ...ntial 50 l Use the cable tie to hold the ferrite bead to protect the cable from falling off l Do not tightly fasten the cable tie otherwise the cable core may be damaged 3 Strap the TE30 composite cable to the rack using a cable tie as shown in Figure 3 41 Figure 3 41 Strapping the composite cable End CAUTION ...

Page 52: ...g Guide 3 Installation Issue 01 Huawei Confidential 51 3 7 Installing Equipment in the Rack 3 7 1 Location of the 5 Port PDU The 5 port power distribution unit PDU is embedded in the rack as shown in Figure 3 42 You do not need to install it Figure 3 42 5 port PDU ...

Page 53: ...Power Adapter Insert the camera s power adapter into the bracket and mount the bracket onto the rack as shown in Figure 3 43 Figure 3 43 Installing the camera s power adapter 3 8 Troubleshooting 3 8 1 Unbalanced Rack 3 8 1 1 Symptom The rack is unbalanced after being taken out of the packing case 3 8 1 2 Cause The wheels of the rack are not level ...

Page 54: ...Adjusting the wheels 3 8 2 Tilted HD Display 3 8 2 4 Symptom An HD display tilts after it is installed 3 8 2 5 Cause The screw holes on the HD display support may deviate from their specifications 3 8 2 6 Installation Techniques If the HD display tilts remove the HD display from the rack and place it on the cushion with its screen facing down Loosen the screws and adjust the horizontal bars For ex...

Page 55: ... Noise is generated by the swinging of the camera s power adapter bracket when you move the rack 3 8 3 8 Cause There is only one power adapter bracket mounted to the horizontal bar of the rack leaving extra moving space 3 8 3 9 Installation Techniques Move the power adapter bracket to the rightmost corner of the rack and attach a viscose cable tie to the left side of the power adapter bracket as s...

Page 56: ...HUAWEI RP Series Telepresence Systems V100R001C04 Commissioning Guide 3 Installation Issue 01 Huawei Confidential 55 Figure 3 46 Fastening the camera s power adapter bracket ...

Page 57: ...ting the cables label them according to section 3 2 4 1 1 Attaching Cable Labels Step 1 Verify the cable labels based on the PNs on them Each cable label has a duplicate one and is available in English and Chinese The content in both languages is consistent Figure 4 1 Cable labels Step 2 Attach four labels two English and two Chinese labels to the correct cable Ensure that l One English label and ...

Page 58: ... Positions of the labels Some cables may have a ferrite bead close to the connector In this case the labels must not be attached between the connector and ferrite bead as shown in Figure 4 3 Figure 4 3 Cable with a ferrite bead End 4 1 2 Cable Connectors Table 4 1 Cable connectors Type Connector Remarks 10 m VGA VGA cable VGA connector V01 V02 2 m VGA VGA cable VGA connector V03 Dedicated for the ...

Page 59: ...able Connection Issue 01 Huawei Confidential 58 Type Connector Remarks TE30 composite cable Proprietary connector HDMI connector Composite connector V04 V05 0 5 m HDMI extension cable HDMI male and female V06 Dedicated for the RP200 Microphone audio cable DIIVA connector A01 ...

Page 60: ...m connector 3 5 mm connector A02 1 m Chinese standard power cable Plug C13 connector P01 P05 HD display power cable PA male C7 female P03 P04 4 2 Cabling In the diagrams different cables are represented by different line colors and letters Cables of the same type are numbered according to their installation sequence For example video cables are numbered V01 V02 V03 and Vn ...

Page 61: ...ble C14 C7 cable 4 2 1 Cabling Rules Table 4 3 Cabling rules No Type Part Number Length Devices to Be Connected Remarks Pre Installed or Not V01 VGA VG A cable 04050165 10 m VGA port of the presentat ion source TE30 VGA IN V02 VGA VG A cable 04050165 10 m TE30 VGA OUT Optional presentation display VGA IN RP100 only V03 VGA VG A cable 04050242 2 m TE30 VGA OUT Presentation display VGA RP200 only V0...

Page 62: ...m network cable 04046011 3 m Wall mo unted network port T30 cable adapter LAN P01 Chinese st andard power cable 04041104 3 m Wall mo unted power outlet PDU power cable P02 PDU power cable 14190404 1 5 m Chinese standard power cable PDU P03 HD display power cable 04043491 2 m PDU Presentation display Power RP200 only two wire cores P04 HD display power cable 04043491 2 m PDU HD display Power Two wi...

Page 63: ...eries Telepresence Systems V100R001C04 Commissioning Guide 4 Cable Connection Issue 01 Huawei Confidential 62 4 2 2 Cabling Connection Illustration Figure 4 4 RP100 46S 55S cabling Figure 4 5 RP200 46S 55S cabling ...

Page 64: ... 1 Upgrade files File Description Telepresence dat Mirroring package containing the target program and resource files for the upgradeIt is the upgrade resource file and is used to replace the current upgrade resource file UpgMaster exe Upgrade programIt is the upgrade tool You can double click this file to set related upgrade parameters UpgConfigDll dll Dynamic link library used by UpgMaster exe d...

Page 65: ...ersion information log in to the TE30 web interface and choose Help Version Figure 1 3 shows the Version dialog box that displays information such as the endpoint model serial number and software version Figure 5 1 Version dialog box 5 1 4 Setting the Upgrade Password The default upgrade password is empty You can change the password from either the web interface or remote controlled UI 5 1 4 1 Fro...

Page 66: ...fidential 65 Figure 5 2 Security screen Step 2 Under Upgrade Password set an upgrade password as shown in Figure 1 5 Figure 5 3 Setting an upgrade password Step 3 Click Save End 5 1 4 2 From the Remote Controlled UI Choose Advanced Settings Security Upgrade password Then set the upgrade password ...

Page 67: ...ic upgrade function 5 2 1 3 Upgrade Using the Upgrade Tool The TE30 can be upgraded over an IP or Wi Fi network The upgrade file is Telepresence dat which is to replace the existing version file of the TE30 during the upgrade l On an IP network The TE30 can be connected to a computer directly or over an IP network as shown in Figure 1 1 You can ping the IP address of the computer from the TE30 or ...

Page 68: ... the IP address Step 4 When prompted enter the upgrade password End 5 2 1 4 Upgrading the TE30 endpoints in batches l Start the upgrade tool and set the IP addresses of the TE30 endpoints to be upgraded To upgrade the TE30 endpoints by manually entering their IP addresses Step 1 Click and enter the number of the TE30 endpoints you want to upgrade Step 2 Enter the IP addresses of the TE30 endpoints...

Page 69: ...d for each endpoint If the upgrade password is incorrect the upgrade will fail End l To upgrade the TE30 endpoints by importing their IP addresses from a file Step 5 Click and choose File Export to export the IP address file Step 6 Add the IP addresses of the TE30 endpoints to be upgraded to the exported IP address file as shown in Figure 1 10 NOTE Endpoint IP addresses Upgrade passwords of the en...

Page 70: ...8 Adding IP addresses to the exported file Step 7 Choose File Import to import the IP address file The imported IP addresses are displayed in the upgrade tool window as shown in Figure 1 11 Figure 5 9 Imported IP addresses Step 8 Select all the IP addresses Step 9 Click Upgrade End Upgrade passwords of the endpoints ...

Page 71: ...e Maintenance Upgrade Step 2 In the displayed screen enter the upgrade password set in section 1 1 5 Setting the Upgrade Password as shown in Figure 1 12 Figure 5 10 Entering the upgrade password Step 3 In the displayed screen click Select File to select the upgrade resource file as shown in Figure 1 13 The default upgrade resource file is Telepresence dat Figure 5 11 Selecting the upgrade resourc...

Page 72: ...matic upgrade can be performed from the TE30 web interface or the remote control interface You must configure an upgrade server and set related parameters before the upgrade 5 2 1 7 Upgrade Server How to build the upgrade the server see Appendix Server structures introduced 5 2 1 8 Automatic Upgrade from the TE30 Web Interface To perform automatic upgrade from the TE30 web interface Step 1 Log in ...

Page 73: ... Huawei Confidential 72 Figure 5 13 Performing an automatic upgrade Step 2 Click Auto Upgrade Settings to display the Auto Upgrade Settings dialog box as shown in Figure 1 16 Figure 5 14 Auto Upgrade Settings dialog box Note l Auto upgrade specifies whether to enable automatic upgrade ...

Page 74: ...e interval specifies the upgrade interval for automatic upgrade l Server address specifies the upgrade server address l User name specifies the user name l Password specifies the password Step 3 Enter parameters correctly and click Manual upgrade An upgrade progress bar is displayed as shown in Figure 1 17 Figure 5 15 Upgrade progress bar If you click Save in Figure 1 16 the TE30 verifies whether ...

Page 75: ...n the next upgrade period arrives and a new software version has been detected on the upgrade server Automatic Upgrade from the remote control interface To perform automatic upgrade from the remote control interface Step 4 Log in to the remote control interface Step 5 Click Advanced to display the Settings screen Step 6 Click Installation to display the Installation screen as shown in Figure 1 19 ...

Page 76: ...wn in Figure 1 20 Figure 5 18 Setting parameters Note Parameters in Figure 3 18 are the same as those in Figure 1 16 Step 8 Click Manual upgrade An upgrade progress bar is displayed as shown in Figure 1 21 Figure 5 19 Upgrade progress bar If you click Save in Figure 1 20 the TE30 verifies whether the current software version is consistent with that on the upgrade server in every upgrade period If ...

Page 77: ...gure 1 22 Figure 5 20 Confirming the upgrade Click Yes to upgrade or No to call off the upgrade This message will be displayed when the next upgrade period arrives and a new software version has been detected on the upgrade server End 5 2 2 Forcible Upgrade If the TE30 cannot be upgraded using the normal system use the bootrom system to perform a forcible upgrade Figure 5 213 shows the forcible up...

Page 78: ...rocess OLED screen displays Booting After a successful start displays the default IP address 192 168 1 1 Step 4 Turn on the switch of the bootrom system using Telnet or SSH command 1 Log in to the TE30 using Telnet or SSH The default user name and password for Telnet and SSH logins are both debug 2 Run the following command DM8148_A8 mnt upgswitch on The command output is as follows set upg switch...

Page 79: ...c IP address the same as that of the normal system If the normal system is unavailable use the default IP address of the bootrom system for upgrade In this case connect the host and the TE30 directly or set the host IP address to a value that is in the same network segment as that of the TE30 and ensure that the host and TE30 can communicate with each other Then upgrade the TE30 in a way the same ...

Page 80: ...0s and the OFF is corresponds to 23s when the TV supporting the TE30 terminal you need to boot delay corresponding parameter is set to ON and the power delay defaults to 60s 6 2 Setting the System Language Step 1 Press the menu key on the remote control of the HD display scroll to Settings and press OK Step 2 Scroll to Picture and press OK Scroll to Function and press OK Step 3 Scroll to Language ...

Page 81: ... OK Scroll to Native and press OK End 6 5 Troubleshooting When the presentation display in an RP200 system is used to show 1080p or 1280 x 1024 pixels images part of an image may be cut or the image is not displayed in full screen Perform the following steps to address this issue Step 1 Press the menu key on the remote control scroll to Settings and press OK Step 2 Scroll to Geometry and press OK ...

Page 82: ...ing endpoint according to the following section to ensure that common videoconferencing requirements are met 7 1 Logging In to the TE30 Web Interface Log in to the videoconferencing endpoint s web interface By default both the user name and password are admin Figure 7 1 Login page Figure 7 2 shows the TE30 settings interface Figure 7 2 TE30 settings interface ...

Page 83: ...ettings Parameter Value Remarks Location France Set the value based on the actual condition Time zone GTM 08 00 Beijing Chongqing Set the value based on the actual condition Time format 24 hour Set it based on the actual condition Date format YYYY MM DD Recommended value Enable NTP Disable Set it based on the actual condition FTP server address 172 19 1 63 This parameter is available when NTP is e...

Page 84: ... settings Parameter Value Remarks Shut Down Disable Recommended value Enter sleep mode After 10 min Recommended value Scheduled power on Disable Default value Scheduled power on time 0 0 Set it based on the actual condition Scheduled Power off Disable Default value Scheduled power off time 0 0 Set it based on the actual condition Wake on LAN Disable Default value ...

Page 85: ...gs for the videoconferencing endpoint Administrator password admin Set it based on the actual condition Confirm password admin Set it based on the actual condition Name of user 1 Reserved user This user cannot configure the system settings for the videoconferencing endpoint Password of user 1 Confirm password Name of user 2 Reserved user This user cannot configure the system settings for the video...

Page 86: ... 7 3 Setting the Site Name Choose System Settings Display and set the parameters according to Table 7 4 Figure 7 6 Setting Site Name Table 7 4 Site name settings Parameter Value Remarks Site Name site Set this parameter based on the real word situation Color White Recommended value Bold No Recommended value Display duration Always display Default value Position of site name Lower right corner Defa...

Page 87: ... 7 5 and Table 7 6 7 4 1 Configuring Video Input Click Video Input and set the parameters according to Table 7 5 Figure 7 7 Video input settings Table 7 5 Video input settings Parameter Value Remarks Common Camera Settings Remote control Forbid Recommended value Built in camera Name CAM IN Default value Moving speed Medium Recommended value Initial position Auto Default value Stretch mode Stretch ...

Page 88: ...ngs Parameter Value Remarks Common Settings GUI MAIN OUT HD Default value Caption output MAIN OUT HD Default value Main output interface MAIN OUT HD Default value Dual screen Disable Enable Set it to Disable for the RP100 with no presentation screen Set it to Enable for the RP100 or RP200 with a presentation screen MAIN OUT HD Name HDMI OUT Default value Video resolution 720p Recommended value Ref...

Page 89: ...rence Parameters Choose System Settings Conference and set the parameters according Table 7 7 and Table 7 8 7 5 1 Configuring Common Settings Choose System Settings Conference Common Settings and set the parameters according to Table 7 7 Figure 7 9 Common conference parameters Table 7 7 Common conference parameter settings Parameter Value Remarks Answer mode Answering call automatically Recommende...

Page 90: ...fault call bandwidth Default call bandwidth 1920 kbps Recommended value Call parameter configuration Disable Default value Wi Fi network preferred Disable Default value 7 5 2 Configuring Advanced Settings Choose System Settings Conference Advanced Settings and set the parameters according to Table 7 8 Figure 7 10 Advanced conference parameters ...

Page 91: ... video protocol Auto Default value Presentation resolution Sharp Default value H 239 video bandwidth type Auto Recommended value Presentation plug and share Disable Recommended value Dynamic bandwidth Disable Default value Conference bandwidth Normal Default value Conference line type H 323 Recommended value Preferred IP protocol H 323 Recommended value reserved presentation bandwidth Disable Reco...

Page 92: ...1 4 1 Set it based on the actual condition E 164 0755025062 Set it based on the actual condition H 323 ID 0755025062 Set it based on the actual condition Authentication user name 0755025062 Set it based on the actual condition Password Set it based on the actual condition Use VoIP gateway Disable Recommended value VoIP gateway address Default value Huawei GK Enable Set it to Enable when a Huawei G...

Page 93: ... Enable Set it to Enable when SIP is used Server address 200 55 53 152 Set it based on the actual condition Conference service number 07550003 Set it based on the actual condition Proxy server Disable Proxy server address Set it based on the actual condition Site number 07550003 Set it based on the actual condition User name Set it based on the actual condition Password Set it based on the actual ...

Page 94: ...ss Book Parameters Choose System Settings Network Network Address Book set Enable network address book to Enable and Synchronize automatically to Enable and choose to enable or disable FTPS based on the status of the network address book on the service layer Figure 7 13 Network Address Book If the current network support LADP address books configure the LDAP server settings based on the actual con...

Page 95: ...et it based on the actual condition Port 389 Set it based on the actual condition Base DN distinguished name Set it based on the actual condition Authentication type Basic SSL encryption Disable User name admin Set it based on the actual condition Password admin Set it based on the actual condition Domain name Synchronize automatically Enable Automatic update interval 24 h Local records prevail if...

Page 96: ...5 SSH Telnet GUI and Upgrade password Table 7 12 Security settings Parameter Default Value Remarks SSH Forbid Recommended value Set it to Allow when commissioning the system Telnet login Forbid Recommended value Set it to Allow when commissioning the system GUI settings The password is null by default Set these parameters based on the actual condition Upgrade password The upgrade password is null ...

Page 97: ...e Control Video Control and set the parameters according to Table 7 13 Figure 7 16 Video input and output sources Table 7 13 Video control settings Area Parameter Default Value Remarks Video Input Source Video Source CAM IN Fixed value Presentation Source VGA IN Fixed value Video Output Source MAIN OUT HD Local video Fixed value 7 8 2 Setting Audio Control Parameters Choose Device Control Audio Co...

Page 98: ...dio control settings Parameter Default Value Remarks Audio Input Unmute Recommended value Built in MIC1 0dB Unmute cleared Recommended values Built in MIC2 0dB Unmute cleared Recommended values AUDIO IN L 0dB Unmute selected Recommended values AUDIO IN R 0dB Unmute selected Recommended values Speaker Unmute Default value Volume 10 Recommended value Alert tone volume 1 Recommended value ...

Page 99: ...lue Treble 0dB Default value Because the VPM220 is used do not select Unmute for Built in MIC1 or Built in MIC2 7 9 Configuring the Address Book 7 9 1 Importing an Address Book Step 1 Choose Address Book Address Book to display the Address Book settings screen as shown in Figure 7 18 Figure 7 18 Address Book Step 2 Click Import to Local Address Book in the lower right corner On the displayed dialo...

Page 100: ...e browser as follows Otherwise the operation may fail Step 1 Open the Internet Explorer Step 2 Choose Tools Internet Options In the displayed Internet Options dialog box click the Security tab Step 3 Click Custom Level In the displayed Security Settings dialog box set Active scripting and all the items under Downloads to Enable Step 4 Click OK Step 5 Choose Trusted sites Sites to display the Trust...

Page 101: ... Step 7 Click the Privacy tab Then set the slider label to Medium Step 8 Click OK to save the settings End To export the address book click Export from Local Address Book on the Address Book screen and click OK Select a save path for the address book A vcf file is then saved to the path Figure 7 21 Clicking OK ...

Page 102: ...eb interface Choose Device Control Built in Camera Parameters Step 2 Set Video resolution to 1080p 60Hz as shown in Figure 8 1 Figure 8 1 Video resolution Step 3 Set 2A mode to Auto as shown in Figure 8 2 The camera then calculates the best effects based on the actual environment Figure 8 2 2A mode If the actual environment is tough and the camera brightness and color fail to meet requirements set...

Page 103: ...r speed Recommended value 1 60 Iris Determines the camera apertures and affects the image definition When the Iris increases the image brightness increases while the depth of the field decreases Set it based on the actual condition Red gain Set it based on the actual condition Blue gain Set it based on the actual condition Adjust the image brightness by setting Brightness gain and Iris Adjust the ...

Page 104: ...01C04B010 Upgrade Guide 8 Camera Settings Issue 01 2013 06 18 Huawei Confidential 103 If the image noise is high set Noise reduction to Low Do not set it to High otherwise ghost images may appear Figure 8 5 Noise reduction End ...

Page 105: ... the TE30 is running log in to its web interface choose System Settings Installation Restore Default and enter the TE30 s SN in the displayed dialog box When the TE30 operates properly press and holds the MODE button for about 10 seconds to restore the default settings and restarts the TE30 After the restoration the default TE30 IP address is 192 168 1 1 No To You 1 Restore the TE30 to its default...

Page 106: ...ly YprPb 720p60 and 1080p60 can be switched to VGA mode If you attempt switch other modes to VGA mode the follow information may be displayed on the remote control UI YPRPB 720P 50 VGA Disable YPRPB 1080P 24 25 30 50 VGA Disable VGA 800 600 1024 768 1280 1024 YPRPB Disable No To You 1 Restore the TE30 to the previous settings Press and hold the SELECT button for 10s or more when the TE30 is operat...

Reviews: