background image

6

 FAQs......................................................................................................... 18


7

 Appendix.................................................................................................. 22


7.1

 Indicators....................................................................................................22


7.2

 Interfaces and Buttons................................................................................22


7.3

 Default Settings..........................................................................................23


7.4

 Technical Specifications.............................................................................23


ii 

Summary of Contents for SmartAX MT882a

Page 1: ...SmartAX MT882a ADSL CPE User Guide HUAWEI TECHNOLOGIES CO LTD ...

Page 2: ...SmartAX MT882a ADSL CPE V100R001 User Guide Issue 01 Date 2008 12 24 Part Number 103130 ...

Page 3: ...be reproduced or transmitted in any form or by any means without prior written consent of Huawei Technologies Co Ltd Trademarks and Permissions and other Huawei trademarks are trademarks of Huawei Technologies Co Ltd All other trademarks and trade names mentioned in this document are the property of their respective holders Notice The information in this document is subject to change without notic...

Page 4: ...lling the USB Driver on the MAC OS 9 3 3 Installing the USB Driver on the Windows OS 11 4 Setting the Network Access Parameters 15 4 1 Accessing the Network Through the Embedded PPP Dial Up Software of the MT882a 15 4 2 Accessing the Network Through the PPP Dial Up Software on the Computer 16 5 Configuring the MT882a 17 5 1 Changing the Administrator Password Used for Logging In to the Web Configu...

Page 5: ...6 FAQs 18 7 Appendix 22 7 1 Indicators 22 7 2 Interfaces and Buttons 22 7 3 Default Settings 23 7 4 Technical Specifications 23 ii ...

Page 6: ...erformance design of the device z While using the device observe all applicable laws directives and regulations and respect the legal rights of other people Environmental Requirements z Place the device in a well ventilated place Do not expose the device to direct sunlight z Keep the device clean free of dust and stain z Do not place the device near a water source or in a damp area z Place the dev...

Page 7: ...sconnect the device from the power supply and unplug all the cables connected to the device such as the power cable telephone cable and RF cable to prevent lightning strike z If the device is not used for a long time disconnect the power supply and unplug the all the cables connected to the device z If smoke sound or smell is emitted from the device stop using the device immediately disconnect the...

Page 8: ...need to dispose it according to the local regulations on disposing of device packing materials exhausted battery and abandoned device and support the recycling activity After the MT882a is used for a certain period of time the cover will be heated which will not affect the function of the MT882a ...

Page 9: ...ion If your telephone line is used for the broadband network access only and you do not need to use a telephone take the following figure as a reference for connecting the cables 1 2 3 POWER LAN RESET ADSL USB 1 Telephone jack on the wall 2 Computer 3 Power adapter ...

Page 10: ... is used for both the broadband network access and a telephone connection take the following figure as a reference for connecting the cables POWER LAN RESET 1 2 3 4 ADSL 5 USB 1 Telephone jack on the wall 2 Splitter 3 Telephone 4 Computer 5 Power adapter ...

Page 11: ...SE T ADSL USB 1 Telephone jack on the wall 2 T connector 3 Microfilter 4 Splitter 5 Telephone 6 Fax 7 Computer 8 Power adapter 2 4 Getting Started Press the power button on the top of the MT882a to power on the MT882a After you power on the MT882a the ADSL indicator blinks for less than three minutes indicating that the MT882a is being activated Later the ADSL indicator becomes on The POWER indica...

Page 12: ...ms OSs z Linux z MAC OS 9 or MAC OS 10 z Windows The installation process of the USB driver varies according to the specific OS as described in the following sections Before installing the USB driver on the PC do not connect the MT882a through a USB cable to the USB port on the PC 3 1 Installing the USB Driver on the Linux OS Take the RedHat 8 0 as an example To install the USB driver on the Linux...

Page 13: ...0 aa bb cc 00 01 BOOTPROTO none NETMASK 255 255 255 0 ONBOOT no IPADDR 192 168 1 2 NETWORK 192 168 1 0 BROADCAST 192 168 1 255 Assume your PC already has an Ethernet interface eth0 In this step you create an Ethernet interface eth1 and configure the related properties of this Ethernet interface Step 7 Find the resolv conf file in the etc sysconfig networking profiles default directory Create this ...

Page 14: ...the MT882a through a USB cable to the PC and then power on the MT882a 3 2 Installing the USB Driver on the MAC OS To install the USB driver on the MAC OS perform the following steps Step 1 Open the USB Driver MAC directory on the compact disk read only memory CD ROM of the MT882a and find and decompress the driver of the MAC OS Step 2 Double click the installer to start the installation program ...

Page 15: ...10 Step 3 Click Next The Authenticate dialog box is displayed Step 4 Enter the OS administrator account and the password and then click OK Step 5 Click Accept to start the installation procedure ...

Page 16: ... MT882a through a USB cable to the PC and then power on the MT882a 3 3 Installing the USB Driver on the Windows OS To install the USB driver on the Windows OS perform the following steps Step 1 Open the USB Driver Windows directory on the compact disk read only memory CD ROM of the MT882a and find the driver of the Window OS Step 2 Double click the installer to start the installation program ...

Page 17: ...12 Step 3 In the Choose Setup Language dialog box select a language such as English and then click Next Step 4 Click Next ...

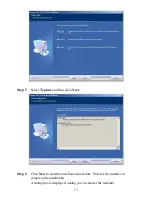
Page 18: ...ep 5 Select Typical and then click Next Step 6 Click Next to start the installation procedure Wait for the installer to complete the installation A dialog box is displayed asking you to connect the terminal ...

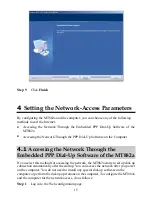
Page 19: ...ect the MT882a through a USB cable to the PC and then power on the MT882a Wait for the MT882a to start The Hardware Installation dialog box is displayed Step 8 Click Continue Anyway to continue with the installation ...

Page 20: ...uter 4 1 Accessing the Network Through the Embedded PPP Dial Up Software of the MT882a If you select this method for accessing the network the MT882a starts to set up dial up connection automatically after the startup You can access the network after you power on the computer You do not need to install any special dial up software on the computer or perform the dial up operations on the computer T...

Page 21: ...You need to perform the preceding operations only once The next time when you power on the computer you can surf the Internet without performing any configuration 4 2 Accessing the Network Through the PPP Dial Up Software on the Computer If you select this method for accessing the network you need to install and configure the dial up software on the computer In addition you need to perform the dia...

Page 22: ...e for creating a network connection After the network connection is created to access the network double click the icon for the dial up connection and then click Connect in the displayed dialog box 5 Configuring the MT882a 5 1 Changing the Administrator Password Used for Logging In to the Web Configuration Page For safety reasons or to make the password easy to remember you can change the log in a...

Page 23: ... Web configuration page you need to launch the Internet Explorer and enter the new IP address in the address bar Ensure that the IP address of the computer is in the same network segment as that of the IP address of the MT882a so that the computer can access the Web configuration page 5 3 Restoring Default Settings To restore default settings log in to the Web configuration page and then do as fol...

Page 24: ...operator Step 3 Check whether the LAN indicator of the terminal is on If the LAN indicator is off perform further checks as follows 1 Ensure that the network adapter of the computer is enabled 2 Ensure that the network cable between the terminal and the computer is properly connected 3 Remove and then insert the network cable or replace the network cable If the LAN indicator is still off contact a...

Page 25: ...click LAN Settings 5 In the Proxy server group box of the Local Area Network LAN Settings dialog box ensure that Use a proxy server for your LAN These settings will not apply to dial up or VPN connections check box is not selected Step 8 Try to access multiple other Web sites to check whether the terminal can access If the terminal still cannot access other Web sites contact your network service p...

Page 26: ...ough the two types of signals are transmitted through one telephone line they are carried by different frequency bands Therefore they do not interfere with each other In this case you can make a telephone call and access the Internet at the same time without degrading call quality or lowering the Internet access rate How can I quickly restore the default settings of the terminal To restore the def...

Page 27: ...USB port On The USB port is connected USB Off The USB port is not connected 7 2 Interfaces and Buttons Interface Button Description POWER The POWER interface on the other models of terminals connects the terminal to a power adapter USB This interface connects the terminal to the USB port on a PC LAN It is used to connect to the Ethernet interface on the computer RESET You can restore the default s...

Page 28: ...ation page admin 7 4 Technical Specifications Item Specification ADSL standards ITU G 992 1 G dmt Annex A ITU G 994 1 G hs ANSI T1 413 Issue 2 ADSL2 standard ITU G 992 3 G dmt bis Annex A Standards ADSL2 standard ITU G 992 5 Annex A G dmt T1 413 z Maximum downstream rate 8 Mbit s z Maximum upstream rate 896 kbit s Data transmission G 992 5 ADSL2 z Maximum downstream rate 24 Mbit s z Maximum upstre...

Page 29: ...24 Item Specification Dimensions W D H 118 4 mm 90 3 mm 40 4 mm Weight 210 g ...

Page 30: ...HUAWEI TECHNOLOGIES CO LTD Huawei Industrial Base Bantian Longgang Shenzhen 518129 People s Republic of China www huawei com Part Number 103130 ...

Reviews: