background image

Tecal RH5485 Server 
Installation and User’s Guide 

1 The Tecal RH5485 server 


Issue 02 (2011-05-25) 

Huawei Proprietary and Confidential      

Copyright © Huawei Technologies Co., Ltd 

1-15 


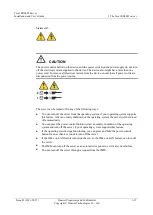
Statement 5: 


CAUTION


The power control button on the device and the power switch on the power supply do not turn 
off the electrical current supplied to the device. The device also might have more than one 
power cord. To remove all electrical current from the device, ensure that all power cords are 
disconnected from the power source. 


The server can be turned off in any of the following ways: 


You can turn off the server from the operating system, if your operating system supports 
this feature. After an orderly shutdown of the operating system, the server will be turned 
off automatically. 


You can press the power-control button to start an orderly shutdown of the operating 
system and turn off the server, if your operating system supports this feature. 


If the operating system stops functioning, you can press and hold the power-control 
button for more than 4 seconds to turn off the server. 


If the Wake on LAN feature turned on the server, the Wake on LAN feature can turn off 
the server. 


The IMM can turn off the server as an automatic response to a critical system failure. 


You can turn off the server through a request from the IMM. 


Summary of Contents for Tecal RH5485

Page 1: ...Tecal RH5485 Server V100R001C00 Installation and User s Guide Issue 02 Date 2011 05 25 HUAWEI TECHNOLOGIES CO LTD ...

Page 2: ......

Page 3: ... customer All or part of the products services and features described in this document may not be within the purchase scope or the usage scope Unless otherwise specified in the contract all statements information and recommendations in this document are provided AS IS without warranties guarantees or representations of any kind either express or implied The information in this document is subject ...

Page 4: ......

Page 5: ...symbols that may be found in this document are defined as follows Symbol Description Indicates a hazard with a high level of risk which if not avoided will result in death or serious injury Indicates a hazard with a medium or low level of risk which if not avoided could result in minor or moderate injury Indicates a potentially hazardous situation which if not avoided could result in equipment dam...

Page 6: ...story Updates between document issues are cumulative Therefore the latest document issue contains all updates made in previous issues Changes in Issue 02 2011 05 25 This issue is the second official release which incorporates the following changes Some figures in chapter 2 are updated Some format errors are modified Changes in Issue 01 2010 08 30 Initial field trial release ...

Page 7: ...controls LEDs and power 1 8 1 8 1 Front view 1 8 1 8 2 Rear view 1 11 1 8 3 Rear view LEDs 1 12 1 8 4 Server power features 1 14 2 Installing optional devices 2 1 2 1 Server components 2 1 2 2 Installation guidelines 2 10 2 3 Internal cable routing and connectors 2 13 2 4 Removing the top cover 2 16 2 5 Removing the top cover bracket 2 17 2 6 Installing the top cover bracket 2 18 2 7 Removing the ...

Page 8: ...nt module 3 10 3 6 Obtaining the IP address for the Web interface access 3 11 3 7 Logging on to the Web interface 3 12 3 8 Using the remote presence and blue screen capture features 3 12 3 9 Enabling the Broadcom Gigabit Ethernet Utility program 3 13 3 10 Configuring the Broadcom Gigabit Ethernet controller 3 13 3 11 Configuring RAID arrays 3 13 4 Regulatory Compliance Standards 4 1 4 1 FCC Certif...

Page 9: ...Figure 2 5 eXFlash backplane connectors 2 5 Figure 2 6 Microprocessor board connectors 2 6 Figure 2 7 Microprocessor board LEDs 2 7 Figure 2 8 I O board connectors 2 8 Figure 2 9 I O board jumpers 2 9 Figure 2 10 I O board LEDs 2 10 Figure 2 11 Routing of the DVD power fans 1 and 2 scalability LED and operator information cables 2 14 Figure 2 12 Routing of the USB and DVD signal cables 2 15 Figure...

Page 10: ...pter carrier 2 32 Figure 2 29 Install a QPI wrap card 2 33 Figure 2 30 Install an internal removable flash drive 2 34 Figure 2 31 Locations of the memory card connectors 2 36 Figure 2 32 DIMM connectors on a memory card 2 36 Figure 2 33 LEDs on the memory card 2 40 Figure 2 34 Remove the server top cover 2 42 Figure 2 35 Insert the DIMM into the connector 2 43 Figure 2 36 Install the memory card 2...

Page 11: ...right Huawei Technologies Co Ltd ix Tables Table 1 1 Features and specifications 1 4 Table 2 1 I O board jumpers 2 9 Table 2 2 Low cost and low power DIMM installation sequence 2 37 Table 2 3 Low cost and low power memory card installation sequence 2 37 Table 2 4 High performance memory card installation sequence 2 37 ...

Page 12: ......

Page 13: ...f reliable data storage Performance ease of use reliability and expansion capabilities were key considerations in the design of the server These design features make it possible for you to customize the system hardware to meet your needs today and provide flexible expansion capabilities for the future 1 1 The HUAWEI Documentation CD The HUAWEI Documentation CD contains documentation for your serve...

Page 14: ...e document press and hold the Ctrl key while you select the documents Click View Book to view the selected document or documents in Acrobat Reader or xpdf If you selected more than one document all the selected documents are opened in Acrobat Reader or xpdf To search all the documents type a word or word string in the Search field and click Search The documents in which the word or word string app...

Page 15: ...he description of a potentially hazardous procedure step or situation Danger These statements indicate situations that can be potentially lethal or extremely hazardous to you A danger statement is placed just before the description of a potentially lethal or extremely hazardous procedure step or situation 1 4 Features and specifications The following information is a summary of the features and sp...

Page 16: ...Installation and User s Guide 1 4 Huawei Proprietary and Confidential Copyright Huawei Technologies Co Ltd Issue 02 2011 05 25 Table 1 1 Features and specifications 1 5 What your server offers The server uses the following features and technologies ...

Page 17: ...interfaces Intelligent Platform Management Interface IPMI version 2 0 Simple Network Management Protocol SNMP version 3 Common Information Model CIM Web browser For more information see Using the integrated management module X Architecture technology X Architecture technology combines proven innovative HUAWEI designs to make your x86 processor based server powerful scalable and reliable Large syst...

Page 18: ...twork interface card NIC provides a failover capability to a redundant Ethernet connection If a problem occurs with the primary Ethernet connection all Ethernet traffic that is associated with the primary connection is automatically switched to the redundant NIC If the applicable device drivers are installed this switching occurs without data loss and without user intervention Redundant cooling an...

Page 19: ...p Hot swap hard disk drives Information and light path diagnostics LED panels Integrated management module Service processor adapter for remote systems management Parity checking on the SAS bus and PCI Express buses Power managed and Advanced Configuration and Power Interface ACPI compliant Power on self test POST Predictive Failure Analysis PFA alerts Redundant Ethernet capabilities requires opti...

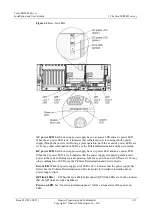
Page 20: ... 1 Front view The following illustration shows the controls LEDs and connectors on the front of the server See Operator information panel for information about the operator information panel The DVD drive is optional in some models Figure 1 1 Front view Electrostatic discharge connector Connect a electrostatic discharge wrist strap to this connector when you work with static sensitive devices DVD ...

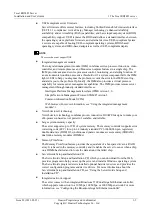
Page 21: ...ent or the power supply or the LED itself has failed Flashing rapidly 4 times per second The server is turned off and is not ready to be turned on The power control button is disabled In a fully configured server it could take up to 8 minutes after the server is connected to ac power before the power control button becomes active Flashing slowly once per second The server is turned off and is read...

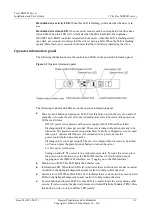
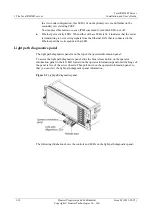
Page 22: ...ving signals from the Ethernet LAN that is connected to the Ethernet port that corresponds to that LED Light path diagnostics panel The light path diagnostics panel is on the top of the operator information panel To access the light path diagnostics panel slide the blue release button on the operator information panel to the left Pull forward on the operator information panel until the hinge of th...

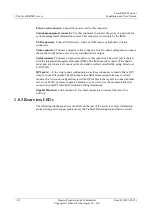
Page 23: ...conds until the problem is corrected the server is restarted or a new problem occurs By placing the system error LED indicator in Remind mode you acknowledge that you are aware of the last failure but will not take immediate action to correct the problem The remind function is controlled by the IMM NMI button Press this button to force a nonmaskable interrupt to the microprocessor if you are direc...

Page 24: ...e serial port is shared with the integrated management module IMM The IMM can take control of the shared serial port to perform text console redirection and to redirect serial traffic using Serial over LAN SOL QPI ports 1 4 In a single node configuration use these connectors to insert either a QPI wrap card or a filler panel The QPI wrap cards enable increased performance in certain models In a tw...

Page 25: ... DC power LED Each hot swap power supply has a dc power LED and an ac power LED When the dc power LED is lit it indicates that the power supply is supplying sufficient dc power to the system During typical operation both the ac and dc power LEDs are lit For any other combination of LEDs see the Problem Determination and Service Guide Error LED When the power supply error LED is lit it indicates th...

Page 26: ...provide cooling while the server is connected to power You can turn on the server and all nodes in the partition and start the operating system by pressing the power control button If you are restarting a two node server after it has been turned off you must allow extra time for the hardware to synchronize before you turn on the server again The server can also be turned on in any of the following...

Page 27: ...ollowing ways You can turn off the server from the operating system if your operating system supports this feature After an orderly shutdown of the operating system the server will be turned off automatically You can press the power control button to start an orderly shutdown of the operating system and turn off the server if your operating system supports this feature If the operating system stop...

Page 28: ......

Page 29: ...system is installed or that a 19990305 error code is displayed indicating that an operating system was not found but the server is otherwise working correctly If the server is not working correctly see the Problem Determination and Service Guide on the HUAWEI Documentation CD for information about how to run diagnostics This chapter provides detailed instructions for installing optional hardware d...

Page 30: ...re you can grip the component to remove it from or install it in the server open or close a latch and so on Orange on a component or an orange label on or near a component indicates that the component can be hot swapped which means that if the server and operating system support hot swap capability you can remove or install the component while the server is running Orange can also indicate touch p...

Page 31: ... 2 3 removing or installing a specific hot swap component for any additional procedures that you might have to perform before you remove or install the component Memory card DIMM connectors The following illustration shows the DIMM connectors on a memory card Figure 2 2 Memory card DIMM connectors Memory card LEDs The following illustration shows the LEDs on a memory card ...

Page 32: ...lation and User s Guide 2 4 Huawei Proprietary and Confidential Copyright Huawei Technologies Co Ltd Issue 02 2011 05 25 Figure 2 3 Memory card LEDs SAS backplane connectors The following illustration shows the hard disk drive connectors on the SAS backplane ...

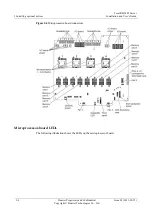
Page 33: ...al Copyright Huawei Technologies Co Ltd 2 5 Figure 2 4 SAS backplane connectors eXFlash backplane connectors The following illustration shows the cable connectors on the eXFlash backplane Figure 2 5 eXFlash backplane connectors Microprocessor board connectors The following illustration shows the connectors on the microprocessor board ...

Page 34: ...ation and User s Guide 2 6 Huawei Proprietary and Confidential Copyright Huawei Technologies Co Ltd Issue 02 2011 05 25 Figure 2 6 Microprocessor board connectors Microprocessor board LEDs The following illustration shows the LEDs on the microprocessor board ...

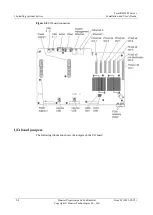
Page 35: ... 2 Installing optional devices Issue 02 2011 05 25 Huawei Proprietary and Confidential Copyright Huawei Technologies Co Ltd 2 7 Figure 2 7 Microprocessor board LEDs I O board connectors The following illustration shows the connectors on the I O board ...

Page 36: ...Server Installation and User s Guide 2 8 Huawei Proprietary and Confidential Copyright Huawei Technologies Co Ltd Issue 02 2011 05 25 Figure 2 8 I O board connectors I O board jumpers The following illustration shows the jumpers on the I O board ...

Page 37: ...er setting J31 Wake on LAN bypass Pins 1 and 2 Normal operation default Pins 2 and 3 Clears Wake on LAN bypass J29 Password override Pins 1 and 2 Normal operation default Pins 2 and 3 Clears Password override J22 Boot recovery Pins 1 and 2 Normal operation default Pins 2 and 3 Enable the UEFI recovery mode NOTE If no jumper is present the server responds as if the jumper is on pins 1 and 2 I O boa...

Page 38: ...mance To download firmware updates for your server complete the following steps NOTE Changes are made periodically to the HUAWEI Web site The actual procedure might vary slightly from what is described in this document In a two node configuration make sure that the Server Firmware FPGA and IMM code are at the same levels on all nodes Before you install optional hardware devices make sure that the ...

Page 39: ...steps that involve removing or installing adapter cables Blue on a component indicates touch points where you can grip the component to remove it from or install it in the server open or close a latch and so on Orange on a component or an orange label on or near a component indicates that the component can be hot swapped which means that if the server and operating system support hot swap capabili...

Page 40: ...ing system when you work inside the server with the power on The server supports hot swap devices and is designed to operate safely while it is turned on and the cover is removed Follow these guidelines when you work inside a server that is turned on Avoid wearing loose fitting clothing on your forearms Button long sleeved shirts before you work inside the server do not wear cuff links while you a...

Page 41: ...npainted metal surface on the outside of the server for at least 2 seconds This drains static electricity from the package and from your body Remove the device from its package and install it directly into the server without setting down the device If it is necessary to set down the device put it back into its static protective package Do not place the device on the server cover or on a metal surf...

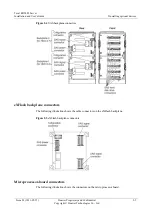
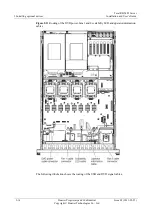
Page 42: ...ide 2 14 Huawei Proprietary and Confidential Copyright Huawei Technologies Co Ltd Issue 02 2011 05 25 Figure 2 11 Routing of the DVD power fans 1 and 2 scalability LED and operator information cables The following illustration shows the routing of the USB and DVD signal cables ...

Page 43: ...erver Installation and User s Guide 2 Installing optional devices Issue 02 2011 05 25 Huawei Proprietary and Confidential Copyright Huawei Technologies Co Ltd 2 15 Figure 2 12 Routing of the USB and DVD signal cables ...

Page 44: ...ervice Guide on the HUAWEI Documentation CD for information about how to run diagnostics To remove the top cover complete the following steps 1 Read t he Tecal RH5485 Safety Information 2 If you are installing or replacing a non hot swap component turn off the server and all attached peripheral devices Disconnect all power cords then disconnect all external signal cables from the server 3 Slide th...

Page 45: ...p component turn off the server and all peripheral devices and disconnect the power cords and all external cables 3 Slide t he server out of the rack until the slide rails lock into place 4 Remove the top cover see Removing the top cover 5 Slide the blue latches on the top cover bracket toward the center of the server Figure 2 14 Slide the blue latches 6 Tilt and lift the top cover bracket out of ...

Page 46: ...acket Figure 2 15 Installing the top cover bracket To replace the top cover bracket complete the following steps 1 Make sure that all internal cables are correctly routed 2 Align the top cover bracket on top of the server so that the metal tabs line up correctly on the chassis and then rotate it into place 3 Slide the blue latches on the top cover bracket toward the outside of the server to lock i...

Page 47: ...s installed in PCI Express slot 7 in some models Locate the documentation that comes with the adapter and follow those instructions in addition to the instructions in this section If you must change the switch setting or jumper settings on the adapter follow the instructions that come with the adapter Avoid touching the components and gold edge connectors on the adapter If you are installing a Ser...

Page 48: ...adapters up to 312 00 mm 12 28 inches long Expansion slots 5 through 7 are non hot plug half length PCI Express 2 0 and can accept adapters up to 167 65 mm 6 6 inches long CAUTION Static electricity that is released to internal server components when the server is powered on might cause the server to halt which might result in the loss of data To avoid this potential problem always use an electros...

Page 49: ...Incorrectly seated adapters might cause damage to the I O board or to the adapter 7 Touch the static protective package that contains the adapter to any unpainted surface on the outside of the server then grasp the adapter by the top edge or upper corners of the adapter and remove it from the package 8 Carefully grasp the adapter by its top edge or upper corners and align it with the connector on ...

Page 50: ...ce start the Setup utility and select Start Options from the main menu See Using the Setup utility on page 87 for details about using the Setup utility The PCI Express 2 0 bus configuration is as follows Expansion slot 1 is x16 slot 2 is x8 x4 lanes and slots 3 through 6 are x8 Expansion slot 7 is a non standard 106 pin connector but accepts PCI Express x8 x4 and x1 standard adapters Expansion slo...

Page 51: ...apter is correctly seated in the connector Incorrectly seated adapters might cause damage to the I O board or to the adapter 7 Touch the static protective package that contains the adapter to any unpainted surface on the outside of the server then grasp the adapter by the top edge or upper corners of the adapter and remove it from the package 8 Carefully grasp the adapter by its top edge or upper ...

Page 52: ...end of each SAS signal cable that came with the eXFlash drive cage and backplane option to the backplane and the other end to the ServeRAID adapter Connect one end of the first cable to Port 0 on the ServeRAID adapter and the other end to connector J39 on the backplane Connect one end of the second cable to Port 1 on the ServeRAID adapter and the other end to connector J40 on the backplane 13 Rein...

Page 53: ...e do so now Otherwise go to Completing the installation 2 10 Installing a hot swap power supply Statement 5 CAUTION The power control button on the device and the power switch on the power supply do not turn off the electrical current supplied to the device The device also might have more than one power cord To remove all electrical current from the device ensure that all power cords are disconnec...

Page 54: ...lide the power supply into the bay and fully close the locking handle by sliding it down to the locked position 5 Connect one end of the power cord for the new power supply into the ac connector on the back of the power supply and connect the other end of the power cord into a properly grounded electrical outlet 6 Make sure that the ac power LED on the power supply is lit indicating that the power...

Page 55: ...all drives to operate at the lowest throughput speed To minimize the possibility of damage to the hard disk drives when you install the server in a rack configuration install the server in the rack before you install the hard disk drives You do not have to turn off the server to install hot swap drives in the hot swap drive bays However you must turn off the server when you perform any steps that ...

Page 56: ...drive is operating correctly If the amber hard disk drive status LED for a drive is lit continuously that drive is faulty and must be replaced If the green hard disk drive activity LED is flashing the drive is being accessed If you have other devices to install or remove do so now Otherwise go to Completing the installation 2 12 Installing a DVD optical drive Figure 2 22 Install a DVD drive To ins...

Page 57: ...eripheral devices and disconnect the power cord and all external cables 3 Remove the server cover see Removing the top cover 4 Remove the top cover bracket see Removing the top cover bracket 5 Pull out the hard disk drives and hard disk drive fillers just enough to disconnect them from the backplane 6 Remove the ServeRAID adapter from behind the hard disk drive backplane 7 Disconnect the SAS signa...

Page 58: ... Proprietary and Confidential Copyright Huawei Technologies Co Ltd Issue 02 2011 05 25 Figure 2 23 Remove the backplane carrier and SAS power cable handle 11 Remove the backplane filler from the backplane carrier Figure 2 24 Remove the backplane filler a Push the tabs on the backplane outward ...

Page 59: ...Connect the new SAS signal cable that came with the backplane to the new backplane 14 Connect the two unconnected power cables from the SAS power cable handle to the new backplane Look at the cabling of the first backplane to make sure that you cable the new backplane correctly 15 Slide the backplane carrier into place until it latches while you hold the SAS power cable handle out of the way 16 In...

Page 60: ...ial Copyright Huawei Technologies Co Ltd Issue 02 2011 05 25 Figure 2 26 ServeRAID M5015 controller Figure 2 27 ServeRAID BR10i controller 18 Install the ServeRAID adapter onto the RAID adapter carrier and then install the carrier into the server Figure 2 28 Install the ServeRAID adapter onto the RAID adapter carrier ...

Page 61: ...er 2 14 Installing a QPI wrap card Figure 2 29 Install a QPI wrap card In a one node server only if your server has more than two microprocessors installed you must install two QPI wrap cards in the server To install a QPI wrap card complete the following steps 1 Read t he Tecal RH5485 Safety Information 2 Turn off the server and peripheral devices and disconnect the power cord and all external ca...

Page 62: ...ernal removable flash drives that are installed in the USB connectors on the I O board You do not have to turn off the server to install an internal removable flash drive Figure 2 30 Install an internal removable flash drive To install an internal removable flash drive complete the following steps 1 Read t he Tecal RH5485 Safety Information 2 Disconnect the power cable and remove the power supply ...

Page 63: ...r PC3 8500 SDRAM Registered DIMM specifications The server supports up to eight memory cards Each memory card holds up to eight DIMMs At least one memory card with one pair of DIMMs must be installed for the server to operate When you install additional DIMMs on a memory card be sure to install them in pairs The DIMMs in each pair must match each other You do not have to save new configuration inf...

Page 64: ... s Guide 2 36 Huawei Proprietary and Confidential Copyright Huawei Technologies Co Ltd Issue 02 2011 05 25 Figure 2 31 Locations of the memory card connectors The following illustration shows the DIMM connectors on a memory card Figure 2 32 DIMM connectors on a memory card ...

Page 65: ...ixth 7 2 and 7 Seventh 1 4 and 5 Eighth 7 4 and 5 If you plan to install additional memory cards in the low cost and low power installation sequence follow the DIMM installation sequence in Table 4 for each memory card Install the memory cards in the installation sequence shown in Table 5 Table 2 3 Low cost and low power memory card installation sequence Memory card pairs Memory card connector num...

Page 66: ...2 and 7 Twenty second 8 2 and 7 Twenty third 4 2 and 7 Twenty fourth 6 2 and 7 Twenty fifth 1 4 and 5 Twenty sixth 7 4 and 5 Twenty seventh 3 4 and 5 Twenty eighth 5 4 and 5 Twenty ninth 2 4 and 5 Thirtieth 8 4 and 5 Thirty first 4 4 and 5 Thirty second 6 4 and 5 To enable memory mirroring you must install DIMMs in sets of four one pair in each memory card All DIMMs in each set must be the same si...

Page 67: ...d 6 Eighth 5 3 and 6 6 3 and 6 Ninth 1 2 and 7 2 2 and 7 Tenth 7 2 and 7 8 2 and 7 Eleventh 3 2 and 7 4 2 and 7 Twelfth 5 2 and 7 6 2 and 7 Thirteenth 1 4 and 5 2 4 and 5 Fourteenth 7 4 and 5 8 4 and 5 Fifteenth 3 4 and 5 4 4 and 5 Sixteenth 5 4 and 5 6 4 and 5 If a problem with a DIMM is detected light path diagnostics lights the system error LED on the front of the server indicating that there i...

Page 68: ...t the memory card has failed DIMM 1 8 error LED When one of these LEDs is lit it indicates that a DIMM has failed Light path diagnostics button power LED When this LED is lit it indicates that the capacitor has power and error LEDs can be lit as necessary Light path diagnostics button Press this button to relight the error LED that had previously been lit Installing a memory card At least one memo...

Page 69: ...card by the retention levers and turn the memory card so that the connector aligns with the connector on the microprocessor board and the guides on the chassis b Insert the memory card into the memory card connector c Press the memory card into the connector and close the retention levers d Slide the blue release latch to the locked position If you have other devices to install or remove do so now...

Page 70: ...the server remove the memory card a Slide the blue release latch to the unlocked position b Open the release levers on the top of the memory card c While you hold the release levers open lift the memory card out of the server 5 Place a memory card on a flat static protective surface with the DIMM connectors facing up CAUTION To avoid breaking the DIMM retaining clips or damaging the DIMM connector...

Page 71: ...ctly with the slot Figure 2 35 Insert the DIMM into the connector 9 Insert the DIMM into the connector by aligning the edges of the DIMM with the slots at the ends of the DIMM connector Firmly press the DIMM straight down into the connector 2 by applying pressure on both ends of the DIMM simultaneously The retaining clips snap into the locked position when the DIMM is seated in the connector NOTE ...

Page 72: ...ose the release levers d Slide the blue release latch to the locked position If you have other devices to install or remove do so now Otherwise go to Completing the installation 2 17 Installing a microprocessor The following notes describe the type of microprocessor that the server supports and other information that you must consider when you install a microprocessor The optional microprocessors ...

Page 73: ...th the microprocessor when you install the microprocessor Read the documentation that comes with the microprocessor to determine whether you have to update the server firmware You can use the Setup utility to determine the specific type of microprocessor in the server Microprocessor sockets must always contain either a heat sink blank or a microprocessor and heat sink Populate the microprocessor s...

Page 74: ...ou handle static sensitive devices take precautions to avoid damage from static electricity For details about handling these devices see Handling static sensitive devices 4 Slide t he blue latches on the top cover bracket toward the center of the server Figure 2 38 Slide the blue latches 5 Lift the top cover bracket out of the server 6 Remove the heat sink blank and store it for future use 7 Open ...

Page 75: ...tallation tool a Touch the static protective package that contains the new microprocessor to any unpainted metal surface on the outside of the server b Twist the handle of the installation tool counterclockwise so that it is in the open position c Using the triangle on the microprocessor to align it with the installation tool place the microprocessor on the underside of the tool d Twist the handle...

Page 76: ...y position the microprocessor with the microprocessor tool over the microprocessor socket Twist the microprocessor tool counterclockwise to insert the microprocessor into the socket Figure 2 41 Position the microprocessor with the microprocessor tool 11 Close the load plate and then rotate the microprocessor release lever to secure the microprocessor Figure 2 42 Secure the microprocessor ...

Page 77: ...el onto the front of the server chassis 2 If you removed the top cover bracket reinstall it Slide the blue latches into the locked position 3 Place the top cover over the top of the server 4 Slide the top cover forward then press down on the cover handle until it clicks into place 5 Connect the cables and power cords to the rear of the server For more information see Connecting the cables Connecti...

Page 78: ...ice drivers that you must install For information about installing device drivers see the documentation that comes with each device The server comes with at least one microprocessor If more than one microprocessor is installed the server can operate as a symmetric multiprocessing SMP server You might have to upgrade the operating system to support SMP For more information see Typical operating sys...

Page 79: ...rver Use this CD during the installation of the server to configure basic hardware features such as an integrated SAS controller with RAID capabilities and to simplify the installation of your operating system For information about obtaining and using this CD see Using the ServerGuide Setup and Installation CD Integrated management module Use the integrated management module IMM for configuration ...

Page 80: ...settings for advanced hardware features View set and change settings for power management features View and clear error logs Resolve configuration conflicts 3 1 1 Starting the Setup utility To start the Setup utility complete the following steps 1 Turn on the server NOTE Approximately 3 minutes after the server is connected to ac power the power control button becomes active 2 When the prompt F1 S...

Page 81: ...tem Settings Memory Memory Mirroring Mode Mirrored Devices and I O Ports Select this choice to view or change assignments for devices and input output I O ports You can configure the serial ports configure remote console redirection enable or disable integrated Ethernet controllers the SAS SATA controller SATA optical drive channels and PCI slots and view the system Ethernet MAC addresses If you d...

Page 82: ...t this choice to view or set the POST loader watchdog timer value Reboot System on NMI Enable or disable restarting the server whenever a nonmaskable interrupt NMI occurs Disabled is the default Commands on USB Interface Preference Enable or disable the Ethernet over USB interface on IMM Network Configuration Select this choice to view and select the system management network interface port the IM...

Page 83: ...twork adapter This choice is on the full Setup utility menu only Boot Manager Select this choice to view add or change the device boot priority boot from a file select a one time boot or reset the boot order to the default setting System Event Logs Select this choice to access the System Event Manager where you can view thePOST event log and the system event log The POST event log contains the thr...

Page 84: ...hout saving them 3 1 3 Password From the User Security menu choice you can set change and delete a power on password and an administrator password The User Security choice is on the full Setup utility menu only If you set only a power on password you must type the power on password to complete the system startup and to have access to the full Setup utility menu An administrator password is intende...

Page 85: ... information that begins on page vii Do not change settings or move jumpers on any system board switch or jumper blocks that are not shown in this document The default for the Password override jumper J29 is Off While the server is turned off move the jumper to pins 2 and 3 clear the power on password override You can then start the Setup utility and reset the power on password You do not have to ...

Page 86: ...recovery J22 jumper to the backup position pins 2 and 3 Use the backup copy of the server firmware until the primary copy is restored After the primary copy is restored turn off the server then move the UEFI boot recovery J22 jumper back to the primary position pins 1 and 2 3 4 Using the ServerGuide Setup and Installation CD The ServerGuide Setup and Installation CD provides software setup tools a...

Page 87: ...nly Checks the microcode firmware levels of a ServeRAID adapter and determines whether a later level is available from the CD Detects installed optional hardware devices and provides updated device drivers for most adapters and devices Provides diskette free installation for supported Windows operating systems Includes an online readme file with links to tips for hardware and operating system inst...

Page 88: ...ted management module IMM is a second generation of the functions that were formerly provided by the baseboard management controller hardware It combines service processor functions video controller and remote presence function in a single chip The IMM supports the following basic systems management features Active Energy Manager Alerts in band and out of band alerting PET traps IPMI style SNMP e ...

Page 89: ...MI Shell The command line interface provides direct access to server management functions through the IPMI 2 0 protocol Use the command line interface to issue commands to control the server power view system information and identify the server You can also save one or more commands as a text file and run the file as a script Serial over LAN Establish a Serial over LAN SOL connection to manage ser...

Page 90: ...u log on 3 On the Welcome page type a timeout value in minutes in the field that is provided The IMM will log you off the Web interface if your browser is inactive for the number of minutes that you entered for the timeout value 4 Click Continue to start the session The System Status page provides a quick view of the server status 3 8 Using the remote presence and blue screen capture features The ...

Page 91: ... half duplex of the network and automatically operate at that rate and mode You do not have to set any jumpers or configure the controllers However you must install a device driver to enable the operating system to address the controllers For device drivers and information about configuring the Ethernet controllers see the Broadcom NetXtreme II Gigabit Ethernet Software CD 3 11 Configuring RAID ar...

Page 92: ......

Page 93: ... correct the interference by taking protective measures If you make any change to this device which is explictly prohibited by FCC regulations your right to operate the device shall be voided 4 2 CE Certification European Union Notice Products that bear the CE lables comply with the EMC Directive 89 336 EEC and the Low Voltage Directive 73 23 EEC issued by the Commission of the European Union If t...

Page 94: ...eral most of the classified products are construction materials or industrial instruments The classified products include industrial products and commercial products For these products some specified features must be tested such as inflammability hazardous performance or government specifications 4 3 3 Recognized This service indicates that components or unfinished products can get the UL approval...

Page 95: ...ct person and telephone number Time when the fault occurred Detailed description of the fault Device type and software version Measures taken after the fault occurs and related results Problem level and required solution deadline 5 1 2 Making Debugging Preparations When you seek for technical support Huawei technical engineer may help you to perform some operations to further collect the fault inf...

Page 96: ...ort department Regional office technical support center Technical support website Customer service center Huawei technical support website http support huawei com You can query how to contact the regional office at http support huawei com 5 4 How to Contact Huawei Huawei provides customers with comprehensive technical support and service Please contact our local office or company headquarters for ...

Reviews: