background image

TP48120A-HD15A1 & TP48120A-HD15A2 & 
TP48200A-HD15A1 & TP48200A-HD15A2 
Installation Guide 

10 Commissioning 


Issue 03 (2014-12-02) 

Huawei Proprietary and Confidential                                     

Copyright © Huawei Technologies Co., Ltd. 

72 


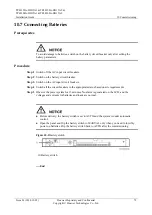
10.7 Connecting Batteries 

Prerequisites 


To avoid damage to batteries, switch on the battery circuit breaker only after setting the 
battery parameters. 

Procedure 

Step 1


Switch off the AC input circuit breakers. 

Step 2


Switch on the battery circuit breaker. 

Step 3


Switch on the AC input circuit breakers. 

Step 4


Switch all the circuit breakers to the appropriate status based on site requirements. 

Step 5


Observe the power system for 15 minutes. No alarm is generated on the LCD, and the 
voltages and currents for batteries and loads are normal. 


Before delivery, the battery switch is set to AUTO and the system is under automatic 
control. 


Open the panel and flip the battery switch to MANUAL only when you need to forcibly 
power on batteries. Flip the battery switch back to AUTO after the commissioning. 

Figure 10-1


Battery switch 


(1) Battery switch 


----End 

Summary of Contents for Telecom Power TP48120A-HD15A1

Page 1: ...TP48120A HD15A1 TP48120A HD15A2 TP48200A HD15A1 TP48200A HD15A2 V500R001 Installation Guide Issue 03 Date 2014 12 02 HUAWEI TECHNOLOGIES CO LTD ...

Page 2: ...ei and the customer All or part of the products services and features described in this document may not be within the purchase scope or the usage scope Unless otherwise specified in the contract all statements information and recommendations in this document are provided AS IS without warranties guarantees or representations of any kind either express or implied The information in this document i...

Page 3: ...ned as follows Symbol Description Indicates an imminently hazardous situation which if not avoided will result in death or serious injury Indicates a potentially hazardous situation which if not avoided could result in death or serious injury Indicates a potentially hazardous situation which if not avoided may result in minor or moderate injury Indicates a potentially hazardous situation which if ...

Page 4: ...d Confidential Copyright Huawei Technologies Co Ltd iii Change History Changes between document issues are cumulative The latest document issue contains all the changes made in earlier issues Issue 03 2014 12 02 Modified SMU06C Issue 02 2014 06 19 Modified section 1 Safety Precautions Issue 01 2014 02 14 This issue is the first official release ...

Page 5: ...ired Tools 6 2 2 Technical Specifications 7 2 3 Installation Dimensions 8 2 4 Requirements for Cable Routing 9 3 Components 10 3 1 Interior 10 3 2 PDU 18 3 3 Rectifier 19 3 4 SMU06C 20 3 5 Sensor and Lamp 26 3 5 1 Optional Smoke Sensor 26 3 5 2 Optional Temperature and Humidity Sensor 27 3 5 3 Optional Water Sensor 28 3 5 4 Lamp 28 4 Installing Cabinets 29 4 1 Unpacking and Acceptance 29 4 2 Remov...

Page 6: ... Cable for the TP48120A HD15A1 or TP48120A HD15A2 55 7 5 2 Installing an AC Input Power Cable for the TP48200A HD15A1 or TP48200A HD15A2 57 8 Optional Installing Batteries 60 8 1 Installing Battery Strings 61 8 2 Installing Copper Bars Between Batteries 62 8 3 Installing Battery Cables 63 9 Verifying the Installation 65 9 1 Checking Hardware Installation 65 9 2 Checking Electrical Connections 65 9...

Page 7: ... tools on the product Follow specified procedures during installation and maintenance Measure contact point voltage with an electric meter before touching a conductor surface or terminal Ensure that the contact point has no voltage or it is within the specified range Note that the load may power off during maintenance or fault location if the power system is not connected to a battery or if batter...

Page 8: ...tion Liquid Prevention Requirements Place this product far away from areas with liquid Do not place the product under positions prone to leakage such as air conditioner vents ventilation vents and feeder windows of the equipment room Prevent liquid from entering the inside of the device to avoid short circuits and ensure that there is no condensation inside the equipment room or device If detectin...

Page 9: ...Preventing Battery Leakage High temperatures may result in battery distortion damage and electrolyte overflow When the battery temperature is higher than 60 C check the battery for electrolyte overflow If the electrolyte overflows absorb and counteract the electrolyte immediately When moving or handling a battery whose electrolyte leaks exercise caution because the leaking electrolyte may hurt hum...

Page 10: ...oisting tools are available and in good condition Before hoisting objects ensure that hoisting tools are firmly fixed onto a weight bearing object or wall Ensure that the angle formed by two cables is less than 90 degrees Using a Ladder Use only ladders that are in good condition Find out and do not exceed the maximum weight capacity The recommended angle for a ladder against another object is 75 ...

Page 11: ...er higher than the roofline Drilling Holes Do not drill holes into a cabinet without permission Non standard drilling may affect the electromagnetic shielding of the cabinet and damage interior cables Metal shards generated during drilling may short circuit circuit boards if they get into the cabinet Before drilling holes into a cabinet remove interior cables Wear goggles and protective gloves whe...

Page 12: ...n Guide 2 Installation Preparations Issue 03 2014 12 02 Huawei Proprietary and Confidential Copyright Huawei Technologies Co Ltd 6 2 Installation Preparations 2 1 Required Tools Figure 2 1 lists the tools that are required for the installation Use tools with insulated handles ...

Page 13: ...fidential Copyright Huawei Technologies Co Ltd 7 Figure 2 1 Installation tools 2 2 Technical Specifications Table 2 1 Technical specifications Model Item Dimensions H x W x D Weight TP48120A HD15A1 Cabinet 1500 mm x 650 mm x 650 mm excluding the base and the protruding part of the door 120 kg excluding rectifiers and batteries Base 100 mm x 650 mm x 650 mm ...

Page 14: ... mm x 650 mm TP48200A HD15A1 Cabinet 1500 mm x 650 mm x 650 mm excluding the base and the protruding part of the door 120 kg excluding rectifiers and batteries Base 100 mm x 650 mm x 650 mm TP48200A HD15A2 Cabinet 1500 mm x 650 mm x 650 mm excluding the base and the protruding part of the door 120 kg excluding rectifiers and batteries Base 100 mm x 650 mm x 650 mm R4830N2 Rectifier 41 mm x 95 5 mm...

Page 15: ...les should be at least five times the diameter of the cables Cables of the same type should be bound together Cables of different types should be a minimum of 30 mm from each other to avoid tangling Cables that are bound together should be close to each other tidy and undamaged Ground cables must not be bound to or tangled with signal cables There should be an appropriate distance between them to ...

Page 16: ...e 03 2014 12 02 Huawei Proprietary and Confidential Copyright Huawei Technologies Co Ltd 10 3 Components 3 1 Interior Figure 3 1 shows the TP48120A HD15A1 interior Figure 3 2 shows the TP48120A HD15A2 interior Figure 3 3 shows the TP48200A HD15A1 interior Figure 3 4 shows the TP48200A HD15A2 interior ...

Page 17: ...d Confidential Copyright Huawei Technologies Co Ltd 11 Figure 3 1 TP48120A HD15A1 interior 1 AC output circuit breakers and terminals 2 Maintenance socket 3 Load low voltage disconnection LLVD circuit breakers 4 AC surge protective device SPD 5 AC input circuit breakers 6 ESD wrist strap 7 Ground bar 8 Space for installing 9 Cable holes ...

Page 18: ...Proprietary and Confidential Copyright Huawei Technologies Co Ltd 12 customer equipment 10 Space for installing batteries 11 Battery low voltage disconnection BLVD circuit breakers 12 Internal circulation fan 13 Battery circuit breakers 14 SMU06C 15 Rectifiers 16 RTN busbar 17 Heat exchanger core 18 External circulation fan ...

Page 19: ...d Confidential Copyright Huawei Technologies Co Ltd 13 Figure 3 2 TP48120A HD15A2 interior 1 AC output circuit breakers and terminals 2 Maintenance socket 3 Load low voltage disconnection LLVD circuit breakers 4 AC surge protective device SPD 5 AC input circuit breakers 6 ESD wrist strap 7 Ground bar 8 Space for installing 9 Cable holes ...

Page 20: ...ietary and Confidential Copyright Huawei Technologies Co Ltd 14 customer equipment 10 Space for installing batteries 11 Battery low voltage disconnection BLVD circuit breakers 12 Internal circulation fan 13 Battery circuit breakers 14 SMU06C 15 Rectifiers 16 RTN busbar 17 Heat exchanger core 18 External circulation fan 19 Heater ...

Page 21: ...d Confidential Copyright Huawei Technologies Co Ltd 15 Figure 3 3 TP48200A HD15A1 interior 1 AC output circuit breakers and terminals 2 Maintenance socket 3 Load low voltage disconnection LLVD circuit breakers 4 AC surge protective device SPD 5 AC input circuit breakers 6 ESD wrist strap 7 Ground bar 8 Space for installing 9 Cable holes ...

Page 22: ...Proprietary and Confidential Copyright Huawei Technologies Co Ltd 16 customer equipment 10 Space for installing batteries 11 Battery low voltage disconnection BLVD circuit breakers 12 Internal circulation fan 13 Battery circuit breakers 14 SMU06C 15 Rectifiers 16 RTN busbar 17 Heat exchanger core 18 External circulation fan ...

Page 23: ...d Confidential Copyright Huawei Technologies Co Ltd 17 Figure 3 4 TP48200A HD15A2 interior 1 AC output circuit breakers and terminals 2 Maintenance socket 3 Load low voltage disconnection LLVD circuit breakers 4 AC surge protective device SPD 5 AC input circuit breakers 6 ESD wrist strap 7 Ground bar 8 Space for installing 9 Cable holes ...

Page 24: ... 220 380 V AC three phase four wire compatible with 220 V AC single phase AC input One 2 pole 63 A AC input circuit breaker One 3 pole 63 A AC input circuit breaker AC output One 1 pole 16 A AC output circuit breaker reserved One 16 A maintenance socket One 1 pole 16 A AC output circuit breaker used for the heater One 16 A maintenance socket One 1 pole 16 A AC output circuit breaker reserved One 1...

Page 25: ...Steady on The rectifier has an AC power input Off The rectifier has no AC power input The rectifier is faulty Blinking at 0 5 Hz The rectifier is being queried Blinking at 4 Hz The rectifier is loading an application program Alarm indicator Yellow Off No alarm is generated Steady on The rectifier generates an alarm for power limiting due to ambient overtemperature The rectifier generates an alarm ...

Page 26: ...g properly Steady on The rectifier locks out due to output overvoltage The rectifier has no output due to an internal fault 3 4 SMU06C Panel Figure 3 6 shows an SMU06C panel Figure 3 6 SMU06C panel 1 Alarm indicator 2 Run indicator 3 LCD 4 Cancel button 5 Down button 6 Enter button 7 Up button Table 3 3 Button description Button Name Description Up Turns to the previous menu or sets parameter valu...

Page 27: ...button is pressed within 1 minute The preset password is 000001 When setting parameter values you can hold down or to quickly adjust values The LCD screen luminance increases or decreases if you hold down and or and simultaneously for more than 2 seconds The SMU is reset if you hold down and simultaneously for more than 10 seconds Indicators Table 3 4 describes the indicators on the SMU06C panel T...

Page 28: ... ports 7 External fan ports 8 Fan power port Communications Ports The SMU06C provides two communications ports which are described in Table 3 5 Table 3 5 SMU06C communications port description Port Communications Parameters Communications Protocol Function COM port Baud rate 9600 bit s and 19 200 bit s Modbus protocol Connects to lower level devices such as the Batt cell detector DC Air Conditione...

Page 29: ... Co Ltd 23 Table 3 6 Description of pins in the COM port Pin Signal Description 1 COM_R Receives data 2 COM_R 3 NC 4 COM_T Sends data 5 COM_T 6 GND Signal ground 7 NC 8 NC Table 3 7 Description of pins in the RS485 RS232 port Pin Signal Description 1 RS485_T Sends data 2 RS485_T 3 RS232_R Receives data 4 RS485_R Receives data 5 RS485_R 6 GND Signal ground 7 RS232_T Sends data 8 NC ...

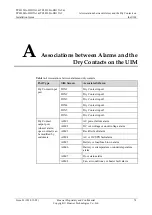
Page 30: ...acts Table 3 8 Sensors and dry contacts description Port Type Silk Screen Description Sensor port TEM HUM Ambient temperature and humidity sensor WATER Water sensor GATE Door status sensor SMOKE Smoke sensor BTEMP Battery temperature sensor TEMP1 Ambient temperature sensor 1 TEMP2 Ambient temperature sensor 2 Dry contact input ports DIN1 NOTE For details about the alarms associated with dry contac...

Page 31: ...Co Ltd 25 Port Type Silk Screen Description Dry contact output ports ALM1 NOTE For details about the alarms associated with dry contact outputs see the appendix ALM2 ALM3 ALM4 ALM5 ALM6 ALM7 ALM8 Table 3 9 Pin definitions Silk Screen No Pin Definition TEM HUM 1 12 V 2 ENV_TEMP 3 12 V 4 ENV_HUM WATER 1 12 V 2 WATER 3 GND 4 GATE 1 GATE 2 GATE SMOKE 1 SMOKE 2 12 V BTEMP 1 BTEMP1 2 GND ...

Page 32: ...ide 3 Components Issue 03 2014 12 02 Huawei Proprietary and Confidential Copyright Huawei Technologies Co Ltd 26 3 5 Sensor and Lamp 3 5 1 Optional Smoke Sensor Figure 3 10 Smoke sensor 1 1 Wiring port 2 Base 3 Indicator Figure 3 11 Smoke sensor 2 1 Wiring port 2 Base 3 Indicator ...

Page 33: ...Installation Guide 3 Components Issue 03 2014 12 02 Huawei Proprietary and Confidential Copyright Huawei Technologies Co Ltd 27 3 5 2 Optional Temperature and Humidity Sensor Figure 3 12 Temperature and humidity sensor 1 Figure 3 13 Temperature and humidity sensor 2 ...

Page 34: ...HD15A1 TP48200A HD15A2 Installation Guide 3 Components Issue 03 2014 12 02 Huawei Proprietary and Confidential Copyright Huawei Technologies Co Ltd 28 3 5 3 Optional Water Sensor Figure 3 14 Water sensor 3 5 4 Lamp Appearance Figure 3 15 Lamp ...

Page 35: ...packing case is severely damaged or wet identify the cause and report the issue to your local Huawei office Step 2 Unpack the cases Step 3 Check the quantity of components against the packing lists attached to the packing cases If the quantity differs from that specified on the packing lists identify the cause and report the issue to your local Huawei office End 4 2 Removing the Cabinet from the P...

Page 36: ...ologies Co Ltd 30 Figure 4 1 Removing a cabinet from a pallet 1 Pallet End 4 3 Marking Hole Positions Prerequisites Keep the installation environment clean and dry Ensure that the concrete floor where the cabinet is to be installed is flat Procedure Step 1 Remove the top cover from the cabinet packing box and find the marking off template on the cover interior as shown in Figure 4 2 ...

Page 37: ...ial Copyright Huawei Technologies Co Ltd 31 Figure 4 2 Taking down the marking off template Step 2 Mark the mounting hole positions based on the marking off template as shown in Figure 4 3 Figure 4 3 Marking hole positions 1 Marker 2 Marking off template 3 Mounting hole 4 Concrete floor Figure 4 4 shows the dimensions of the cabinet and base mounting holes ...

Page 38: ...binet and base mounting holes End 4 4 Drilling Holes and Installing Expansion Sleeves Procedure Step 1 Drill holes to a depth of 52 mm to 60 mm using a hammer drill Step 2 Partially tighten each expansion bolt place it vertically into the hole and use a rubber mallet to pound it until the expansion sleeve completely enters the hole Step 3 Partially tighten the expansion bolts Step 4 Remove the bol...

Page 39: ...ential Copyright Huawei Technologies Co Ltd 33 Figure 4 5 Drilling holes and installing expansion sleeves 1 M12 bolt 2 Spring washer 3 Flat washer 4 Expansion sleeve 5 Expansion nut 6 Concrete floor End 4 5 Hoisting a Cabinet Procedure Step 1 Bind ropes through the lifting eyes and then hoist the cabinet to an appropriate position as shown in Figure 4 6 ...

Page 40: ...5A2 TP48200A HD15A1 TP48200A HD15A2 Installation Guide 4 Installing Cabinets Issue 03 2014 12 02 Huawei Proprietary and Confidential Copyright Huawei Technologies Co Ltd 34 Figure 4 6 Hoisting a cabinet Step 2 Remove the ropes End ...

Page 41: ...right Huawei Technologies Co Ltd 35 4 6 Securing the Cabinet Procedure Step 1 Place the cabinet onto the concrete pad and align the mounting holes on the cabinet with those on the concrete pad Step 2 Place the flat washers spring washers and expansion bolts into the mounting holes of the cabinet Step 3 Secure the expansion bolts Figure 4 7 Securing the cabinet End ...

Page 42: ... Huawei Technologies Co Ltd 36 5 Installing a Ground Cable Procedure Step 1 Route the ground cable into the cabinet through the hole in the left part of the cabinet bottom Ensure that the ground cable is installed securely If devices are not properly grounded damage to devices or human injuries may occur Step 2 Secure the ground cable to the ground bar as shown in Figure 5 1 ...

Page 43: ...TP48200A HD15A1 TP48200A HD15A2 Installation Guide 5 Installing a Ground Cable Issue 03 2014 12 02 Huawei Proprietary and Confidential Copyright Huawei Technologies Co Ltd 37 Figure 5 1 Installing a ground cable 1 Site ground bar End ...

Page 44: ...office The filler panel is removed from the slot where you will install a rectifier Do not put your hands into rectifier slots avoiding electric shocks When a rectifier is running a high temperature is generated around the air exhaust vent at the rear Do not touch the vent or cover the vent with cables or other objects Procedure Step 1 Push the locking latch towards the left Step 2 Draw the handle...

Page 45: ...ectifier End 6 2 Optional Installing a Smoke Sensor Prerequisites You have obtained an ESD wrist strap and a pair of ESD gloves Procedure Step 1 Locate the smoker sensor fastener inside the cabinet top Step 2 Install the smoke sensor base on the fastener Ensure that the switch on the smoker sensor base faces the cabinet door Step 3 Secure the smoke sensor to the base as shown in Figure 6 2 Figure ...

Page 46: ...nect one end of the signal cable for the smoke sensor to the smoke sensor and the other end to the SMOKE port on the SMU06C as shown in Figure 6 3 Figure 6 3 Installing a signal cable for the smoke sensor The SMOKE silkscreen is on the plastic cover in the SMU06C Step 7 Disconnect the ground cable from the ESD wrist strap and take off the ESD wrist strap and ESD gloves End 6 3 Optional Installing ...

Page 47: ... Co Ltd 41 When installing the water sensor keep the sensor bottom 5 mm to 10 mm away from the cabinet bottom Figure 6 4 Installing a water sensor Step 2 Connect the ground cable for the ESD wrist strap and put on the ESD wrist strap and ESD gloves Step 3 Unscrew and remove the SMU06C Step 4 Connect the signal cable for the water sensor to the WATER port on the SMU06C as shown in Figure 6 5 ...

Page 48: ...WATER silkscreen is on the plastic cover in the SMU06C Step 5 Disconnect the ground cable from the ESD wrist strap and take off the ESD wrist strap and ESD gloves End 6 4 Optional Installing a Temperature and Humidity Sensor Prerequisites You have obtained an ESD wrist strap and a pair of ESD gloves Procedure Step 1 Remove the fastener for the temperature and humidity sensor from the left of the c...

Page 49: ...D wrist strap and ESD gloves Step 5 Unscrew and remove the SMU06C Step 6 Connect one end of the signal cable for the temperature and humidity sensor to the sensor and the other end to the TEM HUM port on the SMU06C as shown in Figure 6 6 Figure 6 6 Installing a signal cable for the temperature and humidity sensor The TEM HUM silkscreen is on the plastic cover in the SMU06C Step 7 Close the cover o...

Page 50: ...rature and humidity sensor Step 9 Disconnect the ground cable from the ESD wrist strap and take off the ESD wrist strap and ESD gloves End 6 5 Optional Installing a Lamp Procedure Step 1 Install the lamp on the fastener on the right of the cabinet Step 2 Open the PDU cover Step 3 Connect the negative power cable for the lamp to the F5 circuit breaker recommended on the PDU Step 4 Connect the posit...

Page 51: ...P48120A HD15A2 TP48200A HD15A1 TP48200A HD15A2 Installation Guide 6 Installing Components Issue 03 2014 12 02 Huawei Proprietary and Confidential Copyright Huawei Technologies Co Ltd 45 Figure 6 8 Installing a lamp End ...

Page 52: ...ng cables switch all the circuit breakers to OFF and remove the fuses from positions where cables will be installed 7 1 Optional Installing Dry Contact Signal Cables Procedure Step 1 Press the contact plate using a flat head screwdriver to flip the metal spring inside each dry contact Step 2 Connect the signal cables to the corresponding dry contacts Step 3 Put away the flat head screwdriver and c...

Page 53: ...ect one end of a network cable to the RS485 RS232 port on the SMU Step 2 Connect the other end to the Mon1 port on the baseband unit BBU as shown in Figure 7 2 Figure 7 2 Installing a communications cable 1 RS485 RS232 port on the SMU 2 BBU 3 Mon1 port on the BBU End 7 2 2 NetEco Management Networking Mode 1 over BBU Step 1 Connect one end of a network cable to the RS485 RS232 port on the SMU Step...

Page 54: ... 7 3 Installing a communications cable 1 RS485 RS232 port on the SMU 2 BBU 3 Mon1 port on the BBU End Networking Mode 2 over PSNU Step 1 Connect one end of a network cable to the RS485 RS232 port on the SMU Step 2 Connect the other end to the COM_485 232 port on the PSNU module as shown in Figure 7 4 Step 3 Connect one end of another network cable to the FE port on the PSNU module as shown in Figu...

Page 55: ...onfidential Copyright Huawei Technologies Co Ltd 49 Figure 7 4 Installing communications cables End 7 2 3 NMS Management over YDN1363 Protocol Procedure Step 1 Connect one end of a network cable to the RS485 RS232 port on the SMU Step 2 Connect the other end to the communication port on the NMS that supports YDN1363 protocol as shown in Figure 7 5 ...

Page 56: ...ble 1 RS485 RS232 port on the SMU 2 NMS that supports YDN1363 protocol End 7 3 Installing a DC Output Power Cable Procedure Step 1 Route the DC output power cable into the cabinet through the hole in the right part of the cabinet bottom Step 2 Secure the negative power cable to the corresponding DC output circuit breaker based on the actual load capacity Step 3 Connect the positive power cable to ...

Page 57: ...TP48200A HD15A2 Installation Guide 7 Installing Cables Issue 03 2014 12 02 Huawei Proprietary and Confidential Copyright Huawei Technologies Co Ltd 51 Figure 7 6 Installing a DC output power cable for the TP48120A HD15A1 and TP48120A HD15A2 1 DC Load ...

Page 58: ...48200A HD15A2 Installation Guide 7 Installing Cables Issue 03 2014 12 02 Huawei Proprietary and Confidential Copyright Huawei Technologies Co Ltd 52 Figure 7 7 Installing a DC output power cable for the TP48200A HD15A1 and TP48200A HD15A2 1 DC Load End ...

Page 59: ...8120A HD15A2 and TP48200A HD15A2 are used to power heaters The AC outputs of the TP48120A HD15A1 and TP48200A HD15A1 are reserved for site requirements Procedure Step 1 Remove the cover from the AC output PDU Store the removed cover and reinstall it after installing the AC output power cable Step 2 Route the AC output power cable into the cabinet through the hole in the left side of the cabinet bo...

Page 60: ...TP48200A HD15A2 Installation Guide 7 Installing Cables Issue 03 2014 12 02 Huawei Proprietary and Confidential Copyright Huawei Technologies Co Ltd 54 Figure 7 8 Installing the AC output power cable Step 4 Reinstall the cover on the AC output PDU End ...

Page 61: ...talling an AC Input Power Cable 7 5 1 Installing an AC Input Power Cable for the TP48120A HD15A1 or TP48120A HD15A2 Installing a 220 V AC Single Phase Input Power Cable Procedure Step 1 Route the 220 V AC single phase input power cable into the cabinet through the hole in the left part of the cabinet bottom Step 2 Secure the power cable to the corresponding AC input circuit breakers as shown in Fi...

Page 62: ...8200A HD15A1 TP48200A HD15A2 Installation Guide 7 Installing Cables Issue 03 2014 12 02 Huawei Proprietary and Confidential Copyright Huawei Technologies Co Ltd 56 Figure 7 9 Installing a 220 VAC single phase input power cable 1 ACDB End ...

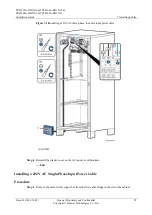
Page 63: ... for the TP48200A HD15A1 or TP48200A HD15A2 Installing a 220 V AC Three Phase Four Wire Input Power Cable Procedure Step 1 Route the 220 V AC three phase four wire input power cable into the cabinet through the hole in the left side of the cabinet bottom Step 2 Remove the plastic cover from AC input circuit breakers Step 3 Secure the AC input power cable to the corresponding AC input circuit break...

Page 64: ...ial Copyright Huawei Technologies Co Ltd 58 Figure 7 10 Installing a 220 VAC three phase four wire input power cable 1 ACDB Step 4 Reinstall the plastic cover on the AC input circuit breakers End Installing a 220 V AC Single Phase Input Power Cable Procedure Step 1 Remove the short circuit copper bar from the first cable bridge in the left of the cabinet ...

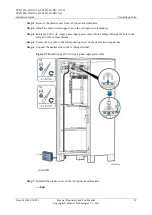
Page 65: ...the short circuit copper bar on the AC input circuit breakers Step 4 Route the 220 V AC single phase input power cable into the cabinet through the hole in the left part of the cabinet bottom Step 5 Secure the live wire to the corresponding screw on the short circuit copper bar Step 6 Connect the neutral wire to the N wiring terminal Figure 7 11 Installing a 220 VAC single phase input power cable ...

Page 66: ...iately If battery acid contacts skin or clothing wash with soap and water immediately Do not use metal to simultaneously contact two or more battery terminals Do not use metal to simultaneously touch battery terminals and grounded objects for example battery compartment otherwise transient short circuit occurs which produces sparks or explosion During battery installation never short circuit or re...

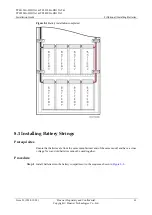
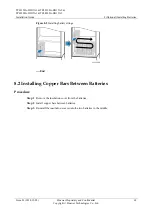
Page 67: ...Copyright Huawei Technologies Co Ltd 61 Figure 8 1 Battery installation completed 8 1 Installing Battery Strings Prerequisites Ensure that batteries are from the same manufacturer and of the same model and have a close voltage New and old batteries cannot be used together Procedure Step 1 Install batteries into the battery compartment in the sequence shown in Figure 8 2 ...

Page 68: ...i Proprietary and Confidential Copyright Huawei Technologies Co Ltd 62 Figure 8 2 Installing battery strings End 8 2 Installing Copper Bars Between Batteries Procedure Step 1 Remove the insulation cover from the batteries Step 2 Install copper bars between batteries Step 3 Reinstall the insulation covers onto the two batteries in the middle ...

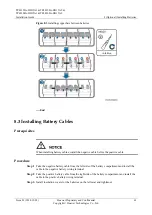
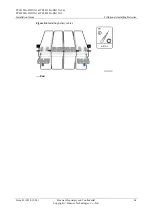
Page 69: ... Cables Prerequisites When installing battery cables install the negative cable before the positive cable Procedure Step 1 Take the negative battery cable from the left side of the battery compartment and install the cable to the negative battery wiring terminal Step 2 Take the positive battery cable from the right side of the battery compartment and install the cable to the positive battery wirin...

Page 70: ...HD15A2 TP48200A HD15A1 TP48200A HD15A2 Installation Guide 8 Optional Installing Batteries Issue 03 2014 12 02 Huawei Proprietary and Confidential Copyright Huawei Technologies Co Ltd 64 Figure 8 4 Installing battery cables End ...

Page 71: ... Electrical Connections Check that all circuit breakers or fuses are OFF Check that flat washers and spring washers are securely installed for all OT terminals and that all the OT terminals are intact and properly connected Check that batteries are correctly installed and that battery cables are correctly connected and not short circuited Check that input and output power cables and ground cables ...

Page 72: ...ng check that the status of the related unit or component meets requirements before turning on any switch When you are performing operations and do not want others to operate attach the label Do not turn on the switch because operations are in process to the power distribution device During commissioning shut down the device immediately if any fault is detected Rectify the fault and proceed with t...

Page 73: ...the display language Table 10 1 Setting the display language Main Menu Second Level Menu Third Level Menu Default Value Setting Value Parameters Settings Local Parameters Language English English 中文 10 3 Setting the Date and Time Set the date and time as required Table 10 2 Setting the date and time Main Menu Second Level Menu Third Level Menu Default Value Setting Value Parameters Settings Local ...

Page 74: ... battery routes 1 and 2 are respectively connected to a battery string each battery string consists of four 12 V 100 Ah batteries in series set Battery1 Connected and Battery2 Connected to Yes and others to No and set Rated Capacity to 100 Ah If battery route 1 is connected to two battery strings in parallel each battery string consists of four 12 V 100 Ah batteries in series set Battery1 Connecte...

Page 75: ...vel Menu Fourth Level Menu Fifth Level Menu Setting Value Parameters Settings Comm Parameters Serial Port North485bound Port Mode Manual Protocol Type M S Protocol North bound Baud Rate 9600 Comm Address 3 End 10 6 2 Setting Parameters Before Using NetEco Management Networking Mode 1 over BBU Step 1 On the LCD check that the port mode protocol type baud rate and communication address are the same ...

Page 76: ...l Protocol Type M S Protocol North bound Baud Rate 9600 Comm Address 3 Step 2 Set the IP address subnet mask and gateway on the LCD as shown in Table 10 8 Step 3 Set the IP addresses and ports for the active and standby servers of the NetEco on the LCD as shown in Table 10 8 Table 10 8 Network parameters Main Menu Second Level Menu Third Level Menu Fourth Level Menu Default Value Setting Value Par...

Page 77: ...rt for the NetEco End 10 6 3 Setting Communications Parameters YDN1363 NMS Procedure Step 1 On the LCD check that the port mode protocol type baud rate and communication address are the same as the default values in Table 10 9 Table 10 9 Communications parameters Main Menu Second Lev el Menu Third Leve l Menu Fourth Level Menu Fifth Level Menu Setting Value Parameters Settings Comm Parameters Seri...

Page 78: ...on the battery circuit breaker Step 3 Switch on the AC input circuit breakers Step 4 Switch all the circuit breakers to the appropriate status based on site requirements Step 5 Observe the power system for 15 minutes No alarm is generated on the LCD and the voltages and currents for batteries and loads are normal Before delivery the battery switch is set to AUTO and the system is under automatic c...

Page 79: ...ubsequent Operations Procedure Step 1 Reinstall the removed cover or panel if there is Step 2 Seal used cable holes by using fireproof mud and seal empty cable holes by using plugs or lids Step 3 The paint on the surface of the cabinet should be kept intact Therefore any damaged paint must be repaired Step 4 Lock the cabinet door and hand over the key to the administrator Clean the site and leave ...

Page 80: ...Silk Screen Associated Alarm Dry Contact input port DIN1 Dry Contact input 1 DIN2 Dry Contact input 2 DIN3 Dry Contact input 3 DIN4 Dry Contact input 4 DIN5 Dry Contact input 5 DIN6 Dry Contact input 6 Dry Contact output port closed alarm open normal can be modified by customers ALM1 AC power failure alarm ALM2 DC overvoltage or undervoltage alarm ALM3 Rectifier fault alarm ALM4 AC or DC SPD fault...

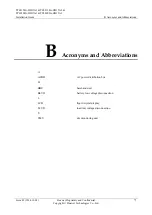
Page 81: ...ns Issue 03 2014 12 02 Huawei Proprietary and Confidential Copyright Huawei Technologies Co Ltd 75 B Acronyms and Abbreviations A ACDB AC power distribution box B BBU baseband unit BLVD battery low voltage disconnection L LCD liquid crystal display LLVD load low voltage disconnection S SMU site monitoring unit ...

Reviews: