Installing the AP
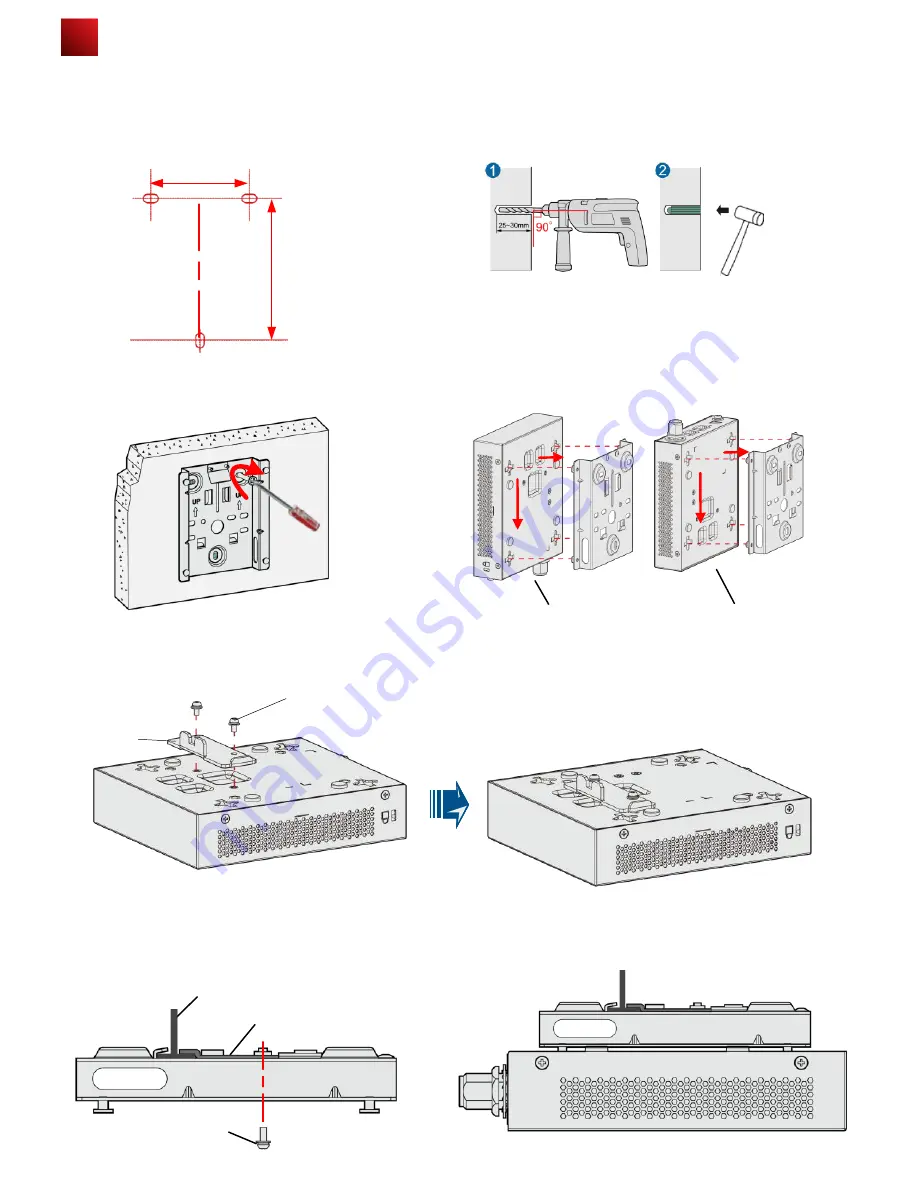
To wall-mount the device using a wall-mounting bracket, perform the following operations:
Install the T-rail:
1. Fix a clip holder at the rear side of the AP with two M3*6 screws. The wall-mounting bracket is fixed at the ceiling, and
the AP is hung on the bracket. The clip holder prevents the AP from dropping.
M3*6 screw
Clip holder
1) Attach the wall-mounting bracket to the wall, adjust
the installation position, and use the marker, level, and
measuring tape to mark the drilling positions where
expansion bolts are installed.
3) Fix the wall-mounting bracket to the wall, and use
the Phillips screwdriver to fasten three self-tapping
screws into the expansion tubes.
2) Use #6 drill bit to drill 25-30 mm deep holes in the drilling
positions. Hammer the expansion tubes into the holes until the
expansion tubes are embedded into the wall.
4) Align the holes at the rear side of the AP with the hooks on
the bracket and hang the AP on the bracket. Hold the AP with
one hand and press the AP downwards with another hand to
secure the AP on the bracket. The AP can be installed with
antennas upwards or downwards, which depends on cable
routing.
2. Use screws to fix the adjustable buckle to the wall-
mounting bracket, hook the adjustable buckle to the T-rail,
and secure the screw on the adjustable hook to fasten the
wall-mounting bracket and T-rail.
3. Align the cucurbit holes at the rear side of the AP with
the foUr hooks on the bracket. Ensure that the AP is
installed in the correct direction; otherwise, the clip holder
cannot fix the AP.
T-rail
Adjustable
buckle
M3*6 screw
Field strength
场强示意
Underfloor cabling
Overhead cabling
59mm
8
5
m
m
5


