17
©Hubbell Incorporated | hubbellpowersystems.com
TD09232E
©Hubbell Incorporated | hubbellpowersystems.com
TD09232E
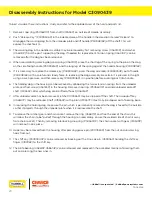
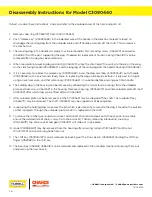
1. Remove bolt in Handle Assembly (P0010997P) from shaft (P3090791P). Then remove cap (P3090822P) and
washer (P0011485P)..
2. Push "release key" (P3090346P) in the indented area of the handle in the direction marked "release" to
disengage the handle dog (E3090354P) from the unloader plate and lift handle (P3090816P) off the shaft.
This will expose the mechanism.
3. The dog inside the Handle Assembly (E3090354P) may be removed by first removing screw (056013P) and
washer (056014P) from the post supporting the dog. Torsion spring (056010P) can be removed, after the dog,
if needed.
4. When reassembling handle, dog, (E3090354P) and spring (056010P), place the short leg of the spring to the
pin on the dog, and the long leg of the spring against handle housing (P3090816P).
5. If necessary, to replace the release key (P3090346P), remove nut (056748P) and press the dog assembly
(E3090354P) out of housing (P3090816P) with a careful and steady force. In replacing the dog assembly,
be certain it is pressed in straight, using an even pressure, and that release key is in position before pressing
post into housing.
6. The housing dog (E3090354P) can be removed by unhooking the long extension spring (056009P) from the
unloader plate (E3090356P) and screw (056163P) in the housing and the short extension spring (P3090352P)
from the dog post and spring anchor pin (P3090347P). Remove snap ring (PS056011P)
and remove unloader plate and lift dog (E3090354P) off post.
7. In replacing the housing dog, make sure the pin, which is permanently secured to the dog, is faced to the
outside so that it will project through the unloader plate when unloader plate is replaced on the shaft.
8. To remove shaft (P3090791P) (the ratchet gear and chain socket are integral), remove ring (056871P) and
free the end of the chain (019353P). This will allow the chain to be "pulled" through the housing (on reassembly,
ensure the welded side of chain is away from chain socket). Remove Interlocking Snap Ring (PS056011P) by
carefully prying one end apart using screwdriver. Take care to ensure parts do not fly away when ring un-snaps.
The shaft (P3090791P) can then be slid through its bearing.
9. Hook (019562P) is assembled to housing (P3090476P) and the nut is pinned in place. If hook is to be replaced,
it must be sawed through shank adjacent to the top of the housing.
10. The shift key (P3090043P) can be removed by backing out the drive-lock pin (059036P) holding the shift key
finger (019296P) to the shift key.
11. The Oilite bearings (058613P, 058614P, 019305P) can be removed and replaced by pressing them out and
pressing the new ones in.
Disassembly Instructions for
Models 3011S and C3090438
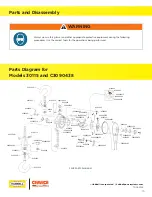
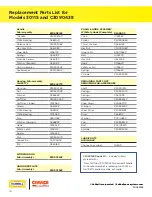
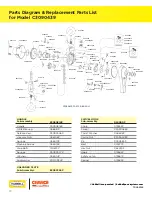
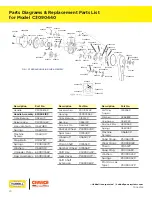
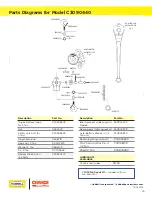
To best visualize these instructions, study and refer to the exploded view of the hoist and parts list.

