16
P817-1187 Rev A
7—Pre-Operation Checks
Energizing
Step 1. — Reassembly
Prior To Energizing
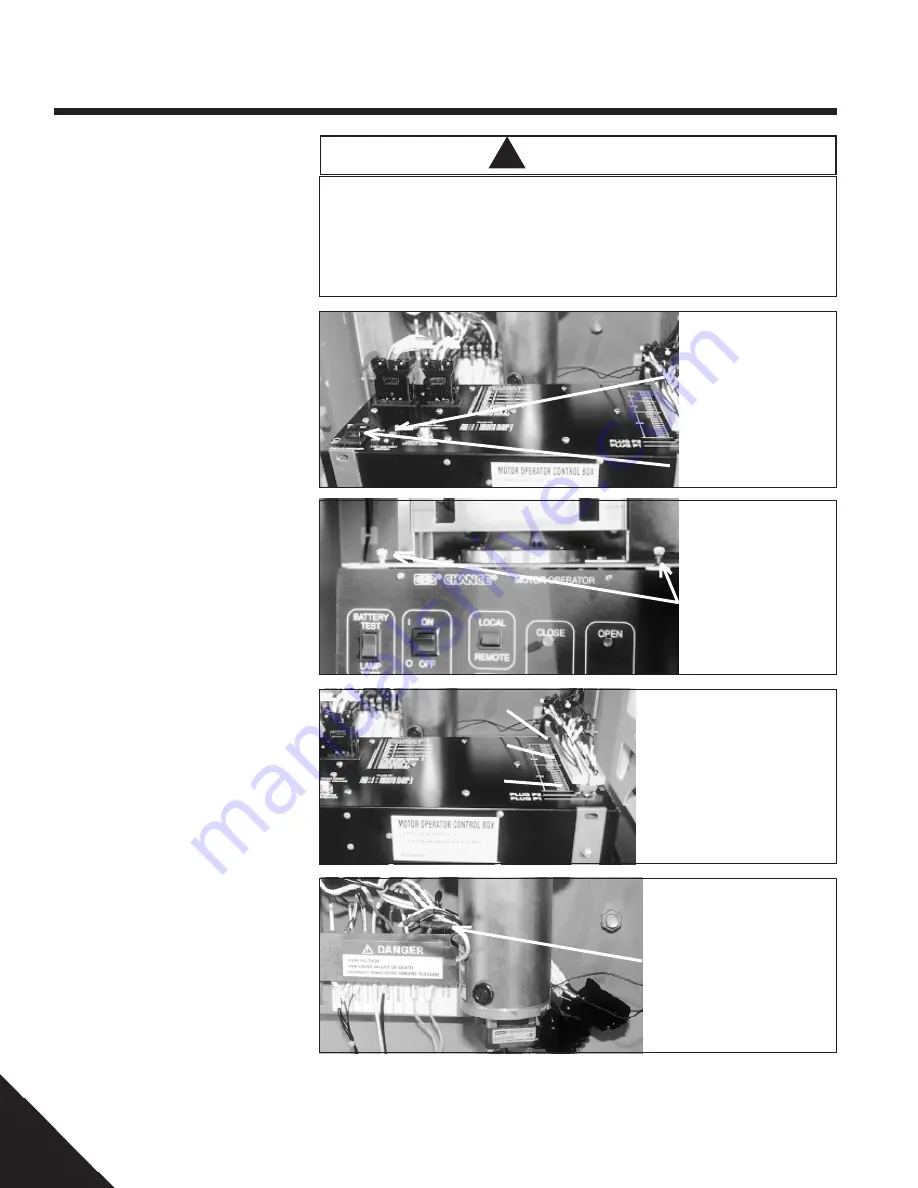
• Refer to Photograph F
• Place control box into mounting slots
• Reconnect all of the plugs to the
control box
NOTE: Plugs P2A and P2B can be
interchanged. See next step for lo-
cation of these plugs and how to
reverse direction of the motor op-
erator.
• Set control box voltage selector switch to
match incoming power supply
voltage (see Photograph F)
• Turn the circuit breaker on the back of the
control box to “ON” position
(see Photograph F)
• Rotate control box to the upright
position and tighten thumbscrews
(see Photograph G)
Reversing Motor Rotation
Step 1. — Reversing
Motor Operator Rotation
Note: The motor operator is factory
set to open the overhead distribu-
tion switch by pulling down on
control pipe and pushing up on the
control pipe to close. Proceed only
if the overhead switch opens by
pushing up on the control pipe.
• Skip this procedure if the overhead switch
opens by pulling down on the control pipe.
• Refer to Photograph H
• Factory set has plugs P2A at the back,
P2B in the middle and P2C at the front
(see Photograph H)
• To reverse the motor operator:
1) reverse plugs P2A and P2B
2) Pull apart the two quick discon-
nect motor lead terminals and reverse the
connections (see Photograph I)
• The motor operator will now operate by
pushing up on the control pipe to open
overhead switch.
Plug P2C
Plug P2B
Plug P2A
Voltage selector switch must be set properly.
Misapplied voltage will result in mis-operation and/or damage equipment
Set voltage selector switch on the back of the control box back to match incoming power
voltage.
Photo F
Voltage
selector
switch
Circuit breaker
Photo G
Control box
thumbscrews
Photo H
To reverse motor
operator, switch
plugs P2A and P2B
Photo I
Motor lead
terminals
!
CAUTION


