Pub. 42004-566A
TempSense Models TS200/TS200W
Page 4 of 9
P:\Standard IOMs - Current Release\42004 Instr. Manuals\42004-566A.docx
03/21
Stand Mount
Mount the TS200/TS200W to a tripod or
microphone stand using the included L-
bracket (see Figure 8).
1.
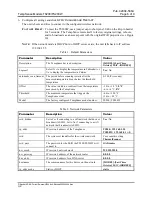
Secure the mounting plate (
TS200
: see
TS200W
: see Figure 7) to the
TS200/TS200W using the four
included #6-32 screws.
2.
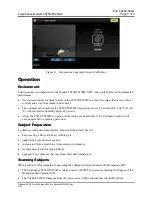
Secure the L-bracket to the mounting
plate using the two included #8-32 flat
head machine screws (see Figure 9).
3.
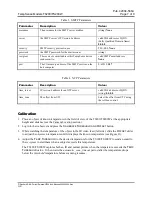
Secure the L-bracket to a microphone
stand or tripod (see Figure 8).
Connection
Model TS200
Plug a Category 5e or better Ethernet cable
with RJ45 plug from a PoE switch port into
the TS200’s Ethernet jack pigtail. The
TS200's IR sensor has a white LED that
blinks slowly for 40 seconds, then changes
to a fast blink.
N
OTE
:
If the IR sensor LED does not
flash, press the sensor into its
socket using a soft cloth, then
reboot the device.
The Model TS200 boots up and is ready for
configuration (see the Configuration
section) or scanning subjects (see the
Operation section) after adjusting to its
environment (
about 10–30 minutes
).
Model TS200W
1.
Plug the included power supply into the
power cord pigtail on the TS200W.
2.
Plug the power supply into a 120 V ac
outlet.
The TS200W's IR sensor has a white LED that blinks slowly for 40 seconds, then changes to a fast blink.
N
OTE
:
If the IR sensor LED does not flash, press the sensor into its socket using a soft cloth, then reboot
the device.
The Model TS200W boots up and is ready for configuration (see the Configuration section) or scanning
subjects (see the Operation section) after adjusting to its environment (
about 10–30 minutes
).
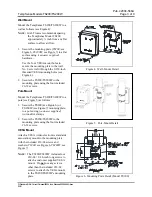
Figure 7. Mounting Plate Detail (Model TS200W)
Figure 8. TS200/TS200W L-Bracket Detail
Figure 9. L-Bracket Attachment for Tripod/Microphone
Stand Mounting


