STEP I
MOUNTING PREPARATION
CAUTION: FIXTURE WEIGHTS ABOUT 30 POUNDS
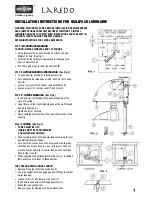
• Using template (A) lay over junction box (B) on the wall.
Mark at (3) hole. (See Fig.1)
• Drill wall for the hardware appropriate for the type wall.
Use 1/4 diameter bolt.
• Pull the supply wires (C) from junction box (B) .
STEP II
FIXTURE MOUNTING PREPARATION
(See Fig. 2)
• To open door (E), loosen (2) retaining screws (F).
• For optional quick release door latch, push pin (D) to open
door (E).
• Loosen (4) screws (X) and them remove reflector (H).
• Loosen screws (O), remove cover (P) and discard.
STEP III
FIXTURE MOUNTING
(See Fig.3)
• Insert all wires (C) through slit on gasket opening at the
back of housing.
• Hang fixture on the mounting hardware at the wall through
key-slots opening (J).
• Tighten bolts (K) securely.
• Apply caulking sealant around the top and two sides of the
housing.
Step IV
WIRING
(See Fig. 3)
• POWER MUST BE OFF.
(WIRING MUST BE PERFORMED BY
A QUALIFIED ELECTRICIAN)
• Wire service leads to fixture power leads according to local
and National Electric Codes.
• For direct wire connections, connect ground wire to green
wire then push ware back to J-box on the wall. Connect
black to black and white to neutral then push connections
back inside J-box (B).
• When supplied with optional terminal block (L) or fuseblock
(M) connect service leads to these devices.
FOR THROUGH WIRING USING CONDUIT
• Remove hole plug (N) for the conduit entry
• Use pipe sealant before engaging conduit fittings to prevent
water leakage.
• Loosen screw (O) and remove wire cover (P).
• Insert fixture lead wires (Q) through grommet ( R ).
• Make the wire connections.
• Replace cover (P) making sure not to pinch wires.
INSTALLATION INSTRUCTIONS FOR WALLPACK LUMINAIRE
Outdoor Lighting
laredo
WARNING: DISCONNECT POWER BEFORE INSTALLATION OR MAINTENANCE.
READ INSTRUCTIONS CAREFULLY BEFORE ATTEMPTING TO INSTALL
LUMINAIRE, FAILURE TO COMPLY WITH INSTRUCTIONS COULD RESULT IN
PERSONAL INJURY AND/OR PROPERTY DAMAGE.
RETAIN INSTRUCTIONS FOR FUTURE REFERENCE.


