background image

16

Parent Unit Menu Options 

4.6  Camera Control
4.6.1  Add (pair) a camera

1.  Press the   button to access the menu.
2.  Press the 

<

 LEFT button or 

>

 RIGHT button until   is highlighted, the 

- (delete) / + (add) /   (view) /   (scan) menu options will display.

3.  Press the 

+

 UP button or 

DOWN button to (add), and press 

the 

 button to confirm.

4.  Camera 

1

 / 

2

 / 

3


/ 4 will display. Press the 

+

 UP button or 

DOWN 

button to select the desired Camera, and press the   button to start 
searching for a camera unit.

Note:

 If a camera is currently paired with the Parent Unit, its camera 

location (with a * against it) cannot be selected for a new registration.

5.  Press and hold the 

PAIR

 button on the back of the Baby Unit until 

the Parent Unit finds the camera, beeps and 

PAIR OK

 appears on the 

screen. The video from the camera will then appear.

Note: 

A camera can only be registered to one Parent Unit at any one time.

4.6.2  View a camera

1.  Press the   button to access the menu.
2.  Press the 

<

 LEFT button or 

>

 RIGHT button until   is highlighted, the 

- (delete) / + (add) /   (view) /   (scan) menu will display.

3.  Press the 

+

 UP button or 

DOWN button to select   (view), and 

press the 

 button to confirm.

4.  Camera 

1

 / 

2

 / 

3

 / 

4

 will display, press the 

+

 UP button or 

DOWN 

button to select the desired Camera, and press the   button to view the 
picture from that camera.

Note: 

Only camera locations with a * can be selected.

TIP 

You can also press the 


button repeatedly to select the available camera 

options from


1

 / 

2

 / 

3

 / 

4

 ,  (scan)

.

Summary of Contents for connected Nursery Pal Skyview

Page 1: ...USER S GUIDE Nursery Pal Cloud Nursery Pal Cloud Twin The features described in this user s guide are subject to modifications without prior notice 5 Smart HD Baby Monitor with Night Light...

Page 2: ...of your dated sales receipt to confirm warranty status Registration is not required for warranty coverage For product related questions please contact Live Chat hubbleconnected com Email support hubbl...

Page 3: ...ss to turn the LCD screen ON OFF Note audio is maintained 7 Microphone 8 MENU button Press to open close the Menu options 9 Navigation button Move Up Down Right Left menu options Move the image upward...

Page 4: ...Playlist 10 lullabies 8 audiobooks Audio Recording and Volume Control Alarm Setting 6h 4h 2h OFF On status bar indicates alarm set and when flashing that alarm time has been reached or missed Temperat...

Page 5: ...cal equipment such as TVs computers cordless or mobile phones fluorescent lights or dimmer switches Other 2 4GHz products such as wireless networks Wi Fi routers Bluetooth systems microwave ovens or o...

Page 6: ...by Monitor 13 3 1 Setting Up 13 3 2 Night Vision Mode 13 3 3 Talk Mode 13 3 4 Video ON OFF 13 3 5 Temperature Display HH C F or LL C F 13 4 Parent Unit Menu Options 14 4 1 Volume 14 4 2 Brightness 14...

Page 7: ...ces 19 5 3 Setup 20 5 4 User Account and Camera Setup on Android Devices or iPhone iPad 20 5 4 1 Power ON and Connect the Camera 20 5 4 2 Download HubbleClub by Hubble Connected App 20 5 4 3 Sign up w...

Page 8: ...Safety Instructions WARNING Strangulation Hazard Children have STRANGLED on cords Keep this cord out of the reach of children more than 3ft 1m away Never use extension cords with AC Adaptors Only use...

Page 9: ...dren to play with it This Baby Monitor is not a substitute for responsible adult supervision Keep this User s Guide for future reference Keep the cords out of reach of children Do not cover the Baby M...

Page 10: ...unit turns on and the power indicator lights in Green colour Note Only use the supplied power adaptor DC5V 1000mA 2 2 Fixing magnetic mount on the wall Pair button Mark the position of the screw hole...

Page 11: ...n battery 2100mAh allows portability to the parent unit The battery provides up to 4 hours operation of the Parent Unit We recommend charging the parent unit battery for at least 4 hours before first...

Page 12: ...3 Press the UP button or DOWN button to select add and press the button to con rm 4 Camera 1 2 3 4 will display Press the UP button or DOWN button to select the desired Camera and press the button to...

Page 13: ...nit detects a low level of ambient light the LEDs will automatically activate and the screen on the Parent Unit will display in black and white The icon will be displayed at the top of the screen 3 3...

Page 14: ...s the LEFT button or RIGHT button until is highlighted 3 Press the UP button or DOWN button to select 1X to 2X zoom 4 4 Audio Playlist You can playback audio content Lullabies Soothing Sounds and Audi...

Page 15: ...Connected App 1 Press the button then Scroll Left Right to select option in the menu 2 Scroll Up or Down to select and press the button to confirm 3 Press UP button or DOWN button to select the desire...

Page 16: ...ss and hold the PAIR button on the back of the Baby Unit until the Parent Unit nds the camera beeps and PAIR OK appears on the screen The video from the camera will then appear Note A camera can only...

Page 17: ...a if there is only one registered camera 4 6 4 Scan camera This function is only available when you have more than 1 Baby Unit Camera 1 Press the button to access the menu 2 Press the LEFT button or R...

Page 18: ...creen function is On you can view multiple cameras on the screen 1 Press the button to access the menu 2 Press the LEFT button or RIGHT button until is highlighted 3 Press UP button or DOWN button to...

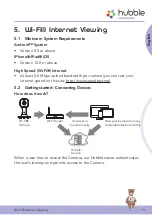
Page 19: ...Mbps upload bandwidth per camera you can test your internet speed on this site http www speedtest net 5 2 Getting started Connecting Devices How does it work Access your Camera locally View your Came...

Page 20: ...a Setup on Android Devices or iPhone iPad What you need Wi Fi Camera Unit Power adaptor for the Camera Device with Android system version 8 0 and above Or iPhone iPad with iOS version 12 0 and above 5...

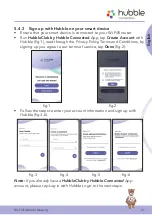
Page 21: ...eate Account with Hubble fig 1 read through the Privacy Policy Terms and Conditions by signing up you agree to our terms of service tap Done fig 2 fig 1 fig 2 Follow the steps to enter your account in...

Page 22: ...Hubble Account by entering User Name and Password fig 7 Tap Add Your Device on the screen of your device to add new Camera fig 8 fig 7 fig 8 To select your device for setting up by tapping Baby Monio...

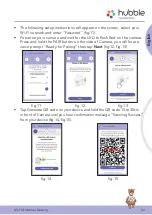
Page 23: ...for the LED to flash Red on the camera Press and hold the PAIR button on the side of Camera you will hear a voice prompt Ready for Pairing then tap Next fig 12 fig 13 fig 11 fig 12 fig 13 Tap Generat...

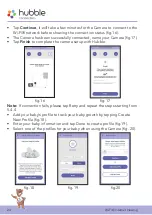
Page 24: ...r Camera fig 17 Tap Finish to complete the camera setup with Hubble fig 16 fig 17 Note If connection fails please tap Retry and repeat the steps starting from 5 4 4 Add your baby s profile to track yo...

Page 25: ...your area The internal battery should be disposed of with the Parent unit in an environmentally friendly manner according to your local regulations 7 Cleaning Clean the Baby Monitor with a slightly d...

Page 26: ...an reactivate the screen by pressing any button Registration If the Baby Unit has lost its link with the Parent Unit If the Baby Unit is too far away it may be going out of range so move the Baby Unit...

Page 27: ...t positions in the rooms Noise interference on your device To avoid background noise or echoes ensure that there is enough distance between your device and the Wi Fi Camera Unit Use of other 2 4 GHz p...

Page 28: ...red Please ensure that you have registered with us Tap Create Account to create an account Account What do I do if I forgot my password Click on the Forgot Password link on https app hubbleconnected c...

Page 29: ...t your video times out after 5 minutes You can click on the Camera again from the Android iOS application to start streaming again If you are accessing from your webbrowser then you can press on the R...

Page 30: ...Android and iOS I am not able to find my Camera during the last step and the setup fails Please reset the Camera to setup mode and try again Press and hold the PAIR button on the side of the camera u...

Page 31: ...on 12 0 General I do not hear any sound when I am accessing a remote Camera You can tap on the speaker icon in the video stream screen to hear audio By default the audio is not ON when you are accessi...

Page 32: ...econnect and this results in lost sound and choppy video You will need to turn off the Auto Lock function of your device to ensure continuous video audio streaming Features How many users can access t...

Page 33: ...ects in material and workmanship under normal use for a period of 1 year from the date of purchase and that any certified accessory Accessory sold for use with this product will be free from defects i...

Page 34: ...IT THE DISCLAIMER OF WARRANTIES THEN THE IMPLIED WARRANTY OF MERCHANTABILITY AND FITNESS FOR A PARTICULAR PURPOSE IS LIMITED TO THE DURATION OF THIS LIMITED WARRANTY REPAIR OR REPLACEMENT IS YOUR SOLE...

Page 35: ...ent that replacement is necessary to remedy a defect in material or workmanship HUBBLE may use new or remanufactured products accessories or parts of equal quality to the original Product or Accessory...

Page 36: ...ction with your purchase of any Product and or Accessory FCC and IC regulations FCC Part 15 Note This equipment has been tested and found to comply with the limits for a Class B digital device pursuan...

Page 37: ...English 10 Technical Specifications BABY UNIT Frequency 2400 MHz to 2483 5 MHz Image sensor color CMOS 2M Pixels IR LED 8 pcs Operating Temperature 41o F 104o F Power Adaptor Input 100 240V AC 50 60Hz...

Page 38: ...8 steps Volume Control 8 steps Power Adaptor Input 100 240V AC 50 60Hz 300mA Output 5 0V DC 1000mA WARNING Use only with provided power supply Battery built in TMB i9300 3 8V 2100mAh Lithium Ion Poly...

Page 39: ...old by Hubble Baby HK Limited Apple logo is trademark of Apple Inc registered in the U S and other countries App Store is a service mark of Apple Inc Google Play and Android are trademarks of Google I...

Reviews: