10
Wi-Fi® Internet Viewing
3.3 Setup
Connect the Wi-Fi® Camera to the Power Adapter, then plug into mains
power. The Camera must be within range of the Wi-Fi® router with which you
want to connect. Make sure the password of the router is available for entering
during the in-app setup process.
LED status indicators
Status
LED Behaviour
1
Power Up Initialising
The BLUE LED lights for around 5
seconds then extinguishes
2
Camera is initialised
The RED LED blinks every second
3
Pair mode (after long press of the
pair button approx 5 secs)
The RED and BLUE LEDs blink
alternately
4
Camera set-up and connected to
server
The BLUE LED is on continuously
5
Connected to router previously
but connection to server is lost
The RED LED blinks every 2
seconds
Note
:
You can only setup via a compatible smartphone or tablet and not
via a PC.
3.4 User Account and Camera Setup on Android™ Devices or
iPhone®/iPad®
What you need
• Wi-Fi® Camera Unit
• Power adapter for the Camera
• Device with Android™ system version 7.0 and above
• Or iPhone®/iPad® with iOS version 10.0 and above
3.4.1 Power ON and Connect the Camera
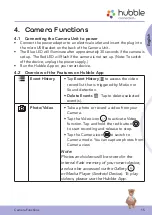
• Connect the power adapter to mains power and insert the plug into the
power socket on the back of the Camera Unit, the unit turns on.


