background image

12

Getting Started

Note: 

When the Baby and Parent Units are both turned on and within range, the Parent 

Unit should show a color image from the Baby Unit camera, but if the room is 

dark, the image will be in black and white, with an   icon showing the Baby Unit 

is in Night Vision mode.

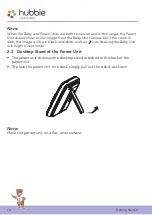
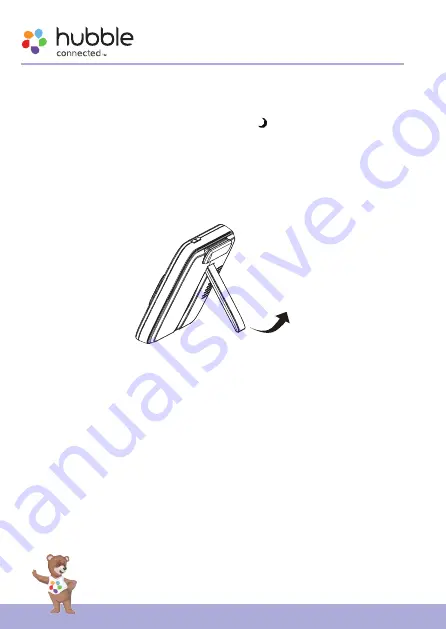
2.3  Desktop Stand of the Parent Unit 

•  The parent unit comes with a desktop stand attached to the back of the 

parent unit.

•  To place the parent unit on a desk, simply pull out the stand, as shown.

Note:

Place the parent unit on a flat, even surface.

Summary of Contents for Nursery View Pro

Page 1: ...USER S GUIDE Nursery View Pro Nursery View Pro Twin The features described in this user s guide are subject to modifications without prior notice 5 Video Baby Monitor...

Page 2: ...egistration is not required for warranty coverage For product related questions please contact Live Chat hubbleconnected com Email support hubbleconnected com https hubbleconnected com warranty https...

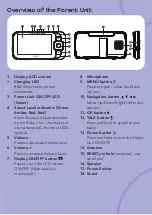
Page 3: ...t up 5 Volume Press to decrease Volume level 6 Volume Press to increase Volume level 7 Display ON OFF button Press to turn the LCD screen ON OFF Note audio is maintained 8 Microphone 9 MENU button Pre...

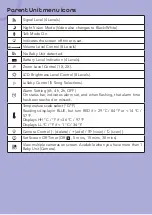
Page 4: ...l 8 Levels Lullaby Control 5 Song Selections Alarm Setting 6h 4h 2h OFF On status bar indicates alarm set and when flashing that alarm time has been reached or missed Temperature scale select C F Read...

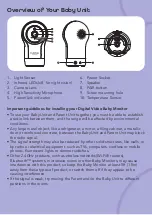
Page 5: ...ctrical equipment such as TVs computers cordless or mobile phones uorescent lights or dimmer switches Other 2 4GHz products such as wireless networks Wi Fi routers Bluetooth systems microwave ovens or...

Page 6: ...2 4 Registration Pairing 13 3 Using the Baby Monitor 14 3 1 Setting Up 14 3 2 Night Vision Mode 14 3 3 Pan and Tilt 14 3 4 Talk Mode 14 3 5 Video ON OFF 14 3 6 Temperature Display HH C F or LL C F 14...

Page 7: ...of contents 4 6 Temperature 17 4 7 Power Saving mode 18 4 8 View multiple cameras on screen 18 5 Disposal of the Device environment 19 6 Cleaning 19 7 Help 20 8 General Information 22 9 Technical Spe...

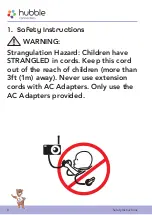
Page 8: ...Safety Instructions WARNING Strangulation Hazard Children have STRANGLED in cords Keep this cord out of the reach of children more than 3ft 1m away Never use extension cords with AC Adapters Only use...

Page 9: ...efore always read the instructions in this User s Guide carefully before using the device Adult assembly is required Keep small parts away from children when assembling This product is not a toy Do no...

Page 10: ...nd battery pack Do not touch the plug contacts with sharp or metal objects Connect the power adapters to easily accessible electrical sockets Caution There is a risk of explosion if the battery is rep...

Page 11: ...necting the Power Supply of the Parent Unit A rechargeable battery Lithium ion battery 2100mAh inside the Parent Unit allows you to move it without losing the link and picture from the Baby Unit We re...

Page 12: ...but if the room is dark the image will be in black and white with an icon showing the Baby Unit is in Night Vision mode 2 3 Desktop Stand of the Parent Unit The parent unit comes with a desktop stand...

Page 13: ...pop up 3 Press the UP button or DOWN button to select add and press the button to con rm 4 Camera 1 2 3 4 will pop up Press the UP button or DOWN button to select the desired Camera and press the butt...

Page 14: ...in black and white The icon will be displayed at the top of the screen 3 3 Pan and Tilt The camera can be remotely controlled from the Parent Unit when in a camera viewing mode 1 Press the UP button...

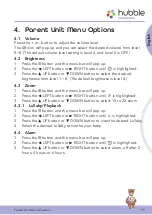
Page 15: ...The default brightness is level 4 4 3 Zoom 1 Press the button and the menu bar will pop up 2 Press the LEFT button or RIGHT button until is highlighted 3 Press the UP button or DOWN button to select 1...

Page 16: ...d hold the PAIR button on the bottom of the Baby Unit until the Parent Unit nds the camera beeps and PAIR OK appears on the screen The video from the camera will then appear Note A camera can only be...

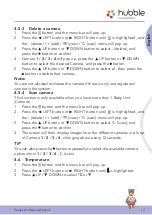
Page 17: ...s only one registered camera in the system 4 5 4 Scan camera This function is only available when you have more than 1 Baby Unit Camera 1 Press the button and the menu bar will pop up 2 Press the LEFT...

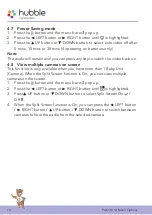
Page 18: ...video back on 4 8 View multiple cameras on screen This function is only available when you have more than 1 Baby Unit Camera When the Split Screen function is On you can view multiple cameras on the...

Page 19: ...your area The internal battery should be disposed of with the Parent unit in an environmentally friendly manner according to your local regulations 6 Cleaning Clean the Baby Monitor with a slightly d...

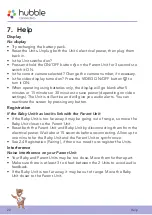
Page 20: ...reactivate the screen by pressing any button Registration If the Baby Unit has lost its link with the Parent Unit If the Baby Unit is too far away it may be going out of range so move the Baby Unit c...

Page 21: ...e interference with this product Keep the Baby Unit or Parent Unit at least 5 feet away from these types of products or switch them off if they appear to be causing interference If the signal is weak...

Page 22: ...TONE warrants that this Hubble connected branded product Product will be free from defects in material and workmanship under normal use for a period of 1 year from the date of purchase and that any ce...

Page 23: ...L REPRESENTATIONS OR WARRANTIES EXPRESS OR IMPLIED INCLUDING WARRANTIES OF MERCHANTABILITY OR FITNESS FOR A PARTICULAR PURPOSE IF YOUR STATE DOES NOT PERMIT THE DISCLAIMER OF WARRANTIES THEN THE IMPLI...

Page 24: ...ibutor at its sole discretion will at no charge repair or replace any Products or Accessories that do not conform to this Warranty In the event that replacement is necessary to remedy a defect in mate...

Page 25: ...by any agent employee or staff of BINATONE that may have been made in connection with your purchase of any Product and or Accessory FCC and IC regulations FCC Part 15 Note This equipment has been tes...

Page 26: ...ns 9 Technical Specifications BABY UNIT Frequency 2400 MHz to 2483 5 MHz Image sensor color CMOS 0 3M Pixels IR LED 8 pcs Operating Temperature 410 F 1040 F Power Adapter Input 100 240V AC 50 60Hz 300...

Page 27: ...perature 410 F 1040 F Power Adapter Input 100 240V AC 50 60Hz 300mA Output 5 0V DC 1000mA WARNING Use only with provided power supply Battery built in TMB i9300 3 8V 2100mAh Lithium Ion re chargeable...

Page 28: ...distributed and sold by Hubble Baby HK Limited Hubble Connected and the logo are trademarks or registered trademarks of Binatone Electronics International LTD All rights reserved US_EN Version 1 0 Pri...

Reviews: