background image


EN - ENGLISH – 01/2020 


Translation of original instructions


2

EN 

Reproduction is prohibited


CONTENTS 

 
01.


I

NTRODUCTION

 ................................................................................................................ 2 

02.


G

ENERAL SAFETY INFORMATION

 ................................................................................... 3 

03.


W

ARRANTY

........................................................................................................................ 4 

04.


R

ECEIPT OF EQUIPMENT

 ................................................................................................. 4 

05.


U

SAGE RESTRICTIONS

 ..................................................................................................... 5 

06.


E

QUIPMENT INFORMATION

 ............................................................................................ 6 

07.


M

OUNTING

-

INSTALLATION

 ............................................................................................ 9 

08.


C

OMMISSIONING

-

USAGE

 ............................................................................................... 11 

09.


M

AINTENANCE

 ................................................................................................................ 15 

10.


D

ECOMMISSIONING

 ....................................................................................................... 16 

11.


S

PARE PARTS

 .................................................................................................................... 16 

12.


T

ROUBLESHOOTING

 ....................................................................................................... 17 

13.


EC


D

ECLARATION OF CONFORMITY

 ............................................................................ 18 

14.


E

XPLODED VIEW DRAWINGS

 .......................................................................................... 19 


01


INTRODUCTION


Dear customer, 


Thank you for choosing this high-quality winch, which has been designed and manufactured 
to strict specifications.  
This manual has been carefully produced to provide you with all the necessary information 
for optimal installation and use of your equipment.  
We recommend that you read it carefully before use and keep it close to hand for future 
reference.  
We also reserve the right to make changes, without notice, as part of our continuous 
improvement of this product. 
 
Please, do not hesitate to contact your RUNVA distributor if you wish to obtain more 
information: 


4, rue Michel Hammid 

60420 FERRIERES (France) 

:contact@huchez.fr 

: 03 44 51 11 33 


WARNING 

Please read, study and follow all instructions before using this equipment.  

Failure to follow these instructions could result in serious injury 

and/or damaged equipment. 

Summary of Contents for EB20000

Page 1: ...FR FRAN AIS 09 2019 MANUEL D UTILISATION Translation of original instructions 1EN Reproduction is prohibited USER MANUAL ELECTRIC WINCH EB20000...

Page 2: ...EN ENGLISH 01 2020 Translation of original instructions 1EN Reproduction is prohibited...

Page 3: ...d manufactured to strict specifications This manual has been carefully produced to provide you with all the necessary information for optimal installation and use of your equipment We recommend that y...

Page 4: ...r moderate injury This symbol is also used to warn you against unsafe practices WARNING This indicates a potentially hazardous situation which if not avoided could result in death or serious injury Th...

Page 5: ...ranty shall only apply to original manufacturer parts For the duration of the warranty the seller is obliged to replace or repair any parts recognised as faulty following examination by their approved...

Page 6: ...correct direction and that it winds around the drum from the bottom and not from the top To ensure that the cable is wound correctly you should apply light tension to the cable while pressing the but...

Page 7: ...layer 2 The motor is fed by a 12 or 24 volt battery which powers the gear mechanism that spins the drum and winds the cable Before use ensure the winch is connected to the correct supply voltage 3 The...

Page 8: ...ional contact us to double the winch s pulling power or change the pulling direction without damaging the cable We recommend that you use a double line and a pulley block when pulling more than 70 of...

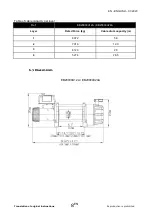
Page 9: ...inal instructions 8EN Reproduction is prohibited Table of cable capacity per layer Ref EB20000U12A EB20000U24A Layer Rated Force kg Cable drum capacity m 1 9072 5 6 2 7316 12 0 3 6129 20 4 5274 26 5 6...

Page 10: ...ment of the winch will ensure uniform distribution of a rated load 2 Begin by assembling the roller fairlead and the mounting plate using 2 screws M10 X 35 a washer a lock washer securing the whole wi...

Page 11: ...rent connections 6 Attach the clevis hook to the cable remove the pin from the hook connect the hook to the cable and replace the pin 7 Always use the safety strap when winding or unwinding the cable...

Page 12: ...rloading can damage the winch motor or cable For loads greater than 70 of the rated load we recommend using a double line with pulley block This will reduce the number of layers of cable on the drum t...

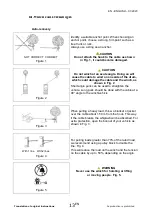
Page 13: ...are secure before each use Never attach the cable to itself or it may become damaged Always use a pulley block sling or an appropriate strength chain as shown in the illustrations Store the remote con...

Page 14: ...le and the winch as shown in Fig 2 Short angle pulls can be used to straighten the vehicle Long pulls should be done with the cable at a 90 angle to the winch vehicle Figure 3 When pulling a heavy loa...

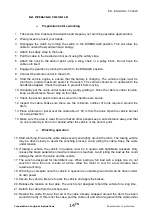
Page 15: ...the drum 13 Place a blanket or jacket over the cable about 1 50 m from the hook Open the vehicle bonnet for extra protection 14 Make sure the area is clear Ensure that all other people keep a safe dis...

Page 16: ...internal lubrication is required 9 2 Cable If the cable is worn or begins to show signs that it might break it must be replaced before using the winch 1 Move the switch to the DISENGAGE position 2 Pu...

Page 17: ...disposed of by decommissioning it and where necessary dismantling it 11SPARE PARTS If you notice during maintenance tasks that certain parts of your winch need replacing only original parts from the m...

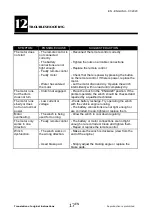
Page 18: ...Clutch not engaged Place the clutch in the ENGAGE position If the problem persists the winch should be checked and repaired by a qualified technician The motor runs slowly or does not run at normal p...

Page 19: ...EN ENGLISH 01 2020 Translation of original instructions 18EN Reproduction is prohibited 13EC DECLARATION OF CONFORMITY...

Page 20: ...EN ENGLISH 01 2020 Translation of original instructions 19EN Reproduction is prohibited 14EXPLODED VIEW DRAWINGS EB20000U12A EB20000U24A...

Page 21: ...2000016 1 Screw M8 10 19 B2000017 1 Coupling 20 B2000018 1 End bearing 21 B2000019 2 Seal 22 B2000020 1 Gearbox collar 23 B2000021 1 Circlip for hole 24 B2000022 1 Bearing 25 B2000300 1 Gear carrier a...

Page 22: ...EN ENGLISH 01 2020 Translation of original instructions 21EN Reproduction is prohibited...

Page 23: ...EN ENGLISH 01 2020 Translation of original instructions 22EN Reproduction is prohibited...

Page 24: ......

Reviews: