background image


EN - ENGLISH - 09/2019 


Translation of original instructions


9

EN 

Reproduction is prohibited


07

 MOUNTING - INSTALLATION  


Accessories you will need which are not included with the winch: 


Gloves for handling the cable and hook safety strap. 


Anchoring sling/chain. 


Blanket to throw over the cable to absorb the energy if the cable breaks. 


1.  The winch is designed with a standard bolt pattern for this class of winch. Many winch 

mounting kits use this bolt pattern for common vehicles and mounting plates. If you wish to use 
a mounting plate, ensure that it is mounted on a flat surface so that the motor, drum and 
gearbox housing are correctly aligned. Correct alignment of the winch will ensure uniform 
distribution of a rated load. 

2.  Begin by assembling the roller fairlead and the mounting plate using 2 screws. Ensure that  the 

screws are inserted through the mounting plate from the inside and through the roller fairlead. This 
will ensure that there is enough space for the winch to be placed on the plate. 

3.  Assemble the winch on the mounting plate by pulling and turning the clutch switch to the 

"DISENGAGE" position. Pull a few centimetres of cable from the drum and pass the cable loop 
through the opening at the front of the mounting plate and through the roller fairlead. You may 
now attach the winch to the mounting plate using the remaining screws. 

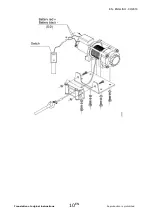
4.  Connect the battery and the motor cables as shown in the diagram below. Bear in mind that 

each type of winch is different. 


CAUTION 

Batteries contain inflammable and explosive gases.  Always wear protective goggles during 
installation and remove all jewellery beforehand.  Do not lean over the battery while making 
the different connections. 

5.  Attach the clevis hook to the cable: remove the pin from the hook, connect the hook to the 

cable and replace the pin. 

6.  Always use the safety strap when winding or unwinding the cable. Using the nylon strap will 

help you to keep your hands and fingers away from the drum when it is rotating. 

7.  Check that the drum rotates correctly. Pull and turn the clutch switch to the "DISENGAGE" 

position. Manually pull out some of the cable and then, turn the clutch switch to the "ENGAGE" 
position to lock the gearbox to the drum. Press the "OUT" button on the remote control. If the 
drum turns and unwinds the cable, your connections are correct. If the drum turns and winds up 
the cable, swap the motor connections. Repeat and check the drum rotation. 

Summary of Contents for EP3500 Series

Page 1: ...EN ENGLISH 09 2019 USER MANUAL Translation of original instructions 2EN Reproduction is prohibited USER MANUAL ELECTRIC WINCH EP3500 EP4500...

Page 2: ...EN ENGLISH 09 2019...

Page 3: ...d manufactured to strict specifications This manual has been carefully produced to provide you with all the necessary information for optimal installation and use of your equipment We recommend that y...

Page 4: ...y hazardous situation which if not avoided could result in minor or moderate injury This symbol is also used to warn you against unsafe practices WARNING This indicates a potentially hazardous situati...

Page 5: ...or electrical parts without our agreement or by an unauthorised party The warranty shall only apply to original manufacturer parts For the duration of the warranty the seller is obliged to replace or...

Page 6: ...far exceed the load capacity of the cable and the drum Do not exceed the maximum rated pulling capacity indicated in this manual When winding the cable please ensure that it is wound in the correct di...

Page 7: ...afely and with complete confidence whenever you need to Below you will find a list of the winch s components and their functions We recommend that you practice using the winch before finding yourself...

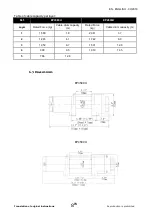
Page 8: ...inch is supplied with a mounting plate which can be mounted on most flat surfaces such as trailers bumper steps truck beds etc The mounting plate also has holes for attaching the roller fairlead 14 Th...

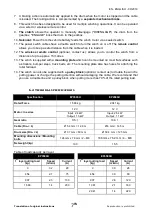
Page 9: ...prohibited Table of cable capacity per layer Ref EP3500U EP4500U Layer Rated Force kg Cable drum capacity m Rated Force kg Cable drum capacity m 1 1 588 1 8 2 041 3 7 2 1 265 4 1 1 742 8 0 3 1 052 6...

Page 10: ...Pull a few centimetres of cable from the drum and pass the cable loop through the opening at the front of the mounting plate and through the roller fairlead You may now attach the winch to the mountin...

Page 11: ...EN ENGLISH 09 2019 Translation of original instructions 10EN Reproduction is prohibited...

Page 12: ...et to know your winch before you actually need to use it We recommend that you carry out some trial runs to practice attaching the cable familiarise yourself with the sounds your winch makes under dif...

Page 13: ...inch as shown in Fig 2 Short angle pulls can be used to straighten the vehicle Long pulls should be done with the cable at a 90 angle to the winch vehicle Figure 3 When pulling a heavy load throw a bl...

Page 14: ...m from the hook Open the vehicle bonnet for extra protection 14 Make sure the area is clear Ensure that all other people keep a safe distance away and that no one is directly in front of or behind eit...

Page 15: ...ght break it must be replaced before using the winch 1 Move the switch to the DISENGAGE position 2 Pull out the full length of the cable Take note of the manner in which the existing cable is attached...

Page 16: ...disposed of by decommissioning it and where necessary dismantling it 11SPARE PARTS If you notice during maintenance tasks that certain parts of your winch need replacing only original parts from the m...

Page 17: ...e winch intermittently with no load until completely dry The motor runs but the drum does not turn Clutch not engaged Place the clutch in the ENGAGE position If the problem persists the winch should b...

Page 18: ...EN ENGLISH 09 2019 Translation of original instructions 17EN Reproduction is prohibited 13EC DECLARATION OF CONFORMITY...

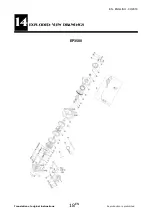
Page 19: ...EN ENGLISH 09 2019 Translation of original instructions 18EN Reproduction is prohibited 14EXPLODED VIEW DRAWINGS EP3500...

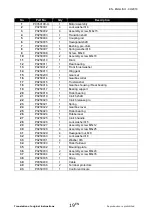
Page 20: ...Gearbox collar 17 P0250015 1 Trust washer 18 P0250016 1 Gearbox housing Rear bearing 19 P0250017 1 Bearing support 20 P0250018 1 Roller bearing 21 P0250019 1 Clutch shaft 22 P0250020 1 Clutch release...

Page 21: ...EN ENGLISH 09 2019 Translation of original instructions 20EN Reproduction is prohibited EP4500...

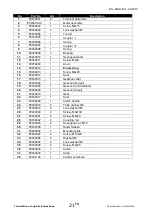
Page 22: ...bearing 15 P0450013 1 Screw M4x25 16 P0450014 1 Seal 17 P0450015 1 Gearbox collar 18 P0450300 1 Gear set Output 19 P0450400 1 Gear set Intermediate 20 P0450500 1 Gear set Input 21 P0450016 1 Gear 22 P...

Page 23: ...EN ENGLISH 09 2019 Translation of original instructions 22EN Reproduction is prohibited...

Page 24: ......

Reviews: