EN
INSTRUCTIONS ON ASSEMBLY AND USE
CONGRATULATIONS ON PURCHASING THIS PRODUCT!
Please read these instructions carefully. The instructions are an integral component of the
product. Therefore, please store them and the packaging carefully in case questions arise
in the future. Please always include these instructions when handing on the product to
a third party. This product must be assembled by an adult. This product is designed for
private/domestic use only. This product is not designed for commercial/industrial use. The
use of the product requires certain capabilities and skills. Always adjust according to the
age of the user and use for the purpose it has been designed for.
TECHNICAL SPECIFICATIONS
Item:
HUDORA Flitzkids Glow
Item number:
11064
Item weight:
approx. 2 kg
Dimensions when assembled: approx. 59 x 28 x 66 cm
Maximum user weight:
50 kg
Purpose:
Roller scooter for playful learning of rolling locomotion.
If you have assembly problems or would like further information on the product, we have
all you need and more at http://www.hudora.de/service/.
CONTENTS
1 x Body of the scooter | 1 x Handlebar | 1 x These instructions
Other items included are meant to facilitate safe transportation and are not required for the
installation and use of the product.
SAFETY INSTRUCTIONS
• Warnings! Protective equipment should be worn. Not to be used in traffic. 50 kg max.
• This product has been designed for children aged from 2 to 6 years and is suitable only
for smooth, paved surfaces. Do not use it on public roads.
• The scooter is to be used by one person at a time.
• Note the maximum user weight indicated in Technical Specifications.
• Please ensure that your child wears the appropriate protective clothing (helmet, hand- /
wrist-, elbow- and knee pads) and does not ride the scooter without shoes.
• Do not allow your child to ride at dusk, at night or in poor light conditions. So that your
child and others are not endangered, do not allow your child to ride on roads and in
thoroughfares, on slopes and hillsides. Avoid riding close to stairs and open waters.
• The functions of self-securing screw threads can be impaired after repeated loosening
and tightening of the connecting elements. Check the scooter before every ride to
make sure that all parts are still fixed correctly and the scooter works as it should.
• Pay attention that your child keeps both hands tightly on the handlebar to have control
over the scooter.
• The scooter should not be used on sensitive surfaces. Such areas should, where expe-
dient, be covered with old carpets.
• The brakes may become hot, if the scooter has been used for a while! Avoid touching
them during and after use until they have cooled down.
• This toy has to be used with caution since the use of the product requires specific skills
and knowledge to be able to avoid injury to the user and third parties through a crash
or collision.
• Always supervise your child when using the product!
• This product contains small parts which could cause asphyxia if swallowed.Supervise
children during the assembly. This product must be assembled by an adult. Children
should only use the product when they are under adult supervision.
INSTRUCTIONS ON ASSEMBLY
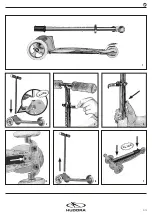
The scooter will be delivered to you in 2 parts (body and handlebar) (Fig. 1).
You will have to proceed as follows in order to set up the scooter for use:
Press in the safety push button at the lower end of the handlebar and push the handlebar
such that the handlebar is aligned in the envisaged opening on the scooter body, with the
logo to the front while riding. You will hear a click, when the safety pushbutton locks into
place (Fig 2). To adjust the handlebar height open the quick release (Fig. 3). If necessary,
press the safety push button (Fig. 4) and pull the handlebar stem with the grips upwards
or else push it down until the safety push button snaps into place at the desired position.
Close the quick release in such a position again. If necessary, turn the nut on the quick
release clamp to tighten more firmly, in the event that you have not been able to achieve
a satisfactory fixation.
You will have to proceed as follows in order to again transform
the scooter into a transport state:
Press the safety push button from the bottom side of the deck (Fig. 5), so that you can pull
out the handlebar. (Fig. 6)
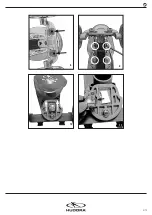
For easier transport of the scooter, the handlebar can be clicked in under the deck. To do
this, just unfold the two clamps under the deck and insert the handlebar as shown (Fig. 7).
The handlebar can be easily removed by pulling the scooter handles. ATTENTION: Before
using the scooter, the clamps must be folded in again and the handlebar rod must be
inserted into the scooter body again!
5/12
Achtung! Zum Schutz der Umwelt dürfen verbrauchte Batterien und Schaltein-
heiten/Elektroteile nicht in den Hausmüll. Durch eine umweltgerechte Entsor-
gung lassen sich wertvolle Rohstoffe zurückgewinnen. Die Rückgabe dieser
Elemente ist daher gesetzlich verpflichtend. Batterien können nach Gebrauch
an der Verkaufsstelle oder bei den bestehenden Sammelstellen unentgeltlich
entsorgt werden. Sämtliche Schalteinheiten müssen aus dem Produkt ausgebaut und
ebenfalls separat entsorgt werden. Das Symbol mit der durchgestrichenen Mülltonne weist
darauf hin.
SERVICE
Wir sind bemüht einwandfreie Produkte auszuliefern. Sollten trotzdem Fehler auftreten,
sind wir genauso bemüht, diese zu beheben. Sie finden zahlreiche Informationen zum Pro-
dukt, zu Ersatzteilen, Problemlösungen und verloren gegangene Aufbauanleitungen unter
http://www.hudora.de/service/.
Alle Abbildungen sind Designbeispiele.
Summary of Contents for 11064
Page 2: ...2 12 1 KLICK 2 3 4 5 6 7 KLICK ...
Page 3: ...3 12 9 8 11 10 ...


