CONGRATULAZIONI PER AVER ACQUISTATO QUESTO PRODOTTO!
La preghiamo di leggere molto attentamente questo manuale. Il manuale fa parte del
prodotto. Quindi va conservato come tutto l’imballaggio per eventuali domande in futuro.
Dando il prodotto a terzi per cortesia allegare sempre il manuale. Il prodotto deve essere
montato da un adulto. Questo prodotto è destinato esclusivamente all’uso domestico e
privato. Questo prodotto non è adatto all’uso pubblico o commerciale. L‘utilizzo del prodotto
richiede determinate abilità e conoscenze. Usare solo in maniera adeguata all‘età, e utiliz-
zare il prodotto esclusivamente per gli scopi previsti.
SPECIFICHE TECNICHE
Articolo:
HUDORA Flitzkids Glow
Articolo n°:
11064
Peso del prodotto:
circa 2 kg
Misure per il montaggio:
circa 59 x 28 x 66 cm
Peso massimo dell'utente: 50 kg
Scopo previsto:
Monopattino per l’apprendimento attraverso il gioco della
locomozione su ruote.
Se avete problemi con l‘assemblea o richiedete più informazioni, visiti prego il nostro web-
site http://www.hudora.de/service/.
CONTENUTO
1 x Corpo del monopattino | 1 x Asta del manubrio | 1 x Queste istruzioni
Sono incluse altre parti che servono alla protezione durante il trasporto e non sono neces-
sarie per il montaggio e l'utilizzo dell'articolo.
NOTE DI SICUREZZA
• Avvertenze! Si raccomanda di indossare un dispositivo di protezione. Non usare nel
traffico. 50 kg max.
• Questo prodotto è stato concepito per bambini in un’età compresa fra i 2 e i 6 anni
e può essere impiegato esclusivamente su superfici piane e lastricate. Non usarlo su
strade pubbliche.
• Il monopattino è idoneo per il trasporto di una sola persona.
• Fate attenzione al peso utente consentito nella sezione "Specifiche tecniche".
• Fate attenzione che il vostro bambino indossi l‘adeguato abbigliamento protettivo (cas-
co, paramani/parapolsi, gomitiere e ginocchiere) e che non vadano sullo monopattino
senza scarpe.
• Non permettere ai bambini di usare il monopattino al crepuscolo, durante la notte op-
pure in condizioni di scarsa visibilità. Allo scopo di non mettere in pericolo i vostri figli
o altre persone, non permettere ai bambini di usare il monopattino su carreggiate, vie
di transito, pendii e colline. Evitare la vicinanza di scalinate e superfici acquatiche non
delimitate.
• La funzione delle filettature autobloccanti può diminuire allentando e stringendo ripetu-
tamente gli elementi di collegamento. Prima di impiegare il veicolo, controllare sempre
il monopattino allo scopo di assicurarsi che tutte le sue parti siano fissate correttamen-
te e che il monopattino funzioni regolarmente.
• Assicurarsi che i bambini abbiano appoggino sempre entrambe le mani sul manubrio,
allo scopo di poter controllare meglio il monopattino.
• Non utilizzate il monopattino su superfici delicate. Coprite eventualmente questo tipo di
superfici con vecchi tappeti.
• In caso di uso continuo il freno può surris caldarsi! È consigliabile non toccarlo prima di
raffreddarsi.
• II giocattolo va usato con prudenza in quanto l’utilizzo del giocattolo richiede deter-
minate capacità e conoscenze al fine di poter evitare cadute e collisioni che possono
causare il ferimento dell’utente o di altre persone.
• Supervisionate il vostro bambino durante l‘utilizzo del prodotto!
• Contiene piccoli componenti, che se ingeriti, possono causare il pericolo di soffoca-
mento. Fate molta attenzione ai bambini durante il montaggio. Il prodotto deve essere
montato da un adulto. Se il prodotto viene usato da bambini, ciò dovrà avvenire sotto la
sorveglianza di un adulto.
ISTRUZIONI PER IL MONTAGGIO
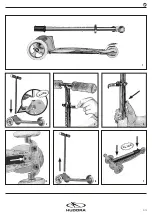
Il monopattino vi verrà consegnato in 2 parti (corpo ed asta del manubrio) (fig. 1).
Per rendere il monopattino pronto per l'uso,
procedete come illustrato di seguito:
Premere il pulsante di sicurezza all'estremità inferiore dell'asta del manubrio e spingere
l'asta del manubrio nell'apposita apertura sul corpo del monopattino, in modo che il
manubrio durante la guida sia orientato con il logo in avanti. Sentirete un clic, quando
il pulsante di sicurezza scatterà in posizione. (Fig. 2). Per regolare l'altezza del manubrio
aprire la leva a sgancio rapido (fig. 3). Premere eventualmente il pulsante di sicurezza (fig.
4) e tirare l'asta del manubrio con le maniglie verso l'alto o spingerla verso il basso finché
il pulsante di sicurezza non scatta nella posizione desiderata. Chiudere nuovamente la leva
a sgancio rapido in tale posizione. Eventualmente girare con più forza il dado sul morsetto
della leva a sgancio rapido, se non si dovesse raggiungere un sufficiente fissaggio.
IT
ISTRUZIONI PER IL MONTAGGIO E PER L’USO
6/12
USAGE INSTRUCTIONS
DRIVING INSTRUCTIONS
The scooter moves when a foot is used to regularly push off. Braking is no problem either
- simply step on the friction brake over the back wheel (mudguard).
ADJUSTMENT OF THE STEERING CONTROL
The steering of this scooter works through weight shift. In the case of very young children, it
may be useful to completely block the steering. Thus the small novice rider can concentrate
solely on the propulsion and the basic movement. In order to change the direction of travel,
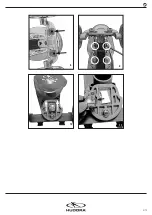
the scooter must be raised slightly and realigned. 2 fuse blocks are mounted on the under-
side of the front axle between the rollers (Fig. 8). In the delivery condition they are stuck
on the outside of the axle carrier. Through slight lifting, lateral movement and the reset in
the teeth the blocks can be completely moved into the middle. In the middle position they
block the steering. Please exclusively use either the total steering block or the entirely open
steering. You should in any case explain the changed steering function to the child.
FUNCTIONING OF THE LED LIGHTING
The scooter offers two types of lighting. The LED display under the axle cover is equipped
with a sensor and is activated by small vibrations, for example when the scooter hits the
ground. The lighting goes out after approx. 5 seconds and can then be reactivated by
repeated vibration. The lighting in the wheels is activated automatically as soon as the
wheels start to move.
BATTERY INSERT / BATTERY CHANGE
2 x CR2032 batteries are required to use the LED display. The batteries are already installed
and ready for use. To remove the batteries, pull the handlebar rod out of the scooter body.
Then loosen the four screws on the underside of the deck (Fig. 9). Once the screws have
been removed, the cover at the front of the scooter can be removed. Underneath is the
battery compartment. (Fig. 10) The battery block can be removed by pulling it off and
can be disposed of in an environmentally friendly manner (Fig. 11). To continue using the
scooter, please remount the axle cover and tighten it again.
Never try to charge non-rechargeable batteries. If attempts are made to charge this type
of battery, they may not only run out but also explode, which may lead to destruction,
the risk of fire and not least to injuries. Use only the batteries specified in the product.
Please remove empty batteries from the product and dispose of them in an environmentally
appropriate manner.
MAINTENANCE AND STORAGE
Use only a dry or damp cloth to clean the product; do not use special cleaning agents!
Check the product for damage or traces of wear and tear before and after each use. Do
not make any structural changes. For your own safety, please use original spare parts only.
These can be sourced from HUDORA. If parts become damaged or if sharp edges or corners
should develop, the product may not be used any more. If in any doubt, please contact our
service team (http://www.hudora.de/service/). Store the product in a safe place where it is
protected from the elements, cannot be damaged, and cannot injure anyone.
BEARINGS
Your kick scooter is equipped with precision ball bearings, which were filled with grease
under high pressure, during manufacture. For this reason, the rollers of the kick scooter
only run lightly and swiftly, while under load. Bearings are maintenance-free, but they are
wear parts. Caution! Worn bearings make conspicuous audible noises and their function is
constrained. In order to maintain optimal riding pleasure and to ensure lasting safety, you
should replace bearings, as soon as they begin to exhibit signs of being worn. In the case
of full load and daily use we recommend the replacement of the rollers and bearings twice
a year. Bearings are available as accessories under http://www.hudora.de/.
DISPOSAL ADVICE
At the end of the product’s life, please dispose of it at an appropriate collection point
provided in your area. Local waste management companies will be able to answer your
questions on this.
Caution: Used batteries and switching units/electrical and electronic parts must
not be discarded in the house waste in order to protect the environment. By the
means of an environmentally friendly disposal, valuable raw materials can be
recovered. Return of old batteries is therefore mandatory by law. After use batte-
ries can be disposed of free of charge at any point of sale or existing collections
centres. All switching units must be removed from the product and must also be disposed
of separately. The symbol with the crossed-out bin indicates this.
SERVICE
We make every effort to deliver faultless products. If faults do arise however, we put just
as much effort into rectifying them. You can find numerous information on the product, re-
placement parts, solutions to problems and lost assembly manuals at http://www.hudora.
de/service/.
All images are examples of the design.
Summary of Contents for 11064
Page 2: ...2 12 1 KLICK 2 3 4 5 6 7 KLICK ...
Page 3: ...3 12 9 8 11 10 ...


