background image

11/28

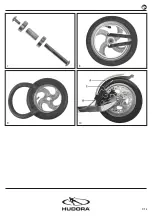
due bordi del cerchio. Quindi spingere completamente nel cerchio 

prima un lato della gomma e poi l‘altro. Se necessario, spingere 

l‘ultimo margine della gomma ogni volta all‘interno del cerchio.


MONTAGGIO DELLA RUOTA

Fare attenzione prima di tutto che i cuscinetti siano nel mozzo della 

ruota e che il manicotto guida dell‘asse si trovi in mezzo. Se è così, 

è possibile inserire la ruota nella forcella e fissarla a questa con la 

vite dell‘asse. Utilizzare per quest‘operazione due chiavi a brugola 

per poter opporre resistenza da entrambi i lati.

CUSCINETTI

Il monopattino è dotato di cuscinetti di precisione che in produzione 

vengono riempiti di grasso a una pressione elevata. Per questo 

motivo le rotelle nel monopattino scorrono facilmente e velocemente 

solo sotto carico. I cuscinetti non richiedono manutenzione, ma sono 

soggetti a usura. Attenzione! I cuscinetti logorati evidenziano rumori 

percettibili e la loro funzione è limitata. Per ottenere una piacevolezza 

di guida ottimale e garantire una sicurezza duratura, i cuscinetti 

logorati si dovrebbero sostituire immediatamente anche in maniera 

rudimentale. A pieno carico e con un utilizzo quotidiano consigliamo 

una sostituzione semestrale di rotelle e cuscinetti. I cuscinetti sono 

disponibili come accessori su http://www.hudora.de/.

MANUTENZIONE E CONSERVAZIONE

Pulire il prodotto solo con un panno oppure con un panno inumi-

dito senza usare speciali detergenti. Verificate che il prodotto non 

abbia subito danno e non presenti tracce di usura prima e dopo 

l’uso. Non apportate alcuna modifica al prodotto. Utilizzate per la 

vostra sicurezza solo ricambi originali. Essi si possono acquistare 

presso la ditta HUDORA. Se le parti dovessero essere danneggia-

te oppure dovessero evidenziare angoli e spigoli, il prodotto non 

potrà essere più utilizzato. Nel dubbio contattate il nostro centro 

di assistenza tecnica (http://www.hudora.de/). Stoccate il prodot-

to in un luogo sicuro, protetto dalle intemperie, in modo che non 

possa essere danneggiato o ferire delle persone.

Sostituire i componenti danneggiati o usurati al fine di garantire la 

sicurezza del monopattino.

ISTRUZIONI PER LO SMALTIMENTO

Siete pregati di portare l’apparecchio, al termine della propria du-

rata utile, presso un apposito punto di raccolta e di restituzione 

disponibile. L’impresa di smaltimento locale sarà a vostra disposi-

zione per rispondere ad eventuali domande.

ASSISTENZA TECNICA

Ci sforziamo a fornire dei prodotti perfettamente funzionali. Se 

comunque doveste riconoscere eventuali difetti, ci impegneremo 

subito a rimuoverli. A tale proposito riceverete tante informazioni 

sul prodotto, sui pezzi di ricambio, sulle soluzioni ai problemi e 

sulle istruzioni per il montaggio andate perse sul sito web all’indi-

rizzo http://www.hudora.de/.

RICAMBI E ACCESSORI ORIGINALI AL:

http://www.hudora.de/

¡LE FELICITAMOS POR LA 

COMPRA DE ESTE PRODUCTO!

Lea atentamente este manual de instrucciones. El manual de ins-

trucciones forma parte integrante del producto. Consérvelo por ello 

cuidadosamente, al igual que el embalaje, para posteriores consul-

tas y preguntas. Entregue asimismo el manual cuando preste o re-

gale el producto a terceros. Este producto debería ser montado por 

un adulto. Este producto está diseñado exclusivamente para el uso 

privado / doméstico. Este producto no está diseñado para el uso 

comercial. El uso delproducto requiere ciertas capacidades y cono-

cimientos para poder evitar heridas a causa de caídas y choques. 

Utilícelo sólo conforme a la edad y exclusivamente con el objeto 

previsto.

ESPECIFICACIONES TÉCNICAS

Artículo:  

HUDORA BigWheel

®

 Air 205 Dual Brake | 


HUDORA BigWheel

®

 Air 230 Dual Brake

Número de artículo:  


14015 | 14035

Dimensiones:  

aprox. 97 cm | aprox. 101 cm de longitud (14015 l 


14035), superficie de paso aprox. 35 x 14 cm

Peso de artículo:   aprox. 5,3 kg | aprox. 5,7 kg (14015 l 14035)

Categoría:  

A, 120 kg peso máximo del usuario

Máxima altura: 

1045 mm | 1065 mm (14015 | 14035)

Objetivo:  

 Patinete para el uso en el tránsito público, no es 

un juguete.

Si usted tiene problemas con la asamblea o requiere más informa-

ción, visite por favor nuestro website http://www.hudora.de/.

CONTENIDO

1 patinete | 1 manual de instrucciones

Otras piezas que pueden estar incluidas en la entrega no son ne-

cesarias.

INDICACIONES DE SEGURIDAD


•    Emplee para su propia seguridad la ropa de protección adecuada. 

¡Utilice equipo de protección personal! Entre ello cuenta como 

mínimo: protectores de manos, muñequera, rodillera, casco y 

protectores de codos. ¡No ande el patinete nunca sin calzado!

•  El patinete está diseñado para ser utilizado por una sola persona. 

•   Utilice el patinete sólo en superficies adecuadas, que deberían 

ser lisas y estar limpias, secas y libres de otros viandantes. 

Evite las superficies inclinadas. ¡En uso permanente los frenos 

pueden calentarse! ¡Su patín podría sufrir daños! No toque los 

frenos entonces hasta que no se haya enfríados.

•   Preste siempre atención a los demás viandantes.

•    Antes de ponerse en marcha: Compruebe la integridad y el 

asiento firme de todos los elementos de unión y cierres, como, 

por ejemplo, el mecanismo de bisagra y el mecanismo de ajuste 

de la altura del manillar. El efecto autobloqueante de las roscas 

autofijadoras puede disminuir cuando se hayan soltado y apre-

tado varias veces los elementos de unión. Compruebe sobre 

todo la alineación correcta y la fijación correcta del manillar.

•   Asegúrese de que el soporte se pliega de manera segura duran-

te la conducción.

•    No ande nunca cuando se esté haciendo oscuro, durante la 

noche y con mala visibilidad. No ande por vías de circulación 

ni pasajes, ni tampoco en cuestas y superficies accidentadas. 

Evite acercarse a escaleras y superficies acuáticas.

IT

ISTRUZIONI PER IL MONTAGGIO E PER L’USO

Tutte le illustrazioni sono esempi di progetti.

ES

INSTRUCCIONES DE MONTAJE Y DE USO

Summary of Contents for 14015

Page 1: ... GEBRAUCHSANLEITUNG INSTRUCTIONS ON ASSEMBLY AND USE ISTRUZIONI PER IL MONTAGGIO E PER L USO INSTRUCCIONES DE MONTAJE Y DE USO INSTRUCTIONS DE MONTAGE ET MODE D EMPLOI MONTAGE EN GEBRUIKSHANDLEIDING INSTRUKCJA MONTAŻU I OBSŁUGI NAVODILA ZA NAMESTITEV IN UPORABO СБОРКА И РУКОВОДСТВО ПО ЭКСПЛУАТАЦИИ DE EN IT NL PL SI ES FR RU ...
Page 2: ...2 28 1 2 3 5 4 6 ...

Page 3: ...3 28 7 8 10 9 ...

Page 4: ...verhältnissen Fahren Sie nicht auf Fahrbahnen und in Durchgängen sowie an Abhängen und Hügeln Meiden Sie die Nähe von Treppen und offenen Gewässern Der Scooter ist nicht für Sprünge geeignet Prüfen Sie vor der Nutzung des Scooters die Einschränkung des Einsatzbereiches durch die geltende Straßenverkehrsordnung Die Benutzung des Produktes erfordert bestimmte Fähigkeiten und Kenntnisse um Verletzung...

Page 5: ...änders ist durch ein faches Ein und Ausklappen gewährleistet Aluminium ist ein guter und leichter Werkstoff bedarf aber auch der umsichtigen Handhabe da es nicht so hart wie beispielsweise Stahl ist REIFENDRUCK Überschreiten Sie nicht den maximalen Reifendruck von 4 5 bar Der empfohlene Reifendruck beträgt 4 0 4 2 bar EINSTELLEN DER SCHEIBENBREMSE Sie können die Scheibenbremse Abb 10 über die Stel...

Page 6: ...RATULATIONS ON PURCHASING THIS PRODUCT Please read these instructions carefully The instructions are an in tegral component of the product Therefore please store them and the packaging carefully in case questions arise in the future Please always include these instructions when handing on the product to a third party This product must be assembled by an adult This product is designed for private d...

Page 7: ...andlebar can be securely adjusted Before using always check that all parts are firmly fixed par ticularly the folding mechanism steering lock wheels brake disc and brake lever TO GET THE SCOOTER READY FOR TRANSPORT AGAIN PLEASE CARRY OUT THE FOLLOWING ACTIONS Loosen the quick release lock by pushing the lever of the quick release lock away from the handlebar stem Picture 5 Please press the locking...

Page 8: ...ssary each of the remaining parts of the sheath edges can be levered into the rim base MOUNTING THE WHEEL First ensure that the ball bearings are fitted in the wheel hub and the axle guide sleeve is positioned between them Once this is ensured you can insert the wheel into the fork and thereby fix it with the axle bolt Use the two Allen screws for this purpose in order to counteract both screw sid...

Page 9: ... i limiti dell ambito di azione imposti dal vigente codice della strada L utilizzo del prodotto richiede determinate capacità e cono scenze al fine di poter evitare lesioni da cadute e urti Se il prodotto viene usato da bambini ciò dovrà avvenire sotto la sorveglianza di un adulto Assicurarsi che durante la guida il manubrio sia orientato con il logo in avanti ovvero con i pulsanti rivolti all ind...

Page 10: ...itato da un semplice mecca nismo a scatto L alluminio è un buon materiale leggero che non necessita tut tavia di una cura scrupolosa giacché non è così rigido al pari ad esempio dell acciaio PRESSIONE DEGLI PNEUMATICI Non superare la pressione massima di 4 5 bar La pressione con sigliata è di 4 0 4 2 bar REGOLAZIONE DEL FRENO A DISCO È possibile regolare il freno a disco Fig 10 agendo sulle viti A...

Page 11: ... E ACCESSORI ORIGINALI AL http www hudora de LE FELICITAMOS POR LA COMPRA DE ESTE PRODUCTO Lea atentamente este manual de instrucciones El manual de ins trucciones forma parte integrante del producto Consérvelo por ello cuidadosamente al igual que el embalaje para posteriores consul tas y preguntas Entregue asimismo el manual cuando preste o re gale el producto a terceros Este producto debería ser...

Page 12: ...r de la barra del manillar fig 5 Si el manillar no estuviera suficientemente fijo en la altura se leccionada abra el cierre rápido nuevamente gire el tornillo que se encuentra en frente profundamente hasta la rosca de modo tal que la abrazadera de cierre quede más estrecha Repita ese procedimiento hasta que el manillar pueda ajustarse correctamente Antes de cada uso compruebe siempre el correcto a...

Page 13: ... al tubo flexible Para colocar un nuevo revestimiento presione la llanta si fuera necesaria una nueva llanta con el tubo recién colocado de modo tal en el revestimiento que ambas partes del revestimiento sobresalgan por encima de los bordes de ambas llantas A continuación presione primero un lado del revestimiento completo en el borde de la llanta y a continuación el otro lado Dado el caso se debe...

Page 14: ...e Ne roulez pas au crépuscule dans la nuit ou en cas de mauvaise visibilité Neroulezpassurlesvoiesdecirculationoudanslespas sages ainsi que sur les pentes et les collines Evitez la proximité d escaliers ou de cours d eau La trottinette n est pas conçue pour effectuer des sauts Avant d utiliser la trottinette vérifiez les restrictions en matière de zone d utilisation imposées par le code de la rout...

Page 15: ...rnier est situé dans la direction de conduite sur le côté gauche sous le marchepied L utilisation du support respectif est assuré par simple pliage ou dépliage L aluminium est un bon matériau léger mais il est nécessaire de le traiter avec ménagement car il n est par exemple pas aussi dur que l acier PRESSION DES PNEUS Ne dépassez pas la pression maximale des pneus de 4 5 bar La pression de pneus ...

Page 16: ...rmations sur le produit les pièces de rechange la résolution des problèmes et les instructions de montage égarées sur http www hudora de PIÈCES D ORIGINE ET ACCESSOIRES DE RECHANGE SUR http www hudora de HARTELIJK GEFELICITEERD MET DE KOOP VAN DIT PRODUCT Lees de gebruiksaanwijzing zorgvuldig door De gebruiksaanwij zing is een vast bestanddeel van het product Bewaar de gebruik saanwijzing en verpa...

Page 17: ...er in de draad zodat de verzekering strakker om de stuurpen klemt Herhaal deze stap totdat de stuurpen goed vastzit Controleer voor het gebruik altijd of alle onderdelen goed vast zitten vooral het inklapmechanisme de stuursluiting de wie len de remschijven en de remhendel GA ALS VOLGT TE WERK OM DE STEP WEER IN DE TRANSPORTTOESTAND TE BRENGEN Maak de snelsluiting los door de hendel van de meet te...

Page 18: ...e kant Uiteindelijk moet de gehele rand van de mantel in de velg zitten MONTAGE VAN HET WIEL Zorg ervoor dat de kogellager in de wielnaaf zit en de asvoerings huls zich daartussen bevindt Wanneer dit is verzekerd kunt u het wiel in de vork zetten en door middel van de asschroef bevestigen Gebruik hiervoor twee inbussleutels zodat u de schroeven aan beide kanten vast kunt draaien LAGERS Uw step is ...

Page 19: ...ć uwagę na to by nóżka była podczas jazdy bezpiecznie złożona Nigdy nie należy jeździć po zmierzchu w nocy lub przy złej widoczności Nie należy jeździć na jezdni i w przejściach oraz po zboczach i pagórkach Należy unikać bliskości schodów i otwartych zbiorników wodnych Hulajnoga nie nadaje się do skoków Zanim zaczniesz jeździć na hulajnodze sprawdź ograniczenia obowiązujące w miejscu korzystania z...

Page 20: ...ojaka 14035 znajdującego się pod podnóżkiem lub stojaka bocznego 14015 Znajduje się on po lewej stronie pod pokładem w kierunku jazdy Proste składanie i rozkładanie zapewnia możliwość wykorzystania danego stojaka Aluminium to dobre i lekkie tworzywo jednakze wymaga os troznego obchodzenia sie z nim poniewaz nie jest tak wytrzymale jak na przyklad stal CIŚNIENIE W OPONACH Nie należy przekraczać mak...

Page 21: ...www hudora de CZĘŚCI ZAMIENNE I ORYGINALNE AKCESORIA POD http www hudora de PRISRČNE ČESTITKE OB NAKUPU TEGA IZDELKA Prosimo vas da si pozorno preberete navodila za uporabo Navodila za uporabo so pomemben sestavni del izdelka Navodila skrbno shranite skupaj z embalažo za primer kasnejših vprašanj Če izdelek podarite tretji osebi obvezno vedno priložite tudi pričujoča navodila Ta izdelek mora sesta...

Page 22: ...ka in zavorne ročice DA BI SKIRO PONOVNO SPRAVILI V TRANSPORTNI POLOŽAJ PROSIMO DA IZVEDETE NASLEDNJE KORAKE Sprostite hitro zaporo tako da ročico za hitro zaporo potisnete stran od palice krmila Slika 5 Pritisnite aretirni gumb za zaklepanje tako da se krmilo lahko premika Slika 6 Krmilno palico do konca potisnite v steblo krmila Hitro zaporo zaprite tako da ročico za hitro zaklepanje namesti te ...

Page 23: ...lec osi Če je to zagotovljeno lahko kolo vstavite v vilice in ga tam pritrdite z osnim vijakom Za to uporabite dva imbus ključa tako da lahko kontrirate obema stranema vijakov LEŽAJ Vaš skiro je opremljen z natančnimi ležaji ki so med proizvodnjo napolnjeni z mastjo pod visokim pritiskom Zaradi tega valji tečejo gladko in hitro le ko je skiro obremenjen Ležaji ne potrebujejo vzdrževanja vendar so ...

Page 24: ...ыми сухими и по возможности их не должны использовать другие участники дорожного движения Избегайте покатых участков При продол жительном использовании самоката тормоза могут нагреться При этом может пострадать Ваша обувь Не следует прикасаться к тормозам пока они не остыли Будьте осторожны по отношению к другим лицам Перед стартом проверьте отсутствие повреждений и жесткую посадку всех соединител...

Page 25: ...действующий затвор на T об разном элементе выноса руля отжав рычаг от T об разного элемента Нажимайте большими пальцами на фиксирующие кнопки и тяните ручки руля наружу до тех пор пока они полностью не выйдут из Т образного элемента Pис 4 Нажимайте ручки руля вниз до тех пор пока они не будут находиться параллельно выносу руля и их мож но будет втолкнуть в предусмотренные для этого крепления Тепер...

Page 26: ... края обода После этого сначала нажатием поместите полностью назад в основание обода одну сторону покрышки а затем другую сто рону Не исключено что всякий раз последний участок RU СБОРКА И РУКОВОДСТВО ПО ЭКСПЛУАТАЦИИ края покрышки придется помещать назад в основание обода с помощью рычага МОНТАЖ КОЛЕСА Сначала убедитесь что шарикоподшипники установ лены в ступице колеса а направляющая втулка оси н...

Page 27: ...Поэ тому Вы можете найти подробную информацию об из делии о запасных частях решения проблем и инструк ции на случай утери по адресу http hudora de ЗАПАСНЫЕ ЧАСТИ И ОРИГИНАЛЬНЫЕ А КСЕССУАРЫ ПОД http www hudora de Все иллюстрации являются примерами дизайна ...

Page 28: ...28 28 ...

Reviews: