7/28
EN
INSTRUCTIONS ON ASSEMBLY AND USE
• The use of the product requires specific skills and knowledge to
be able to avoid injuries due to crashes and collisions.
• Children should only use the product when they are under adult
supervision.
• Ensure when riding that the logo on the handlebar points to the
front or else that the push buttons is as such oriented backwards.
• Check that the brake systems are working before every use!
Both systems must be working perfectly. If necessary, adjust
them as described under “Maintenance and storage”.
INSTRUCTIONS ON ASSEMBLY
No tools are required to assemble the product. The scooter is de-
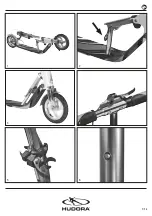
livered in its transport form (folded)! (Picture 1)
PLEASE PROCEED AS FOLLOWS TO GET THE SCOOTER
READY FOR USE
• Pull the lever that is in the direction of movement, located to the
right of the folding mechanism, in order to release the trans-
portation lock. (Picture 2)
• Unfold the scooter‘s handlebars upwards.
• Now push the folding hinge towards the handlebar stem until
you hear it click into place. (Picture 3)
• Loosen the quick release fastener on the T-piece of the handle-
bar shaft by pushing the lever away from the T-piece. (Picture
4). Insert the handlebar grips in the T-piece of the handlebar
grip. Use your thumbs to press down both locking buttons until
the the grips can be easily pushed into the T-section. Turn the
handlebar grips until the locking buttons are positioned in the
two openings intended for them and you hear them click into
place. Check that both handlebar grips are fitted correctly by
pulling both outwards. Do not let the two hand grips move out
of their locking mechanism, once they are fitted properly. Now
close the quick release fastener on the T-piece of the handlebar
shaft, by inserting the lever into the T-piece. In case the grips
are not firmly fitted enough, open the quick release fastener
again and turn the screw on the opposite side deeper into the
thread, so that the fastening clamp tightly sits on the T-piece.
• Loosen the quick release lock on the handlebar rod by pushing
the lever of the quick release lock until the lever is parallel to the
handlebar grip. (Picture 5)
• The handlebars can be locked into place at 4 different heights.
Pull the handlebar rod out of the handlebar stem until it is at the
required height and the relevant button has snapped into place.
(Picture 6) The maximum height cannot be exceeded due to the
integrated lock.
• Now close the quick release lock by pushing the lever down to
the handlebar stem. (Picture 5)
• In the event that the handlebar does not sit tight enough at the
selected height, open the quick release fastener again and turn
the screw on the opposite side deeper into the thread, so that
the fastening clamp tightly sits on the handlebar. Repeat this
process until the handlebar can be securely adjusted.
• Before using, always check that all parts are firmly fixed, par-
ticularly the folding mechanism, steering lock, wheels, brake
disc and brake lever.
TO GET THE SCOOTER READY FOR TRANSPORT AGAIN,
PLEASE CARRY OUT THE FOLLOWING ACTIONS
• Loosen the quick release lock by pushing the lever of the quick
release lock away from the handlebar stem. (Picture 5)
• Please press the locking button so that the handlebar rod can
be moved. (Picture 6)
• Push the handlebar rod as far as it will go into the handlebar
stem.
• Close the quick release lock by pushing the lever down to the
handlebar stem. (Picture 5)
• Loosen the quick release fastener on the T-piece of the handle-
bar shaft by pushing the lever away from the T-piece.
• Use your thumbs to press both locking buttons in the handlebar
grips and pull the handlebar grips outwards until they are re-
leased completely from the T-section. (Picture 4)
• Press the handlebar grips far down until they are parallel to
the handlebar shaft and can be pressed it into the appropriate
supports.
• Now close the quick release fastener on the T-piece of the handle-
bar shaft, by placing the lever around the T-piece.
• Pull the lever that is in the direction of movement, located to the
right of the folding mechanism, in order to release the assem-
bly lock. (Picture 2)
• Fold up the scooter by moving the handlebar rod towards the
back wheel until you hear the transport lock click into place.
(Picture 1)
USAGE INSTRUCTIONS
NOTHING’S EASY AT FIRST …
... most accidents happen to “beginners” within the first ten
minutes. Particular care should be taken during this stage.
DRIVING INSTRUCTIONS
The scooter moves when a foot is used to regularly push off, just
as with well-known children’s scooters. Braking is also easy – just
push down the friction brake on the back wheel (mudguard) or
activate the brake disc by pulling the brake lever on the handlebars.
We advise you to use both brake systems simultaneously and
always to apply them slowly. Look ahead while you are using the
scooter in order to avoid sudden braking maneuvers; this will
protect the material and help keep you safe.
We recommend folding the scooter by hand after each ride or
using the double stand located under the running board (14035)
or the kickstand (14015). The latter is in the direction of travel on
the left side under the running board. The respective stand is used
by simply folding and unfolding it.
Aluminium is a good and light material but should also be handled
carefully as it is not as hard as steel, for example.
TIRE PRESSURE
Do not exceed the maximum tire pressure of 4.5 bar. The recom-
mended tire pressure is 4.0 to 4.2 bar.
ADJUSTING THE BRAKE DISC
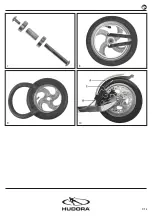
You can adjust the brake disc (Picture 10) using adjustment screws
A and B. Loosen the two screws and make sure that the brake disc
is positioned centrally between the brake pads. Apply the brake.
This presses the brake shoes against the brake disc. Then tighten
the adjustment screws A and B again. Should this adjustment


