background image

8/28

method be insufficient, you can adjust the system using Bowden 

cable screw C. Loosen the screw to free the Bowden cable and 

tauten the cable if necessary. Tighten the screw again after the 

adjusting procedure. Before use, check again that all parts are 

firmly fixed and that the brake disc is functioning perfectly.

REMOVAL OF THE WHEEL 

Use the two Allen wrenches to loosen the axle screw connections. 

Pull the axle bolt from the wheel hub and remove the wheel from 

the fork. 

CHANGING THE BALL BEARINGS 

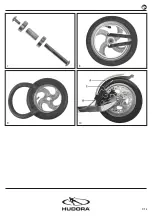
There are two ball bearings inside the wheel hub and between 

these an axle guide sleeve (Picture 7). A screwdriver or an Allen 

wrench can be used to push the ball bearings out of the wheel hub. 

In order to insert a new ball bearing, this must be pressed laterally 

into the wheel hub. 

TUBE, SHEATH AND RIM CHANGES 

In the event that there is still air in the tube, you have to let this 

out first over the valve. Using two levers – we recommend a tire 

lever – try to pry one side of the sheath over the outer edge of the 

rim (Picture 8). Continue this process until the entire side of the 

sheath is protruding over the wheel rim. 

TUBE EXCHANGE 

For the change of the tube, pull the tube from the rim on the 

leveraged sheath side (Picture 9). Press the valve back through 

the hole in the rim base, in order to completely remove the tube. 

For the insertion of a new tube, first lead the valve under the 

sheath through the hole in the rim base. Then slightly inflate the 

tube, this makes the insertion of the remaining part of the tube 

into the rim easier. Press the side of the sheath that is protruding 

over the edge of the rim back into the rim base. If necessary, the 

last remaining part of the sheath edge can be levered into the rim 

base. (Picture 8)

SHEATH AND RIM CHANGES 

For the change of the sheath or else the rim, lever the other side of 

the sheath in the same way over the other rim edge. You can then 

press / turn the rim together with the tube out. In order to attach 

a new sheath, press the rim (if needed a new rim) with already 

mounted tubing into the sheath, so that the two sides of the sheath 

protrude over both of the rim edges. Then first press back one side 

of the sheath completely into the rim base and then do the same 

on the other side. If necessary, each of the remaining parts of the 

sheath edges can be levered into the rim base.


MOUNTING THE WHEEL 

First ensure that the ball bearings are fitted in the wheel hub and 

the axle guide sleeve is positioned between them. Once this is 

ensured, you can insert the wheel into the fork and thereby fix 

it with the axle bolt. Use the two Allen screws for this purpose in 

order to counteract both screw sides. 

BEARINGS 

Your kick scooter is equipped with precision ball bearings, which 

were filled with grease under high pressure during manufacture. 

For this reason, the rollers of the kick scooter only run lightly and 

swiftly, while under load. Bearings are maintenancefree, but they 

are wear parts. Caution! Worn bearings make conspicuous audible 

noises and their function is constrained. In order to maintain optimal 

riding pleasure and to ensure lasting safety, you should replace 

bearings, as soon as they begin to exhibit signs of being worn. In 

the case of full load and daily use we recommend the replacement 

of the rollers and bearings twice a year. Bearings are available as 

accessories under http://www.hudora.de/.

MAINTENANCE AND STORAGE

Use a dry or damp cloth only to clean the product; do not use special 

cleaning agents! Check the product for damage or traces of wear 

and tear before and after each use. Do not make any structural 

changes. For your own safety, please use original spare parts only. 

These can be sourced from HUDORA. If parts become damaged or 

if sharp edges or corners should develop, the product may not be 

used any more. If in any doubt, please contact our service team 

(http://www.hudora.de/). Store the product in a safe place where 

it is protected from the elements, cannot be damaged, and cannot 

injure anyone. 

Replace damaged or worn assembly parts in order to ensure the 

safety of your scooter.

DISPOSAL ADVICE

At the end of the product’s life, please dispose of it at an appro-

priate collection point provided in your area. Local waste manage-

ment companies will be able to answer your questions on this.

SERVICE

We make every effort to deliver faultless products. If faults do arise 

however, we put just as much effort into rectifying them. Therefore, 

you can find numerous information on the product, replacement 

parts, solutions to problems and lost assembly manuals at http://

www.hudora.de/.

SPARE PARTS AND ORIGINAL 

ACCESSORIES AVAILABLE AT:

http://www.hudora.de/

EN

INSTRUCTIONS ON ASSEMBLY AND USE

All images are examples of the design.

Summary of Contents for 14015

Page 1: ... GEBRAUCHSANLEITUNG INSTRUCTIONS ON ASSEMBLY AND USE ISTRUZIONI PER IL MONTAGGIO E PER L USO INSTRUCCIONES DE MONTAJE Y DE USO INSTRUCTIONS DE MONTAGE ET MODE D EMPLOI MONTAGE EN GEBRUIKSHANDLEIDING INSTRUKCJA MONTAŻU I OBSŁUGI NAVODILA ZA NAMESTITEV IN UPORABO СБОРКА И РУКОВОДСТВО ПО ЭКСПЛУАТАЦИИ DE EN IT NL PL SI ES FR RU ...

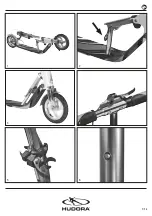
Page 2: ...2 28 1 2 3 5 4 6 ...

Page 3: ...3 28 7 8 10 9 ...

Page 4: ...verhältnissen Fahren Sie nicht auf Fahrbahnen und in Durchgängen sowie an Abhängen und Hügeln Meiden Sie die Nähe von Treppen und offenen Gewässern Der Scooter ist nicht für Sprünge geeignet Prüfen Sie vor der Nutzung des Scooters die Einschränkung des Einsatzbereiches durch die geltende Straßenverkehrsordnung Die Benutzung des Produktes erfordert bestimmte Fähigkeiten und Kenntnisse um Verletzung...

Page 5: ...änders ist durch ein faches Ein und Ausklappen gewährleistet Aluminium ist ein guter und leichter Werkstoff bedarf aber auch der umsichtigen Handhabe da es nicht so hart wie beispielsweise Stahl ist REIFENDRUCK Überschreiten Sie nicht den maximalen Reifendruck von 4 5 bar Der empfohlene Reifendruck beträgt 4 0 4 2 bar EINSTELLEN DER SCHEIBENBREMSE Sie können die Scheibenbremse Abb 10 über die Stel...

Page 6: ...RATULATIONS ON PURCHASING THIS PRODUCT Please read these instructions carefully The instructions are an in tegral component of the product Therefore please store them and the packaging carefully in case questions arise in the future Please always include these instructions when handing on the product to a third party This product must be assembled by an adult This product is designed for private d...

Page 7: ...andlebar can be securely adjusted Before using always check that all parts are firmly fixed par ticularly the folding mechanism steering lock wheels brake disc and brake lever TO GET THE SCOOTER READY FOR TRANSPORT AGAIN PLEASE CARRY OUT THE FOLLOWING ACTIONS Loosen the quick release lock by pushing the lever of the quick release lock away from the handlebar stem Picture 5 Please press the locking...

Page 8: ...ssary each of the remaining parts of the sheath edges can be levered into the rim base MOUNTING THE WHEEL First ensure that the ball bearings are fitted in the wheel hub and the axle guide sleeve is positioned between them Once this is ensured you can insert the wheel into the fork and thereby fix it with the axle bolt Use the two Allen screws for this purpose in order to counteract both screw sid...

Page 9: ... i limiti dell ambito di azione imposti dal vigente codice della strada L utilizzo del prodotto richiede determinate capacità e cono scenze al fine di poter evitare lesioni da cadute e urti Se il prodotto viene usato da bambini ciò dovrà avvenire sotto la sorveglianza di un adulto Assicurarsi che durante la guida il manubrio sia orientato con il logo in avanti ovvero con i pulsanti rivolti all ind...

Page 10: ...itato da un semplice mecca nismo a scatto L alluminio è un buon materiale leggero che non necessita tut tavia di una cura scrupolosa giacché non è così rigido al pari ad esempio dell acciaio PRESSIONE DEGLI PNEUMATICI Non superare la pressione massima di 4 5 bar La pressione con sigliata è di 4 0 4 2 bar REGOLAZIONE DEL FRENO A DISCO È possibile regolare il freno a disco Fig 10 agendo sulle viti A...

Page 11: ... E ACCESSORI ORIGINALI AL http www hudora de LE FELICITAMOS POR LA COMPRA DE ESTE PRODUCTO Lea atentamente este manual de instrucciones El manual de ins trucciones forma parte integrante del producto Consérvelo por ello cuidadosamente al igual que el embalaje para posteriores consul tas y preguntas Entregue asimismo el manual cuando preste o re gale el producto a terceros Este producto debería ser...

Page 12: ...r de la barra del manillar fig 5 Si el manillar no estuviera suficientemente fijo en la altura se leccionada abra el cierre rápido nuevamente gire el tornillo que se encuentra en frente profundamente hasta la rosca de modo tal que la abrazadera de cierre quede más estrecha Repita ese procedimiento hasta que el manillar pueda ajustarse correctamente Antes de cada uso compruebe siempre el correcto a...

Page 13: ... al tubo flexible Para colocar un nuevo revestimiento presione la llanta si fuera necesaria una nueva llanta con el tubo recién colocado de modo tal en el revestimiento que ambas partes del revestimiento sobresalgan por encima de los bordes de ambas llantas A continuación presione primero un lado del revestimiento completo en el borde de la llanta y a continuación el otro lado Dado el caso se debe...

Page 14: ...e Ne roulez pas au crépuscule dans la nuit ou en cas de mauvaise visibilité Neroulezpassurlesvoiesdecirculationoudanslespas sages ainsi que sur les pentes et les collines Evitez la proximité d escaliers ou de cours d eau La trottinette n est pas conçue pour effectuer des sauts Avant d utiliser la trottinette vérifiez les restrictions en matière de zone d utilisation imposées par le code de la rout...

Page 15: ...rnier est situé dans la direction de conduite sur le côté gauche sous le marchepied L utilisation du support respectif est assuré par simple pliage ou dépliage L aluminium est un bon matériau léger mais il est nécessaire de le traiter avec ménagement car il n est par exemple pas aussi dur que l acier PRESSION DES PNEUS Ne dépassez pas la pression maximale des pneus de 4 5 bar La pression de pneus ...

Page 16: ...rmations sur le produit les pièces de rechange la résolution des problèmes et les instructions de montage égarées sur http www hudora de PIÈCES D ORIGINE ET ACCESSOIRES DE RECHANGE SUR http www hudora de HARTELIJK GEFELICITEERD MET DE KOOP VAN DIT PRODUCT Lees de gebruiksaanwijzing zorgvuldig door De gebruiksaanwij zing is een vast bestanddeel van het product Bewaar de gebruik saanwijzing en verpa...

Page 17: ...er in de draad zodat de verzekering strakker om de stuurpen klemt Herhaal deze stap totdat de stuurpen goed vastzit Controleer voor het gebruik altijd of alle onderdelen goed vast zitten vooral het inklapmechanisme de stuursluiting de wie len de remschijven en de remhendel GA ALS VOLGT TE WERK OM DE STEP WEER IN DE TRANSPORTTOESTAND TE BRENGEN Maak de snelsluiting los door de hendel van de meet te...

Page 18: ...e kant Uiteindelijk moet de gehele rand van de mantel in de velg zitten MONTAGE VAN HET WIEL Zorg ervoor dat de kogellager in de wielnaaf zit en de asvoerings huls zich daartussen bevindt Wanneer dit is verzekerd kunt u het wiel in de vork zetten en door middel van de asschroef bevestigen Gebruik hiervoor twee inbussleutels zodat u de schroeven aan beide kanten vast kunt draaien LAGERS Uw step is ...

Page 19: ...ć uwagę na to by nóżka była podczas jazdy bezpiecznie złożona Nigdy nie należy jeździć po zmierzchu w nocy lub przy złej widoczności Nie należy jeździć na jezdni i w przejściach oraz po zboczach i pagórkach Należy unikać bliskości schodów i otwartych zbiorników wodnych Hulajnoga nie nadaje się do skoków Zanim zaczniesz jeździć na hulajnodze sprawdź ograniczenia obowiązujące w miejscu korzystania z...

Page 20: ...ojaka 14035 znajdującego się pod podnóżkiem lub stojaka bocznego 14015 Znajduje się on po lewej stronie pod pokładem w kierunku jazdy Proste składanie i rozkładanie zapewnia możliwość wykorzystania danego stojaka Aluminium to dobre i lekkie tworzywo jednakze wymaga os troznego obchodzenia sie z nim poniewaz nie jest tak wytrzymale jak na przyklad stal CIŚNIENIE W OPONACH Nie należy przekraczać mak...

Page 21: ...www hudora de CZĘŚCI ZAMIENNE I ORYGINALNE AKCESORIA POD http www hudora de PRISRČNE ČESTITKE OB NAKUPU TEGA IZDELKA Prosimo vas da si pozorno preberete navodila za uporabo Navodila za uporabo so pomemben sestavni del izdelka Navodila skrbno shranite skupaj z embalažo za primer kasnejših vprašanj Če izdelek podarite tretji osebi obvezno vedno priložite tudi pričujoča navodila Ta izdelek mora sesta...

Page 22: ...ka in zavorne ročice DA BI SKIRO PONOVNO SPRAVILI V TRANSPORTNI POLOŽAJ PROSIMO DA IZVEDETE NASLEDNJE KORAKE Sprostite hitro zaporo tako da ročico za hitro zaporo potisnete stran od palice krmila Slika 5 Pritisnite aretirni gumb za zaklepanje tako da se krmilo lahko premika Slika 6 Krmilno palico do konca potisnite v steblo krmila Hitro zaporo zaprite tako da ročico za hitro zaklepanje namesti te ...

Page 23: ...lec osi Če je to zagotovljeno lahko kolo vstavite v vilice in ga tam pritrdite z osnim vijakom Za to uporabite dva imbus ključa tako da lahko kontrirate obema stranema vijakov LEŽAJ Vaš skiro je opremljen z natančnimi ležaji ki so med proizvodnjo napolnjeni z mastjo pod visokim pritiskom Zaradi tega valji tečejo gladko in hitro le ko je skiro obremenjen Ležaji ne potrebujejo vzdrževanja vendar so ...

Page 24: ...ыми сухими и по возможности их не должны использовать другие участники дорожного движения Избегайте покатых участков При продол жительном использовании самоката тормоза могут нагреться При этом может пострадать Ваша обувь Не следует прикасаться к тормозам пока они не остыли Будьте осторожны по отношению к другим лицам Перед стартом проверьте отсутствие повреждений и жесткую посадку всех соединител...

Page 25: ...действующий затвор на T об разном элементе выноса руля отжав рычаг от T об разного элемента Нажимайте большими пальцами на фиксирующие кнопки и тяните ручки руля наружу до тех пор пока они полностью не выйдут из Т образного элемента Pис 4 Нажимайте ручки руля вниз до тех пор пока они не будут находиться параллельно выносу руля и их мож но будет втолкнуть в предусмотренные для этого крепления Тепер...

Page 26: ... края обода После этого сначала нажатием поместите полностью назад в основание обода одну сторону покрышки а затем другую сто рону Не исключено что всякий раз последний участок RU СБОРКА И РУКОВОДСТВО ПО ЭКСПЛУАТАЦИИ края покрышки придется помещать назад в основание обода с помощью рычага МОНТАЖ КОЛЕСА Сначала убедитесь что шарикоподшипники установ лены в ступице колеса а направляющая втулка оси н...

Page 27: ...Поэ тому Вы можете найти подробную информацию об из делии о запасных частях решения проблем и инструк ции на случай утери по адресу http hudora de ЗАПАСНЫЕ ЧАСТИ И ОРИГИНАЛЬНЫЕ А КСЕССУАРЫ ПОД http www hudora de Все иллюстрации являются примерами дизайна ...

Page 28: ...28 28 ...

Reviews: