background image

Assembly 

Instructions

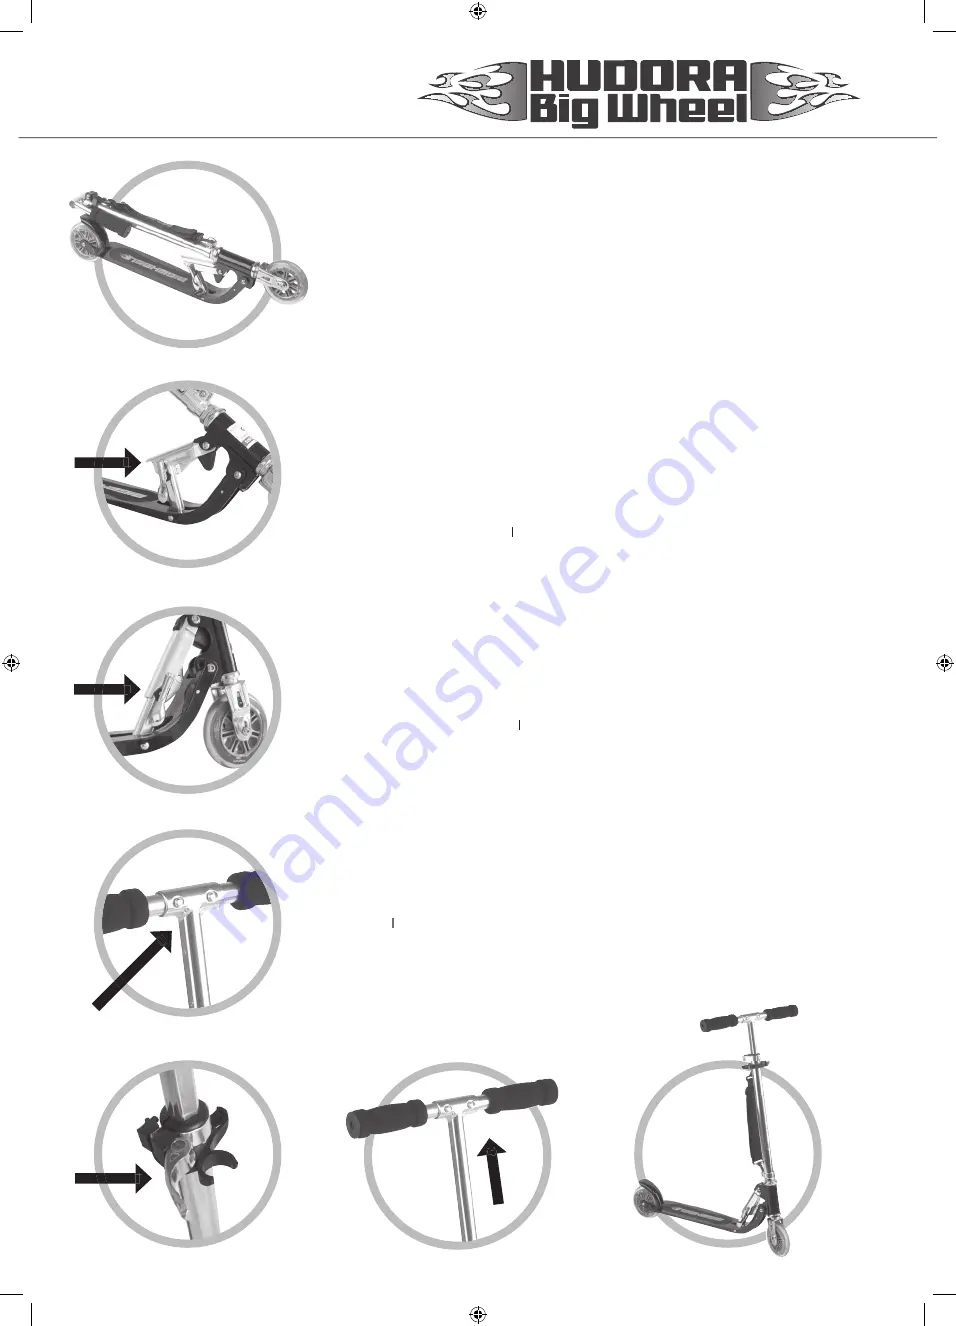
The „HUDORA Big Wheel“ scooter is delivered to you readily assembled! 
(Fig. 1)

In order to make the scooter ready to ride, please proceed as follows:

1. Pull the lever to the right over the footboard in order to loosen the transport 

protection. (Fig. 2)

2. Pivot the handlebar of the scooter up towards the front.
3. Now press the folding hinge in the direction of the handlebar shaft until it 

audibly engages. (Fig. 3)

4. Insert the handlebar grips into the T-joint of the handlebar shaft. Press with 

the thumbs on the two locking buttons, as well as the handlebar grips, until 
the grips can be inserted easily into the T-joint. Rotate the handlebar grips 
until the locking buttons appear in the two locking openings provided for that 
and engage audibly. Check the correct seating of the two handlebar grips by 
pulling both handlebar grips outwards. If the two handlebar grips cannot be 
moved anymore, they are assembled according to specifi cation. (Fig. 4)

5. Loosen the quick-release lock at the handlebar stick by pushing away the lever 

of the quick-release lock from the handlebar until the lever is located parallel 
to the handlebar grip. (Fig. 5)

6. Pull the handlebar stick from the handlebar shaft until the handlebar 

stick

stick

stick 

has reached the height desired by you. (Fig. 6)

7. Now close now the quick-release, by placing the lever around the handlebar 

shaft.

8. Check all parts for secure seating.

In order to return the scooter to the transport confi guration, please proceed 
as follows:

1. Loosen the quick-release lock by pushing the lever of the quick-release away 

from the handlebar shaft.

2. Slide the handlebar stick into the handlebar shaft as far as the stop.

stick

stick

3. Close the quick-release lock, by placing the lever of the quick-release lock 

around the handlebar shaft.

4. Press the locking buttons into the handlebar grips with the thumbs and pull 

out the handlebar grips until they are completely released from the T-joint. 
(Fig. 4)

5. Press the handlebar grips down until they are located parallel to the 

handlebar shaft.

6. Pull up the lever (to the right over the footboard), in order to release the 

assembly protection. (Fig. 2)

7. Fold the „HUDORA Big Wheel SCOOTER“ together by moving the handlebar 

stick in the direction of the back wheel, until the transport protection engages 

stick

stick
audibly.

Color and construction can deviate from the illustrations.

Fig. 1

Fig. 2

Fig. 3

Fig. 4

Fig. 5

Fig. 6

Fig. 7

Manual Big Wheel mehrsprachig.indd   3

14.04.2005   12:16:30 Uhr

Summary of Contents for Big Wheel

Page 1: ...cken bis sich der Hebel parallel zum Lenkergriff befindet Bild 5 6 Ziehen Sie die Lenkerstange soweit aus dem Lenkerschaft bis die Lenkerstange die von Ihnen gewünschte Höhe erreicht hat Bild 6 7 Schließen Sie nun den Schnellverschluss indem Sie den Hebel um den Lenkerschaft legen 8 Überprüfen Sie alle Teile auf festen Sitz Um den Scooter wieder in den Transportzustand zu versetzen gehen Sie bitte ...

Page 2: ...Lösen und Anziehen der Verbindungselemente nachlassen Regelmäßige Wartung Kontrolle und Instandhaltung erhöhen die Sicherheit und Lebensdauer Ihres Scooters Die maximale Belastung beträgt 100 kg Der Scooter ist mit Vorsicht zu verwenden da das Fahren mit dem Scooter große Geschicklichkeit erfordert Der Scooter ist nicht für Sprünge geeignet Rollenwechsel Rollen sind als Zubehör erhältlich und soll...

Page 3: ...bar stick from the handlebar shaft until the handlebar stick stick has reached the height desired by you Fig 6 7 Now close now the quick release by placing the lever around the handlebar shaft 8 Check all parts for secure seating In order to return the scooter to the transport configuration please proceed as follows 1 Loosen the quick release lock by pushing the lever of the quick release away from...

Page 4: ...ted loosening and tightening up of the connector elements Regular care maintenance and control checks increase the safety and the service life of your scooter The maximum loading is 100 kg The scooter is a toy and should be used with caution since riding the scooter requires a 0 kg The scooter is a toy and should be used with caution since riding the scooter requires a 0 high level of skill The sc...

Page 5: ...uidon de la partie inférieure de la barre jusqu à ce que la barre ait atteint la hauteur que vous souhaitez Illustration 6 7 Fermez à présent la fermeture rapide en resserrant le levier autour de la barre du guidon 8 Contrôlez que tous les éléments soient bien serrés Afin de remettre la trottinette dans l état apte au transport veuillez procéder de la façon suivante 1 Débloquez la fermeture rapide ...

Page 6: ...ntretien un contrôle et une maintenance réguliers augmentent la sécurité et la durée de vie de votre trottinette La charge maximale est de 100 kg La trottinette est un jouet et doit être utilisée avec 0 kg La trottinette est un jouet et doit être utilisée avec 0 précaution rouler en trottinette requérant une grande adresse La trottinette n est pas adéquate pour des sauts Changement de roues Les ro...

Page 7: ...to alla maniglia figura 5 6 Estrarre l asta del manubrio dal fusto del manubrio fino a quando l asta del manubrio ha raggiunto l altezza desiderata 7 A questo punto richiudere il dispositivo a chiusura rapida appoggiando la leva al fusto del manubrio 8 Controllare che tutti i pezzi siano serrati correttamente Per riportare lo Scooter nelle condizioni di trasporto procedere come segue 1 Allentare il ...

Page 8: ... della funzionalitá dello Scooter Il carico massimo ammissibile é di 100 Kg Lo Scooter é un giocattolo che deve essere usato con prudenza poiché andare sullo Scooter richiede una 0 Kg Lo Scooter é un giocattolo che deve essere usato con prudenza poiché andare sullo Scooter richiede una 0 grande destrezza Lo Scooter non é idoneo per fare salti Sostituzione delle rotelle Le rotelle sono disponibili ...

Reviews: