background image

14

Assembly

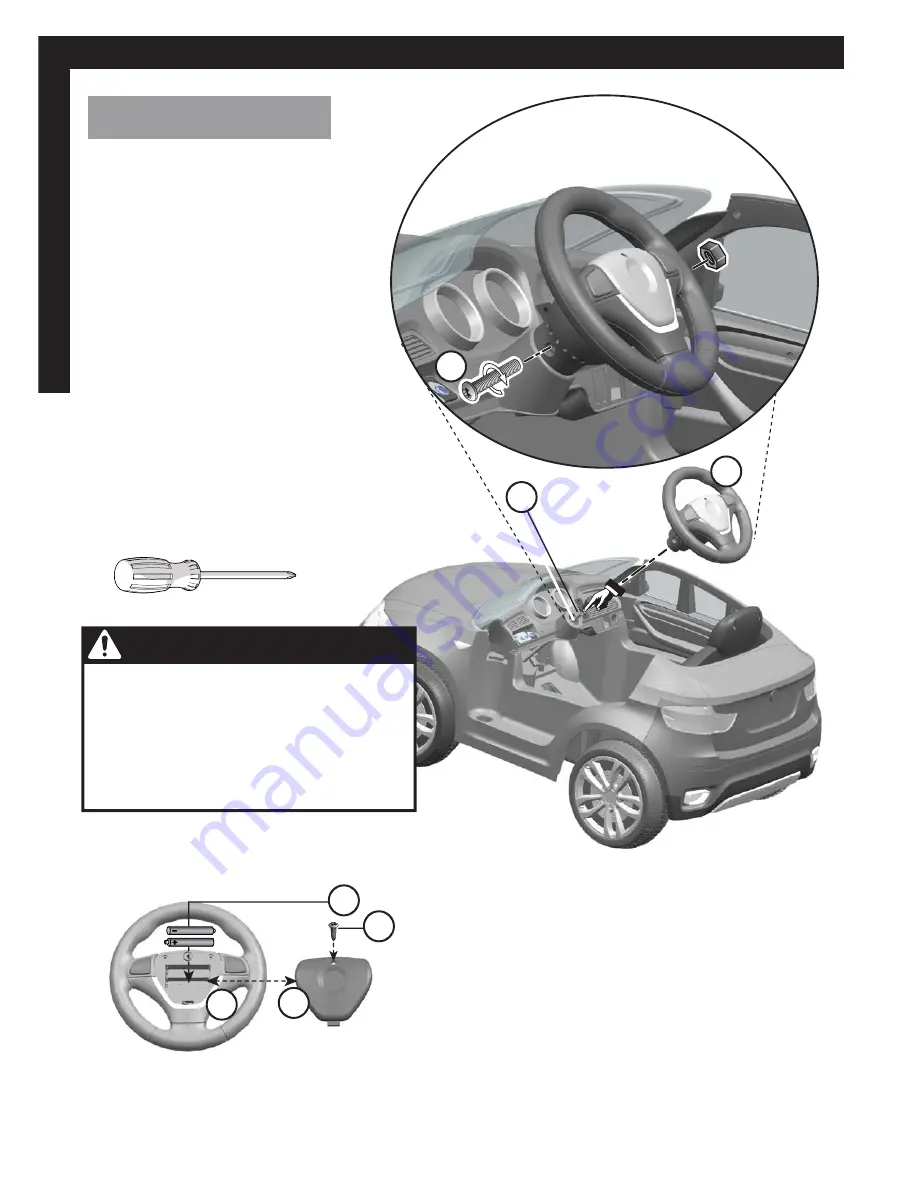
Installing the Steering Wheel and Batteries

4

3

1

3

1

8

7

6

A

2

5

Screw Driver

1. Remove 

the 

screw

 from the 

steering wheel

2. Place 

the 

steering wheel


over the 

steering column


(A).

3. Align 

the 

holes

 on each side 

of 

steering wheel

 with the 

holes at the end of the 

steer-

ing column

.

4. Insert 

the 

screw

 (1) through 

the steering wheel and steer-
ing column, into the nut.  
Tighten securely.

If you wish to use the sound effects, install two AA bat-
teries (non provided) using the following steps:

5.  With a small screwdriver remove the 

screw


on the 

battery cover

 located in the center of 

the steering wheel.

6. Remove 

the 

battery cover

 from the top of the 

battery compartment

.

7. Insert 

two 

AA batteries

 oriented as shown in 

the battery tray.

8. Place 

the 

battery cover

 over the 

battery 

compartment 

and fasten with the 

screw


removed above.

WARNING!

•  Batteries must be installed by Adult. 
•  DO NOT mix old and new batteries.
•  DO NOT mix alkaline, standard (carbon-

zinc) or rechargeable batteries.

•  DO NOT charge non-rechargeable batter-

ies. Always have adult supervision when 
charging rechargeable batteries.

Installation

Summary of Contents for 6V

Page 1: ... read and fully understand this manual before operation Save this manual for future reference This manual contains important safety assembly operation and maintenance information HBMW Rideon EN 092613 m0132 Copyright Huffy Corporation 2013 BC ...

Page 2: ...on 12 Seat Installation 13 Steering Wheel and Sound Effect Batteries 14 Side Mirror Installation 15 Operation Operation and Features 16 Maintenance and Service General 17 Battery Re charge Interval and Time 17 Charging the Drive Battery 18 Battery Fuse 19 Battery Storage 19 Battery replacement and disposal 20 Troubleshooting Guide 21 22 Huffy Warranty Huffy Corporation Limited Warranty 23 Tools Ne...

Page 3: ...at night or in the dark could result in an accident Do not use the vehicle in unsafe conditions such as snow rain loose dirt mud sand or fine gravel This may result in unexpected action such as tip over and skidding This vehicle has no brakes Motor friction will gradually stop the unit Do not use the vehicle in an unsafe manner Examples include but are not limited to Pulling the vehicle with anoth...

Page 4: ... from the battery and keep the battery dry Contact or exposure to battery leakage lead acid may cause serious injury If contact or exposure occurs immediately call your physician If the chemical is on the skin or in the eyes flush with cool water for 15 minutes If the chemical was swallowed immedi ately give the person water or milk Do not give water or milk if the patient is vomiting or has a dec...

Page 5: ... the electronics and gear box inside the vehicle Caution Changes or modifications not expressly approved by the party responsible for compliance could void the user s authority to operate the equipment NOTE This equipment has been tested and found to comply with the limits for the Class B digital device pursuant to Part 15 of the FCC Rules These limits are de signed to provide reasonable protectio...

Page 6: ...6 Parts View Parts View 15 16 17 14 11 18 15 19 20 5 1 4 7 6 3 13 8 21 22 12 10 9 15 18 12 11 15 16 2 15 1 16 LEFT RIGHT REAR AXLE STACK UP ...

Page 7: ...e Wheel 11 Wheel x3 12 Axle 13 Motor Cover Motor Cover Screws x4 14 Wheel Cover x4 Wheel Cover Screws x3 per wheel 15 Axle Washers x8 16 Locknut x4 17 Hubcaps x4 18 Wheel Bushing x7 total for vehicle 19 Steering Rod 20 Cotter Pin 21 Battery Charger 22 Spanner Socket x2 23 Steering Rod Washers x2 Parts List Parts List NOTE Loose parts are packaged in plastic bag ...

Page 8: ...r axle 2 Slide the Bushing 18 into the indent in the back of the Wheel 11 it will sit even with the back of the wheel 3 Slide the Wheel onto the rear axle Ensure Bushing stays in place in Wheel 4 Slide Washer 15 onto the rear axle 5 Install Locknut 16 securely on the end of the rear axle with Spanner Wrench Hint An extra Spanner has been provided to hold the locknut on one side of the rear axle wh...

Page 9: ...en with the back of the wheel 3 Slide the Wheel onto the Front Axle Ensure Bushing stays in place in Wheel 4 Slide Washer 15 onto the Front Axle 5 Install Locknut 16 securely on the end of the Front Axle with Spanner Wrench 6 Align the two tabs of the Hubcap 17 with the slots of the wheel cover and press the Hubcap firmly into place Repeat the above steps for the other front wheel Installation ...

Page 10: ...19 and slide up to rod Dimple C 3 Insert the long end of the Steering Rod 19 through Hole A 4 Insert the short end of the Steering Rod into slotted Hole B as shown 5 Push the Steering Rod through the hole until the rod Dimple C is against the body 6 Place washer 23 over end of Steering Rod as shown 7 Insert Cotter Pin 20 through Steering Rod and bend ends around as shown Installation ...

Page 11: ...tor red battery connector 1 Plug the white motor connector into the white Drive Switch connector as shown above 2 Plug the red battery connector into the red Drive Switch connector as shown above 2 1 WARNING Connect the red to red connectors and white to white connectors Connecting incorrectly can damage the battery and or motor ...

Page 12: ...12 Assembly Installing the Motor Cover 1 Fit the Motor Cover 13 on the motor 2 Install four Screws A securely Screw Driver x4 A 13 Installation ...

Page 13: ... in the middle of the main body hole Be sure the lock is oriented so it will fit into the slot 3 Rotate and lower the seat onto the main body Ensure the seat tabs stay in the slots and the Lock B into the main body hole 4 Using a coin or large screwdriver turn the Lock on the front of the seat to secure the seat to the main body CAUTION Ensure no wires or connectors are pinched under the seat Inst...

Page 14: ...ries non provided using the following steps 5 With a small screwdriver remove the screw on the battery cover located in the center of the steering wheel 6 Remove the battery cover from the top of the battery compartment 7 Insert two AA batteries oriented as shown in the battery tray 8 Place the battery cover over the battery compartment and fasten with the screw removed above WARNING Batteries mus...

Page 15: ...ocated on the door 2 Insert a screw through the top of the hole in the mirror and mirror bracket the nut is captive inside the mirror bracket Tighten securely Do not over tighten 3 Repeat the above steps for the opposite side WARNING Side Mirrors are not reflective and do not provide rear visibility Installation Assembly ...

Page 16: ...eel Each button will make a different sound 4 Shift Lever Changes the direction the vehicle moves from forward to reverse To move the car forward shift the lever up To move the car backward shift the lever down Shift the lever in the middle the car will stop and not run CAUTION To avoid damaging the motors and gears DO NOT shift the lever when the car is moving 5 Foot pedal Applies power speed to ...

Page 17: ...arge or recharge the battery Failure to comply with all safety warnings may result in serious injury or death Maintenance Re charge Interval and Time Important Check the drive battery and charger supply cord connector for wear and damage before charging Do not charge the battery if damage has occurred Only replace with the same type 6V rechargeable battery and charger supplied by the manufacturer ...

Page 18: ...tery connector Only use the 6V charger included with the vehicle input AC 120V 60Hz output DC 6V Plug the charger into a standard 110V wall outlet 4 After charging is complete at least 8 hours but not more than 12 hours 5 Unplug the charger from the wall outlet 6 Unplug the charger connector from the red battery connector 7 Reconnect red connectors 8 Replace Seat see Seat section CAUTION Ensure no...

Page 19: ...tery Fuse The drive motor circuit features a thermal fuse that will automatically trip and cut all power to the vehicle if the motor electric system or battery is overloaded The fuse will reset and power will be restored after the unit is turned OFF for approximately five minutes If the thermal fuse trips repeatedly during normal use the vehicle may need repair To avoid losing power follow these g...

Page 20: ...ead battery in a plastic bag Important The sealed lead acid battery must be recycled or disposed of in an environmen tally sound manner Do not dispose of battery in a fire The battery may explode or leak acid Do not dispose of the battery in household trash The incineration land filling or mixing of sealed lead acid batteries with household trash is prohibited by law Return an exhausted battery to...

Page 21: ...e Battery is dead Replace battery see Battery Re placement and Disposal Electrical system is damaged Call Customer Service Motor is damaged Call Customer Service Vehicle does not run very long Battery is under charged Check that the battery connectors are firmly plugged into each other when recharging see Battery Re charge interval and Time Battery is old Replace battery see Battery Re placement a...

Page 22: ...d to reverse or vice versa Attempting to shift while the vehicle is in motion Completely stop the vehicle and shift see Use Manual Operation Loud grinding or clicking noises coming from motor or gear box Motor or gears are damaged Call Customer Service Drive Wheel is partially engaged Check drive wheel to motor en gagement 6V Battery will not recharge Battery connector or adapter connector is loos...

Page 23: ...This Vehicle has been designed for general transportation and recreational use This warranty shall become immediately null and void if you do any of the follow ing Rent the Vehicle Sell the Vehicle Give away the Vehicle Use Vehicle in ways conflicting with use and warnings described in this manual The user assumes all risk of personal injuries damage to or failure of the Ve hicle and any other los...

Page 24: ...he strap and your chin A proper fitting helmet should be comfortable and not rock forward back ward or side to side Always read the user manual that comes with your helmet to make sure it is fitted and attached properly to the wearer s head according to the fitting instructions described in the user manual CORRECT INCORRECT Check www Huffy com for the current contact information WARNING ALWAYS WEA...

Reviews: