background image

7  

Assembly

Installing the Seat Post Assembly

Seat to Seat Post (Single 

Bolt Style):

 Some models 

are equipped with a seat and 

seat post assembly that uses 

a Single Bolt and Nut 

A

 to 

secure the Seat 

B

 to the seat 

post.  The seat is assembled to 

the seat post at the factory.

Ensure the Seat is secure to the 

Seat Post and the seat bolt is 

tightened. (

See torque table 

for recommended torque)

INSTALL STEPS:

•  If needed, loosen Clamp Nut 

C

 enough to insert the Seat Post 

D

.

•  Point the seat forward and insert Seat Post to the Minimum Insertion marks 

E

.

•  Tighten Clamp Nut 

C

 securely so it supports the rider without moving. (

See 

torque table for recommended torque)


WARNING: 

To prevent the seat coming loose and possible loss of control, the “MIN-

IN” (minimum insertion) mark 

E

 on the Seat Post MUST be 

below

 the top of the Seat Tube 

F

.

E

B

F

F

C

D

A

Summary of Contents for CLASSIC TRIKE

Page 1: ...s renseignements le service à la clientèle Copyright Huffy Corporation 2017 Owner s Manual Classic Trike THIS MANUAL CONTAINS IMPORTANT SAFETY ASSEMBLY OPERATION AND MAINTENANCE INFORMATION PLEASE READ AND FULLY UNDERSTAND THIS MANUAL BEFORE OPERATION SAVE THIS MANUAL FOR FUTURE REFERENCE H Sidewalk Rideon EN AU 111016 m0205 AU EN ...

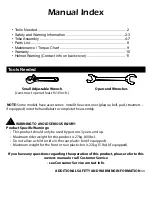
Page 2: ...ow a child to ride in the rear plastic bin if equipped Maximum weight for the front or rear plastic bin is 2 3kg 5 lbs if equipped If you have any questions regarding the operation of this product please refer to this owners manual or call Customer Service see Consumer Service contact info ADDITIONAL SAFETY AND WARNING INFORMATION Tools Needed Small Adjustable Wrench Jaws must open at least 9 16 i...

Page 3: ...eight may cause a hazardous or unstable condition Protective equipment should be worn Do not allow a child to ride without a CPSC approved helmet with the chinstrap securely fastened Always wear shoes when using this product Not to be use in traffic Do not allow a child to ride the product at dusk at night or at times of limited visibility Do not allow a child to ride on roadways or alleys Do not ...

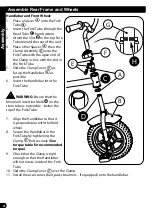
Page 4: ...s far up the Handlebar Gas possible 6 Insert the Handlebar into the Fork Tube WARNING Ensure that the Minimum Insertion Mark H on the stem tube is not visible below the top of the Fork Tube 7 Align the Handlebar so that it is perpendicular with the front wheel 8 Secure the Handlebar in the Fork Tube by tightening the Clamp EBolt securely See torque table for recommended torque 9 Check that the Cla...

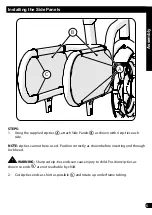
Page 5: ...cannot be re used Position correctly as shown before inserting end through lock head WARNING Sharp cut zip ties ends can cause injury to child Position zip ties as shown so ends Care not reachable by child 2 Cut zip ties ends as short as possible Cand rotate up under frame tubing Assembly Installing the Side Panels ...

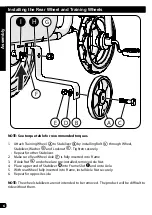
Page 6: ...ther Stabilizer 2 Make sure Rear Wheel Axle Fis fully inserted into Frame 3 If Axle Nut Gand wheel are pre installed remove Axle Nut 4 Place upper end of Stabilizer H into Frame Slot I and onto Axle 5 With rear Wheel fully inserted into Frame install Axle Nut securely 6 Repeat for opposite side NOTE The wheel stabilizers are not intended to be removed The product will be difficult to ride without ...

Page 7: ...and the seat bolt is tightened See torque table for recommended torque INSTALL STEPS If needed loosen Clamp Nut C enough to insert the Seat Post D Point the seat forward and insert Seat Post to the Minimum Insertion marks E Tighten Clamp Nut C securely so it supports the rider without moving See torque table for recommended torque WARNING To prevent the seat coming loose and possible loss of contr...

Page 8: ... Description 1 Frame 10 Handlebar 2 Fork 11 Grips x2 3 Fender 12 Clamp Cover 4 Front Wheel Assembly 13 Handlebar Clamp 5 Rear Wheel Assembly 14 Bushing Spacers 6 Training Wheel Set 15 Pad Bag Plaque 7 Axle Nuts x2 8 Side Panels x2 9 Seat Post Assembly Parts List ...

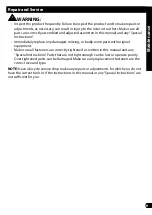
Page 9: ...missing or badly worn parts with original equipment Make sure all fasteners are correctly tightened as written in this manual and any Special Instructions Parts that are not tight enough can be lost or operate poorly Over tightened parts can be damaged Make sure any replacement fasteners are the correct size and type NOTE Have a bicycle service shop make any repairs or adjustments for which you do...

Page 10: ...e instructions and warnings in this Owner s Manual Huffy will not be liable for incidental or consequential loss or damage due directly or indirectly from use of this product Some states do not allow the exclusion or limitation of incidental or consequential damages so the above limitation may not apply to you What rights do you have This warranty gives you specific legal rights You may also have o...

Page 11: ...and your chin A proper fitting helmet should be comfortable and not rock forward back ward or side to side Always read the user manual that comes with your helmet to make sure it is fitted and attached properly to the wearer s head according to the fitting instructions described in the user manual Check www Huffybikes com contact for the current contact information WARNING ALWAYS WEAR YOUR HELMET WHE...

Page 12: ...com contact To Order Parts CANADA only go to http www huffybikes com parts OU appelez le 1 800 872 2453 CANADA only Pour communiquer par courriel huffycanada huffy com MÉXICO ANTES DE DEVOLVER EL PRODUCTO A LA TIENDA COMUNÍQUESE CON SERVICIO AL CLIENTE DE HUFFY NOS COMPLACE AYUDARLO CON CUALQUIER PARTE O PROBLEMA DE ENSAMBLADO QUE PUDIERA TENER Para obtener Servicio al cliente rápido visite http www ...

Reviews: