background image

7  

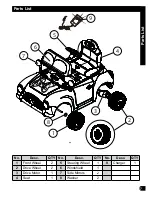
Parts List

4

5

6

7

8

9

1

3

2

Parts List

No.

Desc.

QTY No.

Desc.

QTY No.

Desc.

QTY

1

Front Wheel

2

5

Steering Wheel

1

9

Charger

1

2

Drive Wheel

2

6

Windshield

1

3

Drive Motor

1

7

Side Mirrors

2

4

Seat

1

8

Washer

2

Summary of Contents for Disney Ride On

Page 1: ...ly understand this manual before operation Save this manual for future reference This manual contains important safety assembly operation and maintenance information H Minnie Rideon EN 051716 m0355 Copyright Huffy Corporation 2016 BC Date Code Label Here ...

Page 2: ...nt Disposal and Storage 13 Troubleshooting 14 Warranty Limited Warranty 15 SPECIFICATONS Suitable Age 3 Years Load Capacity 65 lbs 30kgs Charger Input 120v 60hz Output See charger for details Drive Motor 6v 30w Drive Battery 6v 7Ah Important Before using the unit for the first time the battery needs to be charged for at least 8 to 12 hours no more than 20 hours Only an adult who has read and under...

Page 3: ...i sion Body parts such as hands legs hair and clothing can get caught in moving parts Never place a body part near a moving part or wear loose clothing while using the vehicle Always wear shoes when using vehicle Use on flat smooth paved surfaces only Using the vehicle on or near streets motor vehicle drop offs such as steps water swimming pools sloped surfaces hills wet areas flammable vapors in ...

Page 4: ...ontact with the battery or other elec tric components Do not tamper with the electrical system Doing so may create a short causing the fuse to trip or other damage including fire Do not stand on or in vehicle while moving Child should always wear an approved helmet when using this product If equipped child should always use properly and securely attached Seat Belt Only use authorised replacement p...

Page 5: ...ositive and negative terminals may result in fire or explosion Avoid direct contact between the terminals Picking up the battery by the wires or charger can cause damage to the bat tery and may result in a fire Always pick up the battery by its case or handles Battery must be handled by adults only Liquids on the battery may cause fire or electric shock Always keep all liquids away from the bat te...

Page 6: ...ference in a residential installation This equipment generates uses and can radiate radio frequency energy and if not installed and used in accordance with the instructions may cause harmful interference to radio communications However there is no guarantee that interference will not occur in a particular installa tion If this equipment does cause harmful interference to radio or television recept...

Page 7: ...arts List 4 5 6 7 8 9 1 3 2 Parts List No Desc QTY No Desc QTY No Desc QTY 1 Front Wheel 2 5 Steering Wheel 1 9 Charger 1 2 Drive Wheel 2 6 Windshield 1 3 Drive Motor 1 7 Side Mirrors 2 4 Seat 1 8 Washer 2 ...

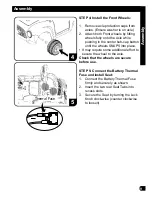
Page 8: ...stall the Windshield and Rear View Mirrors 1 Fit the Windshield tabs into the re cess holes and snap into position 2 Put the Rear View mirrors into the recess holes NOTE There is a Left and Right Mirror The mirror can be turned inwards by 90 STEP 3 Install the Drive wheels 1 Remove axle cap from both ends of axle Ensure washer is on axle 2 Attach both Rear wheels by fitting wheels fully onto the A...

Page 9: ...b cap button until the wheels SNAPS into place It may require some additional effort to secure the wheel to the axle Check that the wheels are secure before use STEP 5 Connect the Battery Thermal Fuse and install Seat 1 Connect the Battery Thermal Fuse firmly and securely as shown 2 Insert the two rear Seat Tabs into recess slots 3 Secure the Seat by turning the Lock Knob clock wise counter clockw...

Page 10: ...he door and push open Pull inside Latch of the door and pull closed Power on Press the Power Switch button A to turn unit ON Move the Shift Lever B to FORWARD to go forward when the Foot Switch C is pressed Move the shift lever to REVERSE to go backwards when the foot switch is pressed Move the shift lever to STOP to stop Thermal Fuse The car has a self recovering Thermal Fuse under the seat When ...

Page 11: ... gears and the vehicle will not run Ensure the battery bracket is securely in place before use Store the vehicle indoors Keep it away from sources of heat such as stoves and heaters Clean the vehicle with a soft dry cloth To restore shine to plastic parts use a non wax furniture polish Do not use automotive wax abrasive cleaners or wash the vehicle with soap and water WARNING Water will damage the...

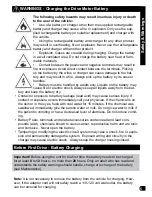
Page 12: ...the battery as directed will cause permanent damage to the battery and will void the warranty CHARGING THE DRIVE BATTERY 1 Charge Drive Battery after 1 2 hours of use or when the vehicle does not move at its normal speed 2 Ensure Power Switch is OFF 3 The Charging Port A is located below the front edge of the seat bottom 4 First insert the Charger DC plug into the Charging Port and then insert the...

Page 13: ... Do not dispose of the battery in household trash The incineration land filling or mixing of sealed lead acid batteries with household trash is prohibited by law Return an exhausted battery to a federal or state approved lead acid battery re cycler such as a local seller of automotive batteries check local battery disposal regulations NOTE Replacement batteries are available at most battery supply...

Page 14: ...g vehicle in harsh conditions see User Requirements and Safety Warnings Vehicle will not run when foot pedal is pressed and shift lever is in the forward or backward position Poor contact of wires or connec tors Check that the battery connectors are firmly plugged into each other If wires are loose around the motor call Customer Service Dead Spot on motor A dead spot means the electric power is no...

Page 15: ...This Vehicle has been designed for general transportation and recreational use This warranty shall become immediately null and void if you do any of the follow ing Rent the Vehicle Sell the Vehicle Give away the Vehicle Use Vehicle in ways conflicting with use and warnings described in this manual The user assumes all risk of personal injuries damage to or failure of the Ve hicle and any other los...

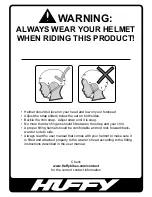
Page 16: ...and your chin A proper fitting helmet should be comfortable and not rock forward back ward or side to side Always read the user manual that comes with your helmet to make sure it is fitted and attached properly to the wearer s head according to the fitting instructions described in the user manual Check www Huffybikes com contact for the current contact information WARNING ALWAYS WEAR YOUR HELMET ...

Reviews: