Assembly
7
Scooter Assembly - continued
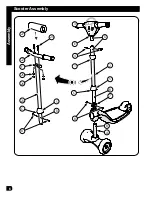
<< See Image Opposite Page
Lights and Sounds Unit (if equipped):
1. Slide lower Locking Cap (5) UP onto Steering Tube (2) as shown.
2. (If unassembled) Slide Axle Shaft (A) up into Scooter Deck as shown.
3. Slide Shoulder Collar (7) down onto Axle Shaft (A).
4. Insert Steering Tube (2) into Axle Shaft (A).
5. Make sure the Axle Shaft holes line up with the Steering Tube holes (B).
6. Install Screw Set (8) through Shoulder Collar (7) and Steering Tube (2) and tighten
securely.
7. Slide lower Locking Cap (5) DOWN so that Tabs (C) lock Cap into position.
8. Slide upper Locking Cap (1) DOWN onto Steering Tube (2) as shown.
9. Ensure Lights and Sounds unit (3) is facing forward (Control Buttons will be facing
rider) and insert into Steering Tube (2).
10. Make sure the Lights and Sounds unit holes line up with the Steering tube
holes (D).
11. Install Screw Set (4) through Steering Tube (2) and tighten securely.
12. Slide upper Locking Cap (1) UP so that tabs lock Cap into position (E).
Handlebar Installation (if equipped):
1. Place Handlebar (22) in Handlebar Tube Bracket (F) as shown.
2. Install Screws (24) through Handlebar and Bracket.
3. Install Washers (25) and Nuts (26) onto Screws (24).
4. Tighten securely.
5. Install Handlebar Pad (27) so that it covers the Screws an Bracket.
6. Slide lower Locking Cap (5) UP onto Handlebar Tube (23) as shown.
7. Slide Axle Shaft (A) up into Scooter Deck as shown.
8. Slide Shoulder Collar (7) down onto Axle Shaft (A).
9. Insert Handlebar Tube (23) into Axle Shaft (A).
10. Make sure the Axle Shaft holes line up with the Handlebar Tube holes (B).
11. Install Screw Set (8) through Shoulder Collar (7) and Handlebar Tube (23) and
tighten securely.
12. Slide lower Locking Cap (5) DOWN so that Tabs (C) lock Cap into position.


