background image


30 


step 5. 
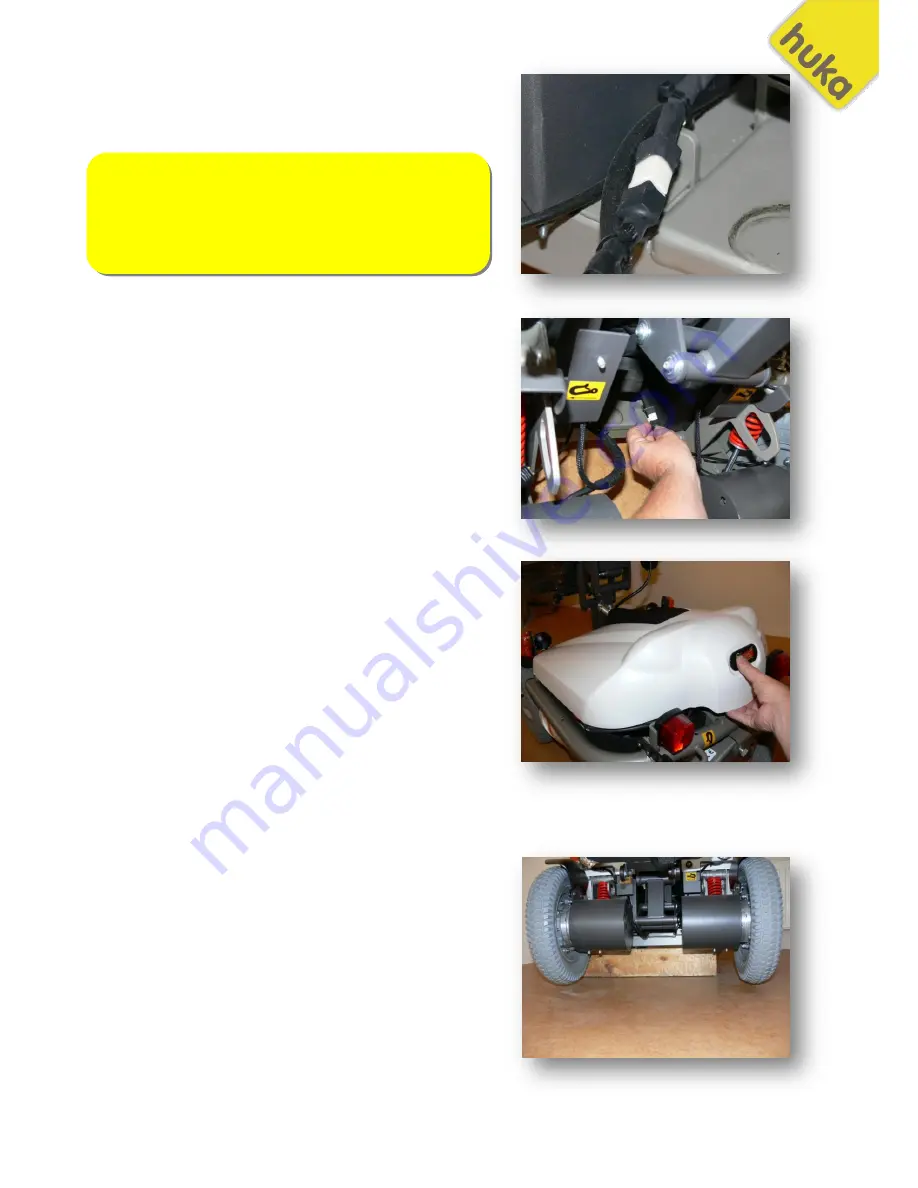
Place the new cable into the chassis and connect the  
cable to the lights.  


step 6. 
Test the light functions to see if the connections are made  
correctly. If everything is OK, fix the cable with cable ties. 


step 7. 
Put the top cover back on to the chassis.


8. Replace the drive motors 

 
step 1. 
First, lift the wheelchair chassis up and place a block  
underneath the chassis. This way the front wheels  
are lifted and free from the ground. Make sure the parking 
brake is still on.  


WARNING: 

The front left and front right lights use different 
connectors. Make sure the right cable part end up at 
the right connector. The front left connector is 3-pin, 
front right connector is 4-pin. 

Summary of Contents for Skwirrel II

Page 1: ...1 service manual Skwirrel II 06 2009...

Page 2: ...er has to wait long for repair this will damage our product but also your reputation as a local supplier Our common goal is to make sure the wheelchair is and stays in perfect condition Should there b...

Page 3: ...g the lighting cable of the chassis 29 8 replacing the drive motors 30 9 replacing the actuators 35 9 1 replacing the seat lift up actuator 35 9 2 replacing the seat lift down actuator 37 9 3 replacin...

Page 4: ...the top cover step 3 Lift up the rear end of the top cover so the thread pin comes out of the frame tube step 4 Carefully pull the front end of the top cover a little forward so the mounting hole is c...

Page 5: ...e covers off step 1 Loosen up the bolt in on the front side step 2 loosen up the screw on the rear end step 3 take away slowly and carefully the side cover NOTE The mounting of the covers will take pl...

Page 6: ...osen the two knobs in the front and the one in the rear and lift the top cover of the chassis step 3 Disconnect the cables from the batteries step 4 if the seat is still in the lowest position connect...

Page 7: ...ully into the battery box Make sure no cable gets stuck between the battery and the battery box slowly lower the battery until it sits on the bottom of the battery box Make sure the connections of the...

Page 8: ...ion about connecting the batteries is shown on the battery box sticker step 10 Place the cover back on to the chassis and secure it with the three knobs WARNING Make sure you connect the rights poles...

Page 9: ...ery cables or if there has been an extreme driving load on the system extreme up hill driving for a long period step 4 Loosen the two nuts which hold the fuse and replace the fuse step 5 Test the whee...

Page 10: ...s way the front wheels are lifted and free from the ground Make sure the parking brake is still on step 2 Remove the centre bolt which holds the wheel cover step3 Lift the wheel cover out of the rim b...

Page 11: ...he plastic bolt covers of the bolts step 7 Mark the bolts on the rim This is important when assembling the rim again If these bolts are mounted on to the wrong hole the wheel covers will not fit step...

Page 12: ...the rim and bolt the rim back together again Do not tighten the bolts yet step 12 Put the rim back on to the wheel hub This will put all holes in line so the wheel will fit on to the wheel hub easily...

Page 13: ...ill the tyre with air up to 2 5 Bar pressure step 15 Put the plastic bolt covers on to the five bolts These bolt covers fixate the plastic wheel cover and prevent it from vibrating during driving step...

Page 14: ...step 18 Tighten the central wheel cover bolt 3 2 replacing the rear tyres step 1 Lift the rear end of the wheelchair and put a support under the rear axle so the rear wheels are free of the ground st...

Page 15: ...tep 3 Loosen the M8 central wheel bolt step 4 Pull the wheel of the rear axle step 5 Loosen all five bolts of the rim step 6 Carefully split the two rim half parts by splitting it with a flat screw dr...

Page 16: ...er doing this pump up the tyre up to 2 5 Bar pressure If the tyre is solid you only need to tighten the five bolts step 10 Place the wheel back on to the rear axle Before doing this put al little grea...

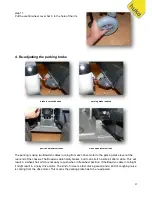
Page 17: ...rive motor to the parking brake lever at the rear end of the chassis The Bowden cable hardly brakes but it can stretch a little bit after a while This will result in a wheelchair which is not easy to...

Page 18: ...e step 3 if the parking brake lever is in to release setting the wheelchair should be easy to push When the wheelchair is switched on the display of the joystick module should show a warning text tell...

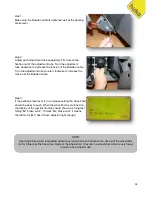
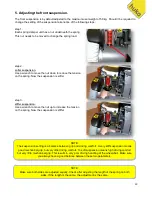
Page 19: ...step 3 stiffer suspension Use a wrench to move the nut up to increase the tension on the spring Now the suspension is stiffer NOTE Make sure both sides are adjusted equally Check after adjusting the l...

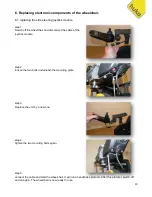
Page 20: ...connect the cable of the joystick module step 2 loosen the two bolts underneath the mounting plate step 3 Replace the unit by a new one step 4 tighten the two mounting bolts again step 5 connect the c...

Page 21: ...joystick module and take away the joystick module guide on one side step 4 Loosen up one of the bolts on the other joystick module guide on the other side At the same time hold the joystick module wi...

Page 22: ...e 4 step 2 Remove the cable connections of the left battery as mentioned on page 6 step 3 Lift the battery slowly out of the battery box step 4 Loosen the four bolt which hold the ISM on to the batter...

Page 23: ...the wheelchair The wheelchair is now ready for use 6 4 Replacing the PM module step 1 remove the top cover of the chassis as mentioned on page 4 step 2 Remove the cable connections of the left batter...

Page 24: ...h hold the ISM on to the battery box step 5 Lift the ISM module and put it aside so the battery box can be removed step 6 Loosen the two screws of the plastic side covers step 6 Loosen the three bolts...

Page 25: ...sconnect the cables from the power module step 9 Loosen the top bolt of the power module This bolt works like a lock and holds the power module in place step 10 now move the power module a little upwa...

Page 26: ...joystick to the ISM step 1 Put the seat lift in its highest position Remove the top cover of the chassis as mentioned on page 4 step 2 Cut the cable ties which keep the cable in pace step 3 Follow the...

Page 27: ...oystick module and fix the cable with cable ties Before putting the top cover back on the chassis move the seat lift totally down to the ground and to its highest position During this moving down and...

Page 28: ...the cover from the chassis as mentioned on page 4 step 2 Disconnect the cable fro mthe ISM module step 3 Disconnect the cable from the PM module step 4 Remove the cable and replace it by a new one NOT...

Page 29: ...chassis as mentioned on page 4 step 2 Disconnect the rear light left and the rear light on the right side step 3 Cut the cable ties on the lighting cable in the front of the wheelchair step 4 Disconne...

Page 30: ...back on to the chassis 8 Replace the drive motors step 1 First lift the wheelchair chassis up and place a block underneath the chassis This way the front wheels are lifted and free from the ground Ma...

Page 31: ...cover step 3 Take off the motor cover step 4 Use a multiple pliers to press both lever parts towards each other Now the Bowden cable can be released from the braking lever step 5 Now removed the Bowde...

Page 32: ...r step 7 Remove the wheel cover by lifting it with a flat screw driver step 8 Loosen the five wheel nuts and take the wheel off step 9 Loosen the 4 bolts of the motor frame There are two bolts on top...

Page 33: ...p 11 Disconnect the left battery and lift it out of the battery box step 12 Loosen up the three bolts at the bottom of the battery box step 13 Loosen the four bolts of the ISM module WARNING Make sure...

Page 34: ...the battery box step 15 Now place the ISM outside the frame and lift the battery box out of the chassis step 16 Disconnect the drive motor connector from the power module step 17 Replace the drive mot...

Page 35: ...ng the seat lift up actuator step 1 Remove the top cover of the chassis step 2 Loosen the two nuts of the mounting bolt and remove them step 3 Remove the washers of the bolt step 4 Remove the split pe...

Page 36: ...o remove the actuator from the bolt step 8 Replace the actuator unit WARNING If the seat lift arm is in its lowest position you can take the pin out without any problem Should the seat lift NOT be in...

Page 37: ...r end of the actuator step 4 Put a safety strap between the seat frame and the rear and of the chassis WARNING If the seat lift arm is in its highest position you can take the pin out without any prob...

Page 38: ...n its highest position you can take the pin out without any problem Should the seat lift NOT be in its highest lowest position the actuator is still lifting the seat lift If you then remove the pin th...

Page 39: ...mounting bolt of the seat tilt actuator step 3 Disconnect the actuator from the ISM module step 4 Cut the cables ties along the way of the actuator cable WARNING Make sure you keep in mind how the cab...

Page 40: ...e back the same way step 6 Loosen up the adjustment screw of the legrest parallel bar step 7 Loosen the legrest tube as well Now you can remove the legrest This is done to have a better access to the...

Page 41: ...ull the bolt some spacers might fall from the bolt These spacers are needed to remount the new actuator step 12 Replace the actuator WARNING If this bolt is taken out the seat will drop backwards Make...

Page 42: ...cable ties and remove the cable from the seat elevator step 4 Check also the way the cable has been lead through this area Make sure you lead the cable back the same way WARNING Make sure you keep in...

Page 43: ...u have adjust the distance between the switch and the switch plate First set the switch maximum to the right and test if the switch is switching when it touches the switch plate see red arrow If not m...

Page 44: ...degrees Now the bayonet locking opens up step 3 Carefully pull the headlight glass of the headlight step 4 Remove the broken bulb out of the socket To do this turn the bulb counter clockwise NOTE The...

Page 45: ...ulb and replace it by a new one 10 3 replacing the rear light bulb step 1 Lift off the rear light glass by lifting the bottom part up The glass will jump out of its fitting NOTE To remove the lower sc...

Page 46: ...46 step 2 Pull the rear light tube out of its socket step 3 Replace the broken bulb by a new one step 4 Push the glass back into the fitting and press it until you hear of feel a soft click...

Page 47: ...sion The unit for side steering also has connectors to connect external on off and mode buttons 11 2 the Intelligent Seating Module The ISM module intelligent Seating Module is the unit where the actu...

Page 48: ...eries There is also an inhibit input connector The module is protected against short circuit overload dust and water 11 4 the speed kit optional for 10 km h version The speed kit is used to make sure...

Page 49: ...nformation it will activate both inhibits 12 1 inhibits input The R net system has 5 inputs in the complete system 1 Inhibit 1 charger plug JSM control unit This inhibits will be activated if the char...

Page 50: ...speed When the seat is not in its normal driving position the drive speed will be reduced When the seat is close to the ground the driving is even blocked 6 Seat elevator to the ground Potentiometer...

Page 51: ...a hexadecimal error code is displayed This code stands for a specific error These codes can be checked on the WWW PGDT COM site It will tell what could be the problem and how to handle All error codes...

Page 52: ...mming is done directly on joystick module To enter the set up mode a R net dongle must be connected to the R net bus a screenshot of the set up mode 3 programming using the dongle and a computer This...

Page 53: ...art up the wheelchair At the start up of the software you will see a warning label Click continue to start the program Detailed information about programming is given is the additional programming Man...

Page 54: ...54 step 3 now we can select one of the parameter groups to program Click on the sign left of Profile management...

Page 55: ...55 step 4 When the group opens up you ll see there are two standard profiles already programmed step 5 To add a profile double click on the field profile name of next empty profile column...

Page 56: ...name Double click on the box profile enable and select yes to activate the new profile Now the new profile is activated The next step will to set the driving parameters step 7 Click on the sign at th...

Page 57: ...and the speed setting is at minimum just 1 bar illuminated Programmable range is 0 to Maximum Reverse Speed in steps of 1 If the Maximum Reverse Speed is set to a value less than the current value of...

Page 58: ...direction when the speed setting is at maximum all 5 bars illuminated Programmable range is 0 to 100 in steps of 1 Minimum Reverse Acceleration Rev Accel Min Sets the acceleration rate of the wheelcha...

Page 59: ...wheelchair while turning when the speed setting is at minimum just 1 bar illuminated Programmable range is 0 to Maximum Turn Deceleration in steps of 1 If the Maximum Turn Deceleration is set to a va...

Page 60: ...mable range is 0 to 100 The higher the value the greater the damping that is applied If using high values of Tremor Damping pay particular attention to the stopping distance of the wheelchair as it wi...

Page 61: ...nitors build in to the software The PM status the ISM the JSM status and the Joystick status Click tools system test and select PM status ISM status JSM status and Joystick status NOTE More detailed i...

Page 62: ...battery current voltage of M1 left motor current of M1 left motor voltage of M2 right motor current of M2 right motor heat sink temperature position the safety inhibits are in Example If the current o...

Page 63: ...nhibit is active Just by activating one of the seat functions on the wheelchair you will see that the values are changing This system monitors a perfect feedback of the wheelchair system It is very ea...

Page 64: ...y pushing the buttons on the joystick module you can see on the system test of the value of this button is changing NOTE More detailed information can be found in the programming manual of the R net s...

Page 65: ...and you will see the system tells you in which position the joystick is Let the joystick go and the system will show you that the joystick had returned into the neutral position NOTE More detailed in...

Page 66: ...chair These data logs are stored in the Joystick Module JSM the Intelligent Seating Module ISM or the Power Module PM Now we can click on read logs to read the log files of the modules The software wi...

Page 67: ...these information s it is much easier to set the right diagnostics for repair After solving the problem it is best to erase the old logs This way there is no more old information inside the system and...

Page 68: ...og clear window Now click on OK The memory will be cleared NOTE More detailed information can be found in the programming manual of the R net system If there is any hesitation or question about the pr...

Page 69: ...69 16 Drawings...

Page 70: ...70...

Page 71: ...71...

Page 72: ...72...

Page 73: ...73...

Page 74: ...74 Huka B V Munsterstraat 13 7575 ED Oldenzaal The Netherlands tel 31 0 541 572 472 fax 31 0 541 520 415 mail info huka nl www huka nl NOTES...

Reviews: