background image

ENGLISH

humantouch.com

8

9

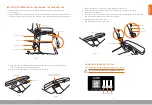
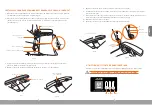
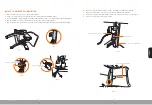
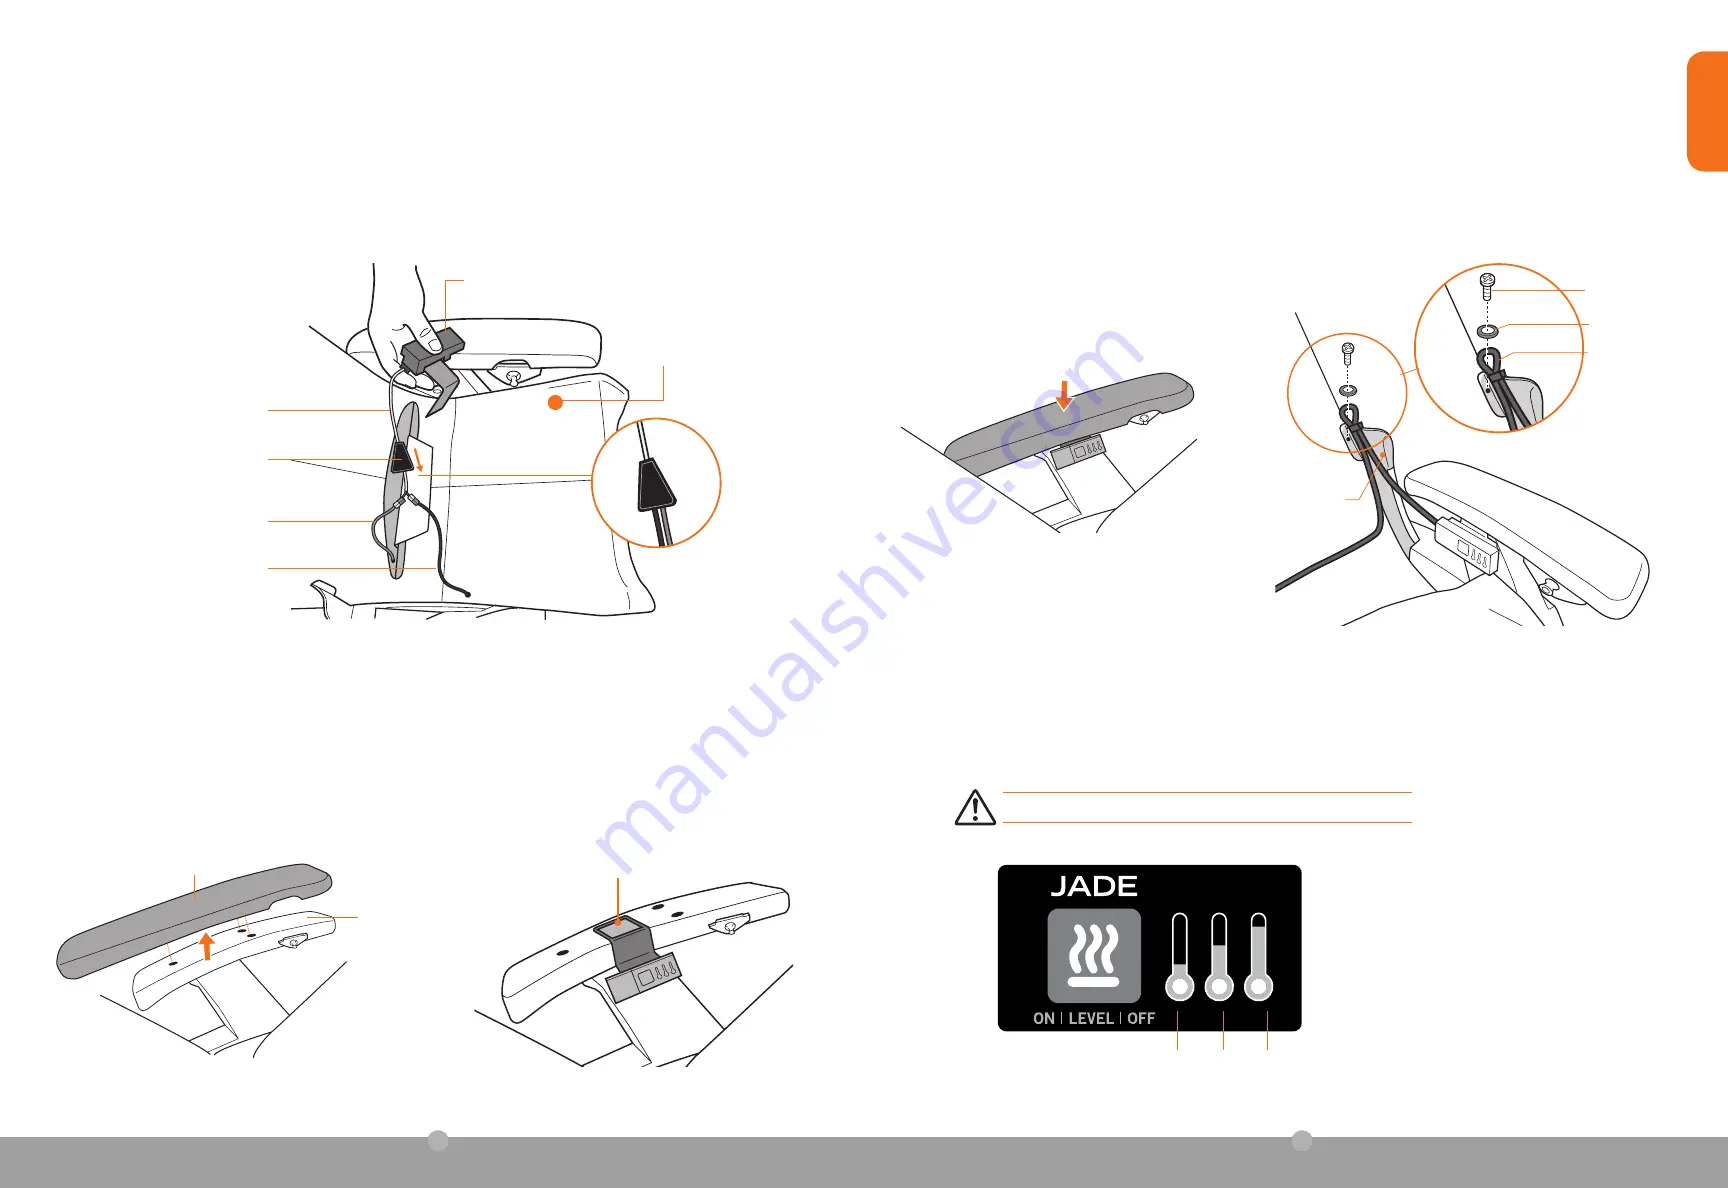
1.  Install the body pad onto the chair seat and footrest, with the backrest pad folded forward onto 
  the seat (Fig.12). 
2.  Connect the transformer cable to both the control panel cable and the jade heat pad cable (the connections are  
  color-coded), slide the connector cover over the connections, then tuck the cables into the seat canvas (Fig.12).

INSTALL THE CONTROL PANEL AND CONNECT THE JADE HEAT PAD

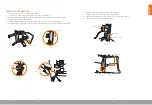
3.  Using a Phillips-head screwdriver, remove the three screws that secure the left-hand armrest cap 
  to the chair, then remove the armrest cap (Fig.13).
4.  Place the control panel bracket on top of the armrest core (Fig.14).

Fig.13

Armrest core

Armrest cap

Fig.14

Center mounting bracket 

between screw holes

5.  Replace the armrest cap, then secure it using the three screws (Fig.15).
6.  Using a Phillips-head screwdriver, remove the screw that secures the glide rail safety tip. 
 

Discard this screw (Fig.16).

7.  Place the cable loop into position over the screw hole, place the provided washer over the cable loop,  
 

then secure the assembly using the provided screw (Fig.16).

8.  Reinstall the body pad onto the chair.
9.  Plug the Jade Heat cord into a wall outlet.

Armrest cap

Fig.15

 Glide rail safety tip

Fig.16

Screw

Washer

Cable loop

Press the heat button to toggle through low, medium, high, and off.  


Be sure to turn off your jade heat system when not in use.  

USING YOUR JADE HEAT SYSTEM

Low Medium High

Transformer cable

Control panel

Backrest pad

Control panel cable

Connector cover

Jade heat pad cable

Fig.12

Summary of Contents for JADE HEAT

Page 1: ...product ONLINE today www humantouch com register 2017 Human Touch LLC Patents pending and intellectual property rights enforced No medical claims are warranted or implied by the use of this product Hu...

Page 2: ...stomers with products and services that help them feel perform and live their best Developed in cooperation with the medical community and industry experts we deliver products that blend patented tech...

Page 3: ...SIBLE FOR THEIR SAFETY CHILDREN SHOULD BE SUPERVISED TO ENSURE THAT THEY DO NOT PLAY WITH THE APPLIANCE DANGER TO REDUCE THE RISK OF ELECTRICAL SHOCK ALWAYS UNPLUG THIS PRODUCT FROM THE ELECTRICAL OUT...

Page 4: ...krest pad cavity 3 Insert the jade heat pad into the backrest pad cavity attaching the hook and look fasteners on the underside of the pad with the corresponding fasteners on the inside of the backres...

Page 5: ...cord coil the excess cord neatly Fig 9 5 Open the pocket on the bottom of the chair canvas then tuck the coiled cord into the lower pocket Fig 9 INSTALL THE POWER HUB Front cross bar Front cross bar...

Page 6: ...ore Armrest cap Fig 14 Center mounting bracket between screw holes 5 Replace the armrest cap then secure it using the three screws Fig 15 6 Using a Phillips head screwdriver remove the screw that secu...

Page 7: ...C 420 PC 600 et PC 610 le syst me JADE HEAT humantouch com 800 355 2762 mode d emploi et d entretien www humantouch com register Enregistrez votre produit EN LIGNE d s maintenant www humantouch com re...

Page 8: ...puis plus de 35 ans Human Touch s est tabli comme un chef de file de l industrie en changeant la vie de ses clients gr ce des produits et services qui les aident se sentir mieux performer davantage et...

Page 9: ...UTILISER CE PRODUIT AVEC UN NOURRISSON CE COUSSIN N EST PAS CON U POUR TRE UTILIS POUR UNE PERSONNE INVALIDE ENDORMIE OU INCONSCIENTE OU UNE PERSONNE AYANT UNE MAUVAISE CIRCULATION SANGUINE MOINS QU...

Page 10: ...mousse car vous d brancherez ou endommagerez la valve du c t gauche Fig 2 2 Retirer les bandes protectrices recouvrant les bandes de fermeture autoagrippante sur le haut et la base de la cavit du cous...

Page 11: ...tissu du fauteuil et rangez le cordon roul dans la pochette inf rieure fig 9 INSTALLEZ LE BLOC D ALIMENTATION Bas de la barre transversale avant Bas de la barre transversale avant Cordon roul Fig 9 F...

Page 12: ...s vis fig 15 6 l aide d un tournevis t te cruciforme retirer la vis qui fixe l embout de s curit du rail coulissant Jeter cette vis Fig 16 7 Placer la boucle de c ble en position par dessus le trou de...

Page 13: ...as de Perfect Chair PC 420 PC 600 y PC 610 El sistema JADE HEAT humantouch com 800 355 2762 www humantouch com register Registre su producto EN L NEA hoy manual de uso y cuidado www humantouch com reg...

Page 14: ...e m s de 35 a os Human Touch se ha establecido como l der de la industria que cambia las vidas de sus clientes con productos y servicios que los ayudan a sentirse desempe arse y vivir en la mejor mane...

Page 15: ...E EL FUNCIONAMIENTO DE ESTE PRODUCTO APAGUE LA ALIMENTACI N EL CTRICA DE INMEDIATO Y NO UTILICE ESTE PRODUCTO CONSULTE A SU M DICO NO HALE EL CABLE DE CA CUANDO UTILICE ESTE PRODUCTO DESPU S DE HABERS...

Page 16: ...te la almohadilla de calor de jade en la cavidad de la almohadilla del espaldar e instale las bandas de cierre m gico en la parte inferior de la almohadilla con los sujetadores de cierre m gico corres...

Page 17: ...ior de la lona de la silla e introduzca el cable enrollado en el bolsillo inferior Fig 9 INSTALE LA UNIDAD DE ALIMENTACI N Fig 7 Fig 6 Fig 9 Cable de alimentaci n enrollado Fig 8 Unidad de alimentaci...

Page 18: ...apoyabrazos Fig 14 Soporte del panel de control Fig 14 Presione el bot n de calor para alternar entre bajo medio alto y apagado Aseg rese de apagar su sistema de calor de jade cuando no lo est utiliz...

Reviews: