Direct Mount
(Vertical or Horizontal)
1.
The CPU450 can be mounted to the underside of a desk
for horizontal or vertical CPUs or to the side of a desk or on
a wall for vertical CPUs. Determine CPU orientation and
preferred mounting location. If necessary, reposition
knobs/bolts on CPU450 so that the side of the CPU450
that will connect to a desk or wall does not have a knob.
2.
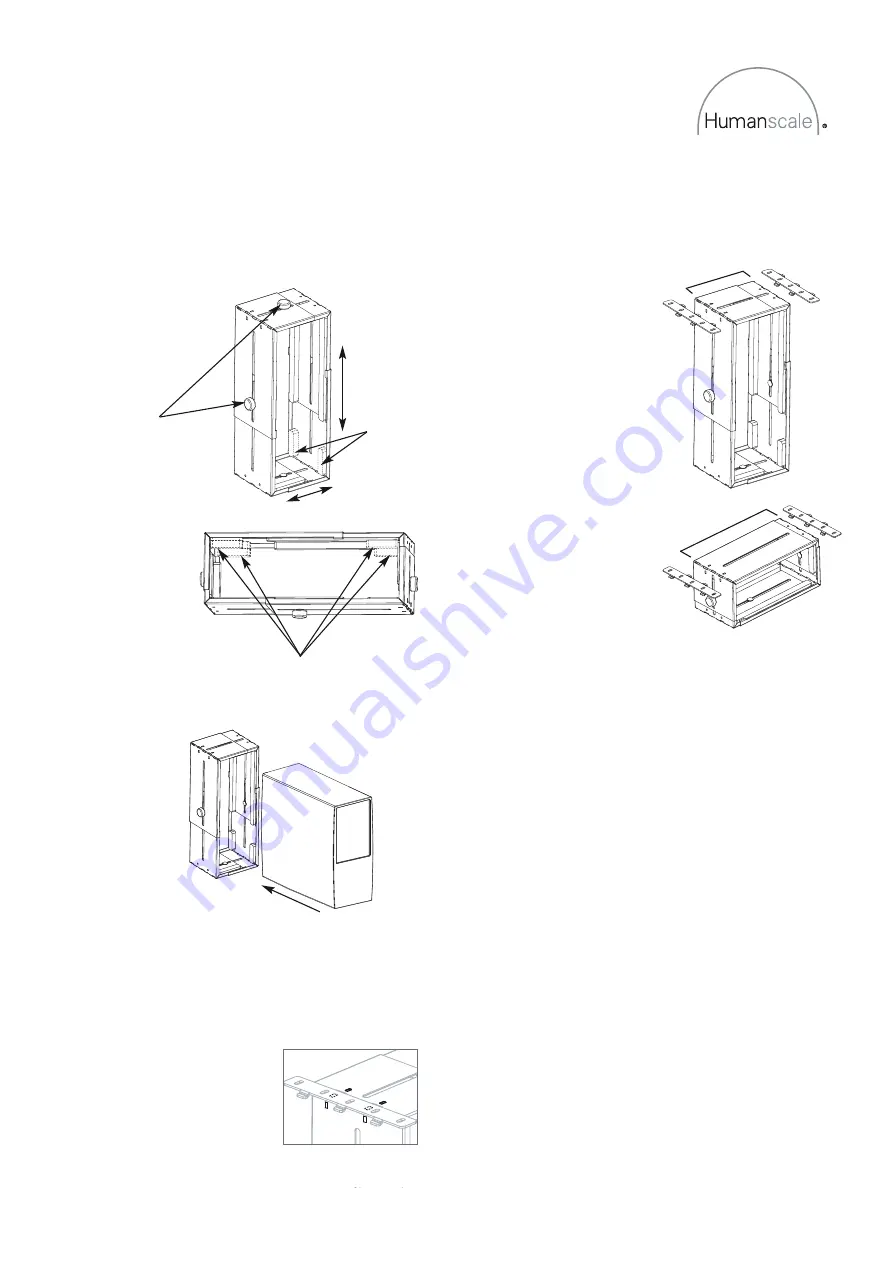
Loosen rubber knobs
of CPU450 (a) and
adjust CPU450 to its
largest size (b).
FIG. 1
3.
For small CPUs
(4” tall/wide or
less), attach extra
foam spacer pads
to existing foam
pads as shown (c).
Use additional
spacer pads as
needed.
FIG. 2
4.
Place CPU inside
CPU450 (d) and
resize so that it
fits snugly around
CPU.Tighten all
three knobs.
FIG. 3
(a)
(b)
(c)
FOAM SPACER PADS
RUBBER
KNOBS
FIG. 1
FIG. 2
FIG. 3
(d)
(b)
FOAM
SPACER
PADS
For large CPUs, attach
foam spacer pads as
shown in
FIG. 1
5.
Determine mounting bracket positions. The two mounting
brackets fit into the CPU450 in a very specific way,
depending on orientation. The following will help you
determine the proper positions and orientations.
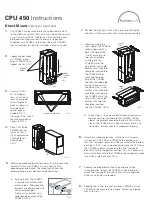
a. Each
corner
of
the
CPU450
is marked with either circles
or rectangles. The mounting
brackets are also marked with
circles or rectangles.
Please match bracket to its
corresponding corner of the
CPU450.
FIG. 4
FIG 4
b.
Position the brackets so that the circles and rectangles
and tabs all face away from the surface being mounted.
c. When
mounting
the
short side of the CPU450
to the underside of a
desk, the side of the
“circle” bracket with
two tabs should be
inserted into the
CPU450, while the
side of the “rectangle”
bracket with three tabs
should be inserted into
the CPU450. When
mounting the long
side of the CPU450
to either the underside
of a desk or on a wall,
the side of the “circle”
bracket with three tabs
should be inserted into
the CPU450, while the
side of the “rectangle”
bracket with two tabs
should be inserted
into the CPU450.
FIG. 5
SHORT
SIDE
LONG
SIDE
FIG. 5
CPU 450
Instructions
d.
When steps a, b, and c are performed correctly and
the brackets are inserted into the CPU450, the flat
side of the brackets should be perfectly flat with the
side of the CPU450 that will be mounted. (Note: The
“rectangle” bracket should fit somewhat loosely.)
6.
Determine mounting location. (Note: For wall mounts,
it is easiest if the CPU and CPU450 are oriented such
that the “rectangle” bracket will be mounted in the bottom
position. If it isn't, you can optionally remove the CPU from
the CPU450 and turn it around so that the “rectangle”
bracket will be in the bottom position. This isn't necessary,
but will make mounting the CPU450 easier, especially when
it contains a large or heavy CPU.)
7.
Keeping the proper bracket position and orientation
in mind relative to how the CPU450 will be mounted,
attach the “rectangle” bracket to the wall or underside
of desk using screws provided.
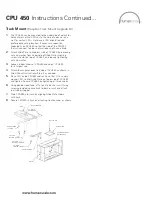
8.
Keeping the “circle” bracket inserted in CPU450, attach
CPU450 to the mounted “rectangle” bracket by aligning
tabs with slots.


