3
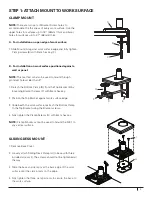
STEP 1: ATTACH MOUNT TO WORK SURFACE
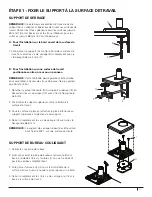
CLAMP MOUNT
NOTE:
There are two sets of Bracket Screw holes to
accommodate the thickness of every work surface. Use the
upper holes for surfaces up to 1.8” (48mm) thick and lower
holes for surfaces up to 2.7” (68mm) thick.
A - For installation on open edge of work surface:
1. Slide Mount (A) against work surface edge and fully tighten
Clamp screws(B) with 4mm hex key (C).
B - For installation on work surface positioned against a
wall or panel:
NOTE:
This method can also be used to mount through
grommet holes wider than 3”
1. Detach the Bottom Clamp (D) from the Top Bracket (E) by
loosening Bracket Screws (F) with 5mm hex key.
2. Position the Top Bracket against work surface edge.
3. Underneath the work surface, reattach the Bottom Clamp
to the Top Bracket using the Bracket screws
.
4. Fully tighten the Clamp Screws (G) with 5mm hex key.
NOTE:
Clamp Mounts cannot be used to mount the M2.1 to
any vertical surface.
SLIDING DESK MOUNT
1. Remove Base Cover.
2. Loosely attach Sliding Desk Clamp (H) to base with three
included screws (I). The screws should not be tightened all
the way.
3. Slide the base and clamp over the back edge of the work
surface until the clamp rests on the edge.
4. Fully tighten the three clamp screws to secure the base to
the work surface
.
A
B
C
D
F
H
I
G
E

