background image

7

4

(Bij gebruik van oppervlaktebevestiging): 

Monteer, met de meegeleverde schroeven, 

het T-vormige bevestigingsstuk aan de 

onderzijde van het bureau op de gewenste 

locatie. Zorg ervoor dat er genoeg ruimte 

is aan alle zijden voor de Thin Client en de 

houder.

Zie pagina 3, 

(Bij gebruik van balkbevestiging): 

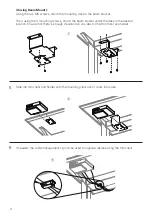
Bevestig het T-vormige bevestigingsstuk met 

de twee M5-schroeven aan de balkbeugel.

Monteer het T-vormige bevestigingsstuk 

vervolgens met de 4 bevestigingsschroeven 

aan de onderzijde van het bureau op de 

gewenste locatie. Zorg ervoor dat er genoeg 

ruimte is aan alle zijden voor de Thin Client en 

de houder.

Zie pagina 4,

 ①

5

Schuif de Thin Client en de houder op het 

T-vormige bevestigingsstuk totdat deze op zijn 

plaats klikt.

Zie pagina 4, 

6

Indien nodig, kan de kabelbeheerclip worden 

gebruikt om de kabels die uit de Thin Client 

komen, te ordenen.

Zie pagina 4, 

Utensili necessari

 Trapano con punta con testa a croce

Parti incluse

 Chiave a brugola da 5 mm

 Clip per l'organizzazione dei cavi

 Viti di fissaggio da superficie

 Tassello di fissaggio

Kit traversa di fissaggio (facoltativo)

 Staffa di supporto

 Viti per traversa di fissaggio

Vedere pagina 2

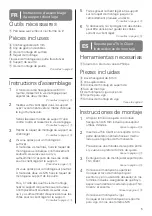
Istruzioni per il montaggio

1

Utilizzando la chiave esagonale da 5 mm 

inclusa, allentare la vite di regolazione per 

separare le due metà.

Vedere pagina 2, 

2

Inserire il thin client nel contenitore con la 

parte frontale rivolta verso il logo Humanscale.

Contenitore thin client

Istruzioni per il montaggio

IT

Avvicinare le due metà del contenitore e 

stringere nuovamente la vite di regolazione.

Vedere pagina 3, 

3

Rimuovere il tassello di fissaggio dal 

contenitore del thin client.

Vedere pagina 3, 

4

(In caso di montaggio su superficie): 

Utilizzando le viti incluse, fissare il tassello di 

montaggio nella posizione desiderata sotto 

la scrivania. Verificare che ci sia abbastanza 

spazio su tutti i lati per il thin client e il relativo 

contenitore.

Vedere pagina 3, 

(In caso di montaggio su staffa): 

Utilizzando due delle viti M5, fissare il tassello 

di montaggio alla staffa di supporto.

Quindi, utilizzando le 4 viti, fissare il tassello 

di montaggio nella posizione desiderata sotto 

la staffa di supporto. Verificare che ci sia 

abbastanza spazio su tutti i lati per il thin client 

e il relativo contenitore.

Vedere pagina 4,

 ①

5

Fare scorre thin client e contenitore 

sul tassello di fissaggio fino a che non 

raggiungono la posizione prevista.

Vedere pagina 4, 

6

Se necessario la clip di gestione dei cavi può 

essere utilizzata per organizzare i cavi del thin 

client.

Vedere pagina 4, 

Summary of Contents for Thin Client Holder

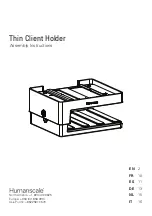
Page 1: ...Assembly Instructions North America 1 800 400 0625 Europe 353 0 1 858 0910 Asia Pacific 8522581 0570 EN FR ES DE NL IT 10 11 13 15 16 2 Thin Client Holder ...

Page 2: ...ed 5mm hex key loosen the adjustment screw to pull the two halves apart Tools Required Parts Included Cable Management Clip Drill with Phillips Head Driver bit Beam Bracket 5mm Hex Key Surface Mounting Screws Mounting Cleat Beam Mounting Screws ...

Page 3: ...ing the same side as the Humanscale logo Squeeze the two halves of the holder together and re tighten the adjustment screw 4 If using Surface Mount Using the included screws attach the mounting cleat under the desk in the desired location Ensure that there is enough clearance on all sides for the thin client and holder ...

Page 4: ...s attach the beam bracket under the desk in the desired location Ensure that there is enough clearance on all sides for the thin client and holder 5 Slide the thin client and holder onto the mounting cleat until it clicks into place 6 If needed the cable management clip can be used to organize cables exiting the thin client ...

Page 5: ...léger et le support Consultez la page 4 Instructions d assemblage du support client lége FR 5 Faites glisser le client léger et le support sur le taquet de montage jusqu à ce l emboîtement produise un déclic Consultez la page 4 6 Si nécessaire le clip de gestion des câbles peut être utilisé pour guider les câbles sortant du client léger Consultez la page 4 Soporte para Thin Client Instrucciones de...

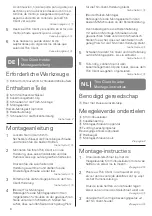
Page 6: ... der gewünschten Stelle unter dem Schreibtisch Stellen Sie sicher dass auf allen Seiten noch genug Platz Thin Client Holder Montageanleitung DE für die Thin Client Halterung bleibt Siehe Seite 3 Bei der Balken Montage Befestigen Sie die Montageplatte mit den beiden M5 Schrauben an der Balkenhalterung Dann befestigen Sie die Balkenhalterung mit seinen 4 Montage Schrauben an der gewünschten Stelle u...

Page 7: ...oni per il montaggio 1 Utilizzando la chiave esagonale da 5 mm inclusa allentare la vite di regolazione per separare le due metà Vedere pagina 2 2 Inserire il thin client nel contenitore con la parte frontale rivolta verso il logo Humanscale Contenitore thin client Istruzioni per il montaggio IT Avvicinare le due metà del contenitore e stringere nuovamente la vite di regolazione Vedere pagina 3 3 ...

Page 8: ...manscale com about legal information terms conditions cfm 2021 Humanscale Corporation The text and artwork are copyrighted materials All rights reserved The Humanscale mark and logo are trademarks of Humanscale Corporation and are registered in the United States and certain other countries GT NPD AI 1874 001 R01 ...

Reviews: