background image

Français   37

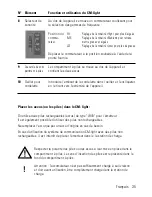
Station de charge CM

2

3

1

4

N° Elément

Fonction et utilisation de la station de charge

1

12 V  

Prise de raccordement au bloc-secteur au de la station de    

Tension

charge.

d’entrée

Installation de la station de charge

1. 

Raccorder le bloc-secteur au réseau (230 volts).

2. 

Raccorder la station de charge CM au bloc-secteur en enfichant la fiche jack (ronde) 
du bloc-secteur dans la fiche DC au dos de la station de charge.

2

Boîtier du   

Boîtier de chargeur tripolaire destiné à recevoir le CM-light. 

chargeur pour 
les composants

3

LED (rouge)  

Indicateur de disponibilité

4

LED (verte)

Indicateur de charge

Summary of Contents for cm-light

Page 1: ...ons communication system Page 16 F Mode d emploi Système de communication Page 30 NL Gebruiksaanwijzing Communicatiesysteem Pagina 44 I Istruzioni per l uso Sistema di comunicazione Pagina 58 E Instrucciones de servicio Sistema de comunicación Página 72 HUMANTECHNIK cm light ...

Page 2: ...ltig darauf dass die Lautstärke am CM light für Ihre persönlichen Belange korrekt eingestellt ist um mögliche Schäden durch überhöhte Lautstärke zu vermeiden Stellen Sie dazu den Lautstärkeregler auf einen niedrigen Wert ein Das Kommunikationssystem CM light enthält verschluckbare Kleinteile und ist für Kinder unter 3 Jahren nicht geeignet Bei nicht bestimmungsgemäßem Gebrauch schließt der Herstel...

Page 3: ...che 8 CM light Ladegerät 9 Das Kommunikationssystem CM light im täglichen Betrieb Bei einem Vortrag 10 Am runden Tisch 11 Im direkten Dialog 12 Auf Reisen im Auto im Zugabteil oder im Flugzeug 12 Das Klangbild verändern 13 Anhang Sicherheitshinweise 13 Umwelthinweis Entsorgung 14 Wartung und Pflege 14 Garantie 14 CE Zeichen 15 Technische Daten im Überblick 15 ...

Page 4: ...CM light Kommunikationssystem 1 2 Kopfhörer 1 3 CM Ladegerät 1 4 Netzteil 1 5 Trageschlaufe 1 6 Stift zur Einstellung des Klangs 1 7 Transporttasche 1 8 Akku Typ AAA 2 Bedienungsanleitung 1 Garantiekarte 1 Der vollständige Verpackungsinhalt umfasst folgende Komponenten 4 Deutsch ...

Page 5: ...iertem Abstand zur räumlichen Einheit Aufnahme der Geräusche 2 LED rot Anzeige des Ladezustands des Akkus bei eingeschaltetem Gerät Dauerlicht Der Akku ist ausreichend geladen Blinklicht Wiederaufladung bald erforderlich Sie haben ca 2 Std Reserve kein Licht Akku entladen CM light zum Nachladen des Akkus in das CM Lade gerät stellen 1 2 6 8 7 3 4 5 9 10 Deutsch 5 ...

Page 6: ...t zwei Signal impulsen akustisch angezeigt Omni Raumhören verstärkt die Signale aus allen Richtungen Bei einge schaltetem Gerät wird der Wechsel in diese Schalterstellung mit einem Signalimpuls akustisch angezeigt 4 Ein Ausschalter Schalter Ein Schieben Sie den Schalter nach oben stellung um Ihren CM light einzuschalten Aus Schieben sie den Schalter nach unten um Ihren CM light auszuschalten 6 Deu...

Page 7: ... ein und rasten Sie den Knauf spürbar ein indem Umhängekordel Sie ihn in richtung der Gerätespitze verschieben Akkus Batterien in den CM 1 Sender einsetzen Für den Betrieb zwei wiederaufladbare Akkus vom Typ AAA verwendet Der Betrieb mit nicht wiederaufladbaren Batterien ist ebenfalls möglich Verwenden Sie bei Bedarf ausschließlich Original Ersatzakkus Wenn Sie Ihr CM 1 Kommunikationssystem mit Ba...

Page 8: ...Sie die mitgelieferten Akkus in das Batteriefach ein Polung beachten 4 Schließen Sie das Batteriefach 5 Stellen Sie den CM light in eines der CM Ladegeräte Die grüne LED des CM Ladegerätes blinkt während des gesamten Ladevorgangs Nach 12 Stunden ist der Akku voll aufgeladen Transporttasche ...

Page 9: ... Ladegerätes 1 Verbinden Sie das Netzteil mit dem 230 Volt Stromnetz 2 Verbinden Sie das CM Ladegerät mit dem Netzteil indem Sie den runden Stecker des Netzteils in die rückseitige DC Buchse des CM Ladegeräts stecken 2 Ladeschale 3 polige Ladekontaktschale zur stehenden Aufnahme des für Geräte CM 1 Sendeteils oder CM 1 Empfangsteils komponente 3 LED rot Bereitschaftsanzeige 4 LED grün Ladeanzeige ...

Page 10: ...twas zu erhöhen und Ruckelgeräusche von der Tischplatte mechanisch abzudämpfen 5 Schalten Sie Ihren CM light am Ein Ausschalter ein 6 Regeln Sie die Übertragungslautstärke auf eine für Sie angenehme Höhe indem Sie den Lautstärkeregler an Ihrem CM light auf einen entsprechenden Wert einstellen Sie sitzen in geselliger Runde z B in einem Vortragsraum mit mehreren Tischgruppen Der gesamte Vortragsrau...

Page 11: ...tet sein sollte 4 Schalten Sie Ihren CM light am Ein Ausschalter ein 5 Regeln Sie die Lautstärke des Vortrags auf eine für Sie angenehme Höhe indem Sie den Lautstärkeregler an Ihrem CM light auf einen entsprechenden Wert einstellen Sie sind Teilnehmer der abgebildeten Gesprächsrunde Ihre Gesprächspartner sprechen in unterschied licher Lautstärke Verwenden Sie den Übertragungsmodus Zoom um störende...

Page 12: ... Auto im Zugabteil oder im Flugzeug Sie sind unterwegs zum Beispiel als Mitglied einer Reisegruppe im Zug oder Bus mit Begleitung im Pkw oder als Einzelreisender im Flugzeug Während der Reise wollen Sie sich mit der neben Ihnen sitzenden Person unterhalten doch leider sitzt diese Person nicht auf der Seite auf der sich auch Ihr Hörgerät befindet Hinzu kommen all die störenden Nebengeräusche des Ve...

Page 13: ... sicherheitstechnischen Regeln gebaut Beachten Sie die folgenden Sicherheitshinweise Stellen Sie das Ladegerät auf eine rutschfeste Unterlage Verlegen Sie die Anschlusskabel unfallsicher Setzen Sie das Gerät nie folgenden Einflüssen aus Wärmequellen direkter Sonneneinstrahlung Feuchtigkeit Schützen Sie das Gerät vor Nässe Staub aggressiven Flüssigkeiten und Dämpfen Schließen Sie die Anschlusskabel...

Page 14: ...lten Sie das Gerät gelegentlich mit einem weichen angefeuchteten Tuch reinigen Verwenden Sie niemals Alkohol Verdünner oder andere organische Lösungsmittel Das Gerät sollte nicht über längere Zeit direkter Sonneneinstrahlung ausgesetzt werden und darüber hinaus vor großer Hitze Feuchtigkeit oder starker mechanischer Erschütterung geschützt werden Garantie Das Kommunikationssystem CM light weist ei...

Page 15: ... das CE Zeichen auf dem Gerät bestätigt Technische Daten CM light Abmessungen H x B x T 19 x 37 x 120 mm Schalldruckpegel bei Kopfhörerbetrieb max 118 dB Gewicht 64 g Stromversorgung 2 x 1 2 V NiMH Akkus Typ LR03 Ladezeit nach Vollentladung max 12 14 h Betriebsdauer Belastungsabhängig max 8 10 h CM Ladegerät Abmessungen H x B x T 67 x 83 x 65 mm Gewicht 94 g Stromversorgung über Netzteil Primär 22...

Page 16: ...t the volume on the CM light receiver is set correctly to suit your personal needs in order to avoid possible damage resulting from excessive volume To do this turn the volume control down low The CM light communication system contains small parts which can be swallowed and is not suitable for children under the age of 3 If the device is not used properly the manufacturer will not accept any liabi...

Page 17: ...M light charger 23 The CM light communication system in everyday use At a presentation 24 Meeting around a table 25 In direct dialogue 26 On a trip in a car in a train compartment or on an airplane 26 Changing the sound pattern 27 Appendix Safety instructions 27 Environmental advice Disposal 28 Maintenance and care 28 Warranty 28 CE symbol 29 Technical data at a glance 29 ...

Page 18: ...elivered 1 CM light communication system 1 2 Headset 1 3 CM charger 1 4 Power supply unit 1 5 Carrying loop 1 6 Pin to set the sound 1 7 Transport pouch 1 8 Battery AAA 2 Operating instructions 1 Warranty card 1 The complete pack contains the following components 18 English ...

Page 19: ... a defined distance from the area where the unit sound is picked up 2 LED red Battery charge status when device is switched on Continuous light Battery is adequately charged Flashing light Will need to be recharged soon approx 2 hours reserve No light Battery discharged Place the CM light on the CM charger to recharge the battery 1 2 6 8 7 3 4 5 9 10 English 19 ...

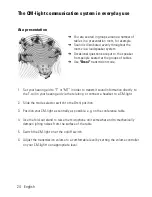
Page 20: ...on the change to this switch position is indicated acoustically by two signal pulses Omni Presentation amplifies the signals from all directions When the device is switched on the change to this switch position is indicated acousti cally by a signal pulse 4 On off switch Switch On Push the switch up to activate your setting CM light Off Push the switch down to activate your CM light 20 English 5 V...

Page 21: ...nto the circular part of the device device and engage the knob perceptibly by pushing it towards pendant cord he tip of the device Inserting the batteries into the CM 1 transmitter The device runs on two rechargeable AAA type batteries It can also run on non rechargeable batteries Where necessary only use original replacement batteries If you run your CM 1 communication system on disposable batter...

Page 22: ...supplied batteries into the battery compartment note the polarity 4 Place the cover onto the battery compartment 5 Place the CM light receiver into one of the CM chargers The green LED on the CM charger flashes throughout the charging process The battery is fully charged after 12 hours Transport pouch ...

Page 23: ...lation of the CM charger 1 Plug the power supply unit into the 230 V mains 2 Connect the CM charger to the power supply unit by inserting the round connector of the power supply unit into the DC jack on the back of the CM charger 2 Charging cradle 3 pin charging cradle to hold the CM light unit for device components 3 LED red Standby indicator 4 LED green Charge indicator ...

Page 24: ... Use the fold out stand to raise the microphone unit somewhat and to mechanically dampen jolting noises from the surface of the table 5 Switch the CM light on at the on off switch 6 Adjust the transmission volume to a comfortable level by setting the volume controller on your CM light to an appropriate level You are seated in groups around a number of tables in a presentation room for example Soun...

Page 25: ...directly as possible towards the speaker 4 Switch the CM light receiver on at the on off switch 5 Adjust the speech volume to a comfortable level by setting the volume controller on your CM light to an appropriate level You are taking part in the meeting shown The other people are speaking at different levels Use the Zoom transmission mode to reduce disruptive sounds from behind perceptibly and at...

Page 26: ...rtment or on an airplane You are on a journey for instance as part of a travel group on a train or bus accompa nied by someone in the car or traveling alone by air You want to be able to chat to the person sitting beside you during the trip however the person isn t sitting on the same side as your hearing aid The situation is compounded by all the other disruptive sounds on board especially the pe...

Page 27: ...Pay attention to the following safety instructions Position the charger on a non slip base Lay the connecting cable so that it cannot be tripped over Never expose the device to the following sources of influence heaters direct sunlight moisture Protect the device from damp dust aggressive fluids and vapors Only connect the connecting cables to the designated sockets jacks Only connect approved acc...

Page 28: ...p cloth Never use spirits thinners or other organic sol vents Do not set up the unit where it will be exposed to full sunlight for long periods In addition it must be protected against excessive heat moisture and severe mechani cal shock Warranty The warranty covers the repair of the product and returning it to you free of charge during the warranty period It is essential that you send in the prod...

Page 29: ...t max 118 dB Weight 64 g Power supply 2x 1 2V NiMH batteries LR03 type Charge time following complete discharge max 12 14hrs Operating time load dependent max 8 10hrs CM charger Dimensions H x W x D 67 x 83 x 65 mm Weight 94 g Power supply via a PSU Primary 220 230 V 50 60 Hz AC Secondary 12 V DC English 29 ...

Page 30: ...pteur CM light soit correctement réglé pour son utilisateur afin d empêcher tout dommage dû à un volume trop élevé Il suffit d ajuster le volume sur une valeur faible Le système de communication CM light contient des éléments pouvant être avalés et n est donc pas adapté aux enfants de moins de 3 mois En cas d utilisation non conforme le fabricant décline toute responsabilité pour les dommages maté...

Page 31: ... charge 37 Le système de communication CM light en utilisation quotidienne Lors d une conférence 38 A une table ronde 39 Lors d un dialogue direct 40 En voyage en auto en train ou en avion 40 Modifier la sonorité 41 Annexe Consignes de sécurité 41 Consigne environnementale élimination 42 Maintenance et entretien 42 Garantie 42 Marquage CE 43 Caractéristiques techniques 43 ...

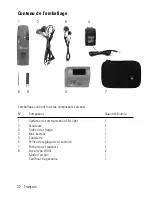
Page 32: ...de communication CM light 1 2 Ecouteurs 1 3 Station de charge 1 4 Bloc secteur 1 5 Cordelette 1 6 Pointe de réglage de la sonorité 1 7 Pochette de transport 1 8 Accu type LR03 2 Mode d emploi 1 Certificat de garantie 1 L emballage contient tous les composants suivants 32 Français ...

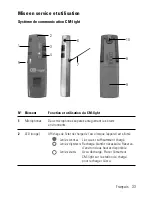
Page 33: ...its environnants 2 LED rouge Affichage de l état de charge de l accu lorsque l appareil est allumé Lumière continue L accu est suffisamment chargé Lumière clignotante Recharge bientôt nécessaire Réserve d environ deux heures disponible Lumière éteinte Accu déchargé Placer l émetteur CM light sur la station de charge pour recharger l accu 1 2 6 8 7 3 4 5 9 10 Français 33 ...
Page 34: ...ur ce mode est signalée par deux impulsions acoustiques Omni Ecoute ouverte amplifie les sig naux de toutes les directions Lorsque l appareil est en marche la commuta tion sur ce mode est signalée par une impulsion acoustique 4 Interrupteur Position de Marche Faire coulisser l interrupteur vers le haut pour marche l inter la mise en marche du CM light arrêt rupteur Arrêt Faire coulisser l interrup...

Page 35: ...l oeillet et l encliqueter cordelette en le tirant vers l extrémité de l appareil Placer les accus ou les piles dans le CM light On utilise deux piles rechargeables accus de type LR03 pour l émetteur Il est également possible d utiliser des piles non rechargeables Ne remplacer l accu que par un accu d origine en cas de besoin En cas d utilisation du système de communication CM light avec des piles...

Page 36: ...is dans le compartiment à piles en respectant leur polarité 4 Refermer le compartiment à piles 5 Placer l émetteur CM light sur la station de charge La LED verte de la station de charge clignote pendant toute la durée de la charge L accu est entièrement rechargé au bout de 12 heures Pochette de transport ...

Page 37: ...on de la station de charge 1 Raccorder le bloc secteur au réseau 230 volts 2 Raccorder la station de charge CM au bloc secteur en enfichant la fiche jack ronde du bloc secteur dans la fiche DC au dos de la station de charge 2 Boîtier du Boîtier de chargeur tripolaire destiné à recevoir le CM light chargeur pour les composants 3 LED rouge Indicateur de disponibilité 4 LED verte Indicateur de charge...

Page 38: ...pour surélever les microphones et atténuer les bruits transmis par le plateau de la table 5 Mettre l l interrupteur du CM light sur la position marche 6 Régler le volume du CM light à un niveau agréable pour vous Lors d une rencontre conviviale par exemple une salle de conférence avec plusieurs groupes de tables Toute la salle de conférence est sonorisée par des hauts parleurs Des questions sont p...

Page 39: ...il doivent être orientés aussi directement que possible vers le conférencier 4 Mettre le CM light en marche 5 Régler le volume du CM light à un niveau agréable pour vous Participation à une table ronde Les interlocuteurs parlent chacun à un volume différent Employer le mode de retransmission zoom afin d atténuer de façon perceptible les bruits provenant de derrière et d amplifier les paroles venan...

Page 40: ...erlocuteur choisi En voyage en auto en train ou en avion En voyage par exemple en train ou en bus avec un groupe avec de la compagnie en voiture ou seul en avion Pendant le voyage on souhaite souvent converser avec son voisin qui parfois n est pas assis du bon côté celui où se trouve l appareil auditif A cela s ajoutent tous les bruits parasites de la circulation et surtout le bruit de fond de la ...

Page 41: ...s consignes de sécurité suivantes Placer la station de charge sur une surface antidérapante Poser le câble de raccordement de façon à prévenir tout accident Ne pas placer ou exposer l appareil près d une source de chaleur aux rayons du soleil à l humidité Protéger l appareil de l humidité de la poussière des liquides corrosifs et des vapeurs Ne raccorder le câble de raccordement qu aux prises fich...

Page 42: ...votre achat Maintenance et entretien Le CM light ne demande pas d entretien S il est sale le nettoyer à l aide d un chiffon doux et humide Ne pas utiliser d alcool de diluant ni de solvant organique Il est préférable de ne pas exposer trop longtemps le CM light aux rayons du soleil et de le protéger des grandes chaleurs de l humidité et des vibrations mécaniques impor tantes Garantie Le CM light e...

Page 43: ...s haut Caractéristiques techniques CM light Dimensions H x L x P 19 x 37 x 120 mm Niveau de pression acoustique pour le fonctionnement avec écouteurs 118 dB maxi Poids 64 g Alimentation électrique 2x 1 2V accus NiMH de type LR03 Durée de charge après décharge complète 12 à 14 h maxi Durée de service en fonction de l utilisation 8 à 10 h maxi Station de charge CM Dimensions H x L x P 67 x 83 x 65 m...

Page 44: ...ume van de CM light correct is ingesteld voor uw behoeften om eventuele schade door een te hoog volume te voorkomen Daarvoor stelt u de volume regelaar in op een lage waarde Het communicatiesysteem CM light bevat verschillende kleine onderdelen die ingeslikt kunnen worden Het systeem is daarom niet geschikt voor kinderen onder de 3 jaar Bij foutief gebruik aanvaardt de fabrikant geen aansprakelijk...

Page 45: ...etui 50 CM light laadapparaat 51 Dagelijks gebruik van het communicatiesysteem CM light Bij een voordracht 50 Aan de ronde tafel 51 Bij directe dialoog 52 Op reis in de auto de treincoupé of het vliegtuig 52 Klankbeeld veranderen 53 Bijlage Veiligheidsinstructies 55 Milieu Verwijdering 56 Onderhoud en verzorging 56 Garantie 56 CE teken 57 Technische gegevens 57 ...

Page 46: ...M light communicatiesysteem 1 2 Hoofdtelefoon 1 3 CM laadapparaat 1 4 Netadapter 1 5 Draaglus 1 6 Stift voor het instellen van de klank 1 7 Transportetui 1 8 Accu type AAA 2 Handleiding 1 Garantiekaart 1 De verpakking bevat de volgende delen 46 Nederlands ...

Page 47: ...rde afstand voor een eenheid ruimtelijke opname van de geluiden 2 LED rood Aanduiding van de ladingstoestand van de accu als het apparaat ingeschakeld is brandt De accu is voldoende geladen knippert Accu moet binnenkort worden geladen U hebt ca 2 uur reserve geen licht Accu leeg CM light in het CM laadapparaat plaatsen om de accu op te laden 1 2 6 8 7 3 4 5 9 10 Nederlands 47 ...

Page 48: ...eld is wordt het omschakelen op deze modus aangegeven Twee signaalimpulsen Omni Ruimtelijk horen versterkt de sig nalen uit alle richtingen Als het apparaat ingeschakeld is wordt het omschakelen op deze modus aangege ven met één signaalimpuls 4 Aan Uit Positie Aan Schuif de schakelaar omhoog om uw schakelaar CM light in te schakelen Uit Schuif de schakelaar omlaag om uw CM light in te schakelen 48...

Page 49: ... gedeelte van omhangkoord de bevestigingsinrichting Vergrendel de knop dan door deze in de richting van de spits te schuiven tot hij vastklikt Accu s batterij in de CM 1 zender plaatsen Het apparaat werkt met twee herlaadbare accu s van het type AAA Het gebruik met niet herlaadbare batterijen is ook mogelijk Gebruik indien nodig uitsluitend originele reserveaccu s Als u in uw CM 1 communicatiesyst...

Page 50: ...sel 3 Plaats de meegeleverde accu s in het batterijvak polen correct plaatsen 4 Sluit het batterijvak 5 Plaats de CM light in één van de CM laadapparaten De groene LED van het CM laadapparaat knippert tijdens het laden Na 12 uur is de accu volledig opgeladen Transportetui ...

Page 51: ...dapparaat ingang CM laadapparaat installeren 1 Verbind de netadapter met het 230 V stroomnet 2 Verbind het CM laadapparaat met de netadapter door de ronde stekker van de netadapter in de DC aansluiting aan de achterkant van het CM laadapparaat te steken 2 Uitsparing 3 polig laadapparaat voor staande opname van de CM light voor apparaat 3 LED rood Stand by 4 LED groen Laden ...

Page 52: ...etafel 4 Gebruik het uitklapbare statief om de microfooneenheid een beetje hoger te plaatsen en geluiden die via het tafelblad worden overgedragen mechanisch te dempen 5 Schakel de CM light in met de Aan Uit schakelaar 6 Stel het transmissievolume met de volumeregelaar op uw CM light in op een aangename waarde U zit in een gezellige ronde bijv in een zaal met meerdere tafels Het geluid wordt met e...

Page 53: ...k direct op de spreker 4 Schakel de CM light ontvanger in met de Aan Uit schakelaar 5 Stel het transmissievolume met de volumeregelaar op uw CM 1 light in op een aangename waarde U bent een deelnemer van de afgebeelde gespreksronde Uw gesprekspartners praten niet allemaal even luid Met de functie Zoom kunt u de storende geluiden achter u aanzienlijk afzwakken en de spraaksignalen aan de voorkant v...

Page 54: ...g U bent bijv als lid van een reisgroep onderweg in de trein of de bus met gezelschap in de auto of alleen in het vliegtuig Tijdens de reis wilt u graag praten met de persoon die naast u zit maar jammer genoeg zit deze niet aan de kant waar u uw hoortoestel heeft Bovendien zijn er een heleboel storende nevengeluiden bijv het permanente zoemen van de airconditioning in het vliegtuig Net als in de d...

Page 55: ...de veiligheids instructies in acht Plaats het laadapparaat op een slipvaste ondergrond Plaats het aansluitsnoer zo dat niemand erover kan struikelen Stel het apparaat nooit bloot aan de volgende invloeden warmtebronnen directe zonnestraling vocht Bescherm het apparaat tegen vocht stof agressieve vloeistoffen en dampen Verbind het aansluitsnoer alleen met de passende contactdozen aansluitingen Slui...

Page 56: ...ight is onderhoudsvrij Reinig het apparaat af en toe met een zachte vochtige doek Gebruik nooit alcohol verdunner of andere organische oplosmiddelen De CM light mag niet gedurende langere tijd worden blootgesteld aan directe zonnestraling en moet bovendien worden beschermd tegen grote hitte vochtig heid of sterke mechanische schokken Garantie De CM light is zeer betrouwbaar Mochten ondanks deskund...

Page 57: ...door het CE teken op het apparaat Technische Daten CM light Afmetingen H x B x D 19 x 37 x 120 mm Geluidsniveau bij gebruik met hoofdtelefoon max 118 dB Gewicht 64 g Voeding 2 x 1 2V NiMH accu s type LR03 Ladingsduur na volledige ontlading max 12 14 h Gebruiksduur afhankelijk van de belasting max 8 10 h CM laadapparaat Afmetingen H x B x D 67 x 83 x 65 mm Gewicht 94 g Voeding via netadapter primai...

Page 58: ...l volume del ricevitore CM light sia regolato in base alle vostre esigenze per evitare i possibili danni provocati da un volume eccessivo Abbassate al minimo il volume Il sistema di comunicazione CM light contiene componenti minuscoli che potrebbero essere inghiottiti pertanto non è indicato per i bambini di età inferiore a 3 anni Il produttore non accetta responsabilità per i danni o le lesioni d...

Page 59: ...t 65 Il sistema di comunicazione CM light nell uso quotidiano A una presentazione 66 A una tavola rotonda 67 In una conversazione diretta 68 In viaggio in automobile in un compartimento del treno o in aeroplano 68 Modifica della frequenza audio 69 Appendice Istruzioni per la sicurezza 69 Nota sull ambiente smaltimento 70 Manutenzione e pulizia 70 Garanzia 70 Marchio CE 71 Scheda riassuntiva dei da...

Page 60: ...cazione CM light 1 2 Cuffia 1 3 Caricatore CM 1 4 Alimentatore 1 5 Loop di trasporto 1 6 Astina per l impostazione del suono 1 7 Borsa di trasporto 1 8 Batteria ministilo 2 Istruzioni di funzionamento 1 Scheda di garanzia 1 La confezione completa contiene i seguenti componenti 60 Italiano ...

Page 61: ...ta dall area in cui viene captato il suono 2 LED rosso Stato di carica della batteria all accensione del dispositivo Luce continua La batteria è sufficientemente carica Luce lampeggiante La batteria deve essere ricaricata l autonomia residua è di 2 ore Nessuna luce La batteria è scarica Per ricaricare la batteria appoggiare il ricevitore CM light 1 2 6 8 7 3 4 5 9 10 Italiano 61 ...

Page 62: ...mpulsi acustici Omni Ascolto spaziale Amplifica i segnali provenienti da tutte le direzioni Quando il dispositivo è acceso il pas saggio a questa posizione del seletto re è indicato da un impulso acustico 4 Interruttore di Impostazione On Spostare l interruttore verso l alto per accensione del selettore attivare il CM light spegnimento Off Spostare l interruttore verso il basso per disattivare il ...

Page 63: ...remere in direzione della punta del dispositivo di registrazione Inserimento delle batterie nel trasmettitore CM light Il dispositivo opera con due batterie ministilo ricaricabili Può essere comunque utilizzato anche con batterie non ricaricabili Se necessario sostituite le batterie solo con altre identiche alle originali Se il sistema di comunicazione CM light viene utilizzato con batterie non ri...

Page 64: ...rie in dotazione rispettando la polarità indicata 4 Chiudete il coperchio del vano batteria 5 Appoggiate il ricevitore CM light sul caricatore CM Il LED verde che si trova sul caricatore CM lampeggerà per tutta la durata della ricarica Le ricarica completa della batteria richiede circa 12 ore Borsa di trasporto ...

Page 65: ... CM 1 Inserire la spina dell alimentatore nella presa di corrente 230 V 2 Collegare il caricatore CM all alimentatore inserendo il connettore rotondo dell alimentatore nella presa DC che si trova sul retro del caricatore 2 Base di rica Base di ricarica a tre spine per sostenere in posizione verticale il rica per i CM light componenti 3 LED rosso Indicatore di standby 4 LED verde Indicatore di cari...

Page 66: ... Utilizzate l apposita base di supporto per sollevare il microfono e attutire meccanicamente i rumori provenienti dalla superficie del tavolo 5 Spostate l interruttore di accensione e spegnimento del trasmettitore e del CM light in posizione On 6 Regolate il volume di trasmissione agendo sull apposito controllo del CM light Supponiamo che siate seduti a uno dei tavoli di una sala conferenze Il suo...

Page 67: ...nte verso l oratore 4 Accendete il ricevitore CM light 5 Regolate il volume del discorso agendo sull apposito controllo che si trova sul ricevitore CM light State partecipando a un meeting come mostrato in figura I partecipanti parlano con livelli di voce differenti Utilizzate la modalità di trasmissione Zoom per ridurre i suoni di disturbo provenienti da dietro e contemporaneamente amplificare le...

Page 68: ...in aeroplano Siete su un treno o un autobus insieme agli altri viaggiatori della vostra comitiva accompagnati da una guida oppure state viaggiando da soli in automobile o in aereo Volete chiacchierare con chi occupa il sedile a fianco al vostro che però si trova sul lato opposto a quello in cui portate l apparecchio acustico Questa situazione è contaminata da molti suoni di disturbo ad esempio il ...

Page 69: ...nti precauzioni Appoggiate il caricatore su una superficie non scivolosa Stendete il cavo di collegamento in modo che non possa venire calpestato Non esponete mai il dispositivo all influenza delle seguenti fonti riscaldatori luce diretta del sole umidità Proteggete il dispositivo da umidità polvere liquidi e vapore corrosivi Collegate i cavi solo alle prese specificate Collegate solo accessori ap...

Page 70: ...ulire l apparecchio con un panno morbido e leggermente umido Non utilizzare alcol diluenti o solventi organici Non esporre il CM light alla luce diretta del sole per lunghi periodi di tempo Tenere il telefono al riparo da fonti di calore intenso umidità o forti vibrazioni meccaniche Garanzia Questo CM light è una apparecchio estremamente affidabile Tuttavia a dispetto di un installazione e un util...

Page 71: ...CE sui CM light Dati tecnici CM light Dimensioni A x L x P 19 x 37 x 120 mm Livello di pressione acustica se utilizzato con cuffia max 118 dB Peso 64 g Alimentazione 2 batterie NiMH da 1 2 V tipo LR03 Tempo di ricarica batterie completamente esaurite 12 14 ore Autonomia di funzionamento a seconda del carico 8 10 ore Caricatore CM Dimensioni A x L x P 67 x 83 x 65 mm Peso 94 g Alimentazione tramite...

Page 72: ...light está ajustado correctamente a sus intereses personales con el objeto de evitar posibles daños debido a un volumen muy alto Para ello ajuste el regulador del volumen a un valor bajo El sistema de comunicación CM light contiene piezas pequeñas por lo que no es adecuado para niños menores de 3 años ya que pueden ingerirlas En el caso de hacer un uso inapropiado de este sistema el fabricante no ...

Page 73: ... light 79 Uso diario del sistema de comunicación CM light En una conferencia 80 En una mesa redonda 81 En una conversación directa 82 De viaje en el automóvil en el tren o en el avión 82 Cambio de las características de sonido 83 Anexo Indicaciones de seguridad 83 Indicaciones medioambientales Eliminación 84 Mantenimiento y conservación 84 Garantía 84 Símbolo CE 85 Resumen de los datos técnicos 85...

Page 74: ...de comunicación CM light 1 2 Auriculares 1 3 Cargador CM 1 4 Fuente de alimentación 1 5 Cinta portadora 1 6 Punta para ajustar el tono 1 7 Bolsa de transporte 1 8 Pila tipo AAA 2 Instrucciones de manejo 1 Tarjeta de garantía 1 El contenido completo del embalaje incluye los siguientes componentes 74 Español ...

Page 75: ...eterminada para la captación micrófono tridimensional de los ruidos 2 LED rojo Indicación del estado de carga de la pila con el receptor conectado Luz continua La pila está suficientemente cargada Luz intermitente Pronto deberá hacer una recarga Tiene aprox 2 horas de reserva Sin luz La pila está descargada Para recargar la pila coloque el CM light 1 2 6 8 7 3 4 5 9 10 Español 75 ...

Page 76: ...ica acústicamente mediante dos impulsos de señal Omni Audición total amplifica las señales procedentes de todas las direcciones Cuando el emisor está conectado el cam bio a esta posición del interruptor se indica acústicamente mediante un impulso de señal 4 Interruptor de Posición On Mueva el interruptor hacia arriba para conexión del conectar el CM light desconexión interruptor Off Mueva el inter...

Page 77: ...amiento del dispositivo y encájela de forma que se pueda oír moviéndola en cordón para colgar dirección al extremo del emisor Colocación de las pilas baterías en el emisor CM light Para el funcionamiento del emisor se utilizan dos pilas recargables del tipo AAA El emisor también puede funcionar con una pila no recargable En caso necesario utilice exclusivamente pilas de recambio originales Si el s...

Page 78: ...luidas en el volumen de suministro en la cámara tenga en cuenta la polaridad 4 Cierre la cámara de la pila 5 Ponga el CM light en uno de los cargadores CM El LED verde del cargador CM parpadea durante todo el proceso de carga Al cabo de 12 horas la pila estará completamente recargada Bolsa de transporte ...

Page 79: ...n con la red de corriente de 230 voltios 2 Conecte el cargador CM con la fuente de alimentación enchufando el conector redondo de la fuente de alimentación en la hembrilla DC situada en el lado posterior del cargador CM 2 Receptáculo de carga Receptáculo de contacto de carga de 3 polos para alojar vertical para los componentes mente el emisor CM light o el receptor CM light del sistema 3 LED rojo ...

Page 80: ... soporte plegable para elevar un poco la unidad de micrófono y amortiguar mecánicamente los ruidos que generan las sacudidas de la mesa 5 Conecte el CM light con el interruptor de conexión desconexión 6 Regule el volumen de transmisión a un nivel que le resulte agradable ajustando el regulador del volumen del CM light a un valor en correspondencia Vd participa en una tertulia p ej en una sala de c...

Page 81: ... orador 4 Conecte el receptor CM light con el interruptor de conexión desconexión 5 Regule el volumen de la conferencia a un nivel que le resulte agradable ajustando el regulador del volumen del CM light a un valor en correspondencia Vd participa en una mesa redonda como la de la figura Sus interlocutores hablan a diferente volumen Utilice el modo de transmisión Zoom para mitigar considerablemente...

Page 82: ... avión Vd está de viaje por ejemplo como miembro de un grupo que viaja en tren o en autocar acompañado en el automóvil o como pasajero en un avión Durante el viaje quiere con versar con la persona que está sentada a su lado pero lamentablemente esta persona no está sentada en el lado en el que se encuentra su audífono A ello se añaden todas las interferencias secundarias del medio de transporte so...

Page 83: ...s de seguridad reconocidas Tenga en cuenta las siguientes indicaciones de seguridad Coloque el cargador sobre una base antideslizante Tienda el cable de conexión de forma que no pueda ocasionar accidentes No exponga nunca los aparatos a las siguientes influencias Fuentes de calor Radiación directa del sol Humedad Proteja el sistema de la humedad del polvo y de los líquidos y vapores agresivos Cone...

Page 84: ...ando un paño suave humedecido Nunca alcohol aguarrás u otros disolventes orgánicos No deje el CM light expuesto al sol durante largos períodos de tiempo y protéjalo también contra altas temperaturas humedad o altos niveles de vibración mecánica Garantía Este CM light es un aparato muy fiable Sin embargo si se produjese alguna avería a pesar de estar instalado correctamente y de haber sido utilizad...

Page 85: ...sche Daten CM light Dimensiones altura x longitud x anchura 19 x 37 x 120 mm Nivel de presión acústica en funcionamiento de auriculares máx 118 dB Peso 64 g Alimentación de corriente 2 pilas NiMH de 1 2 V tipo LR03 Tiempo de carga tras una descarga completa máx 12 14 h Autonomía en función de la carga máx 8 10 h Cargador CM Dimensiones altura x longitud x anchura 67 x 83 x 65 mm Peso 94 g Alimenta...

Page 86: ...8 Grand Rue F 68170 Rixheim Tel 33 3 89 4414 00 Fax 33 3 89 44 6213 Humantechnik GHL AG Rastatterstrasse 9 CH 4057 Basel Tel 0 61 6 93 22 60 Fax 0 61 6 93 22 61 For other service partners in Europe please contact Humantechnik Germany Tel 49 76 21 9 56 89 0 Fax 49 76 21 9 56 89 70 Internet www humantechnik com e mail info humantechnik com HUMANTECHNIK RM436000 0306 Switzerland CH Austria Eastern Eu...

Reviews: