10
Version 2019/01
Operating Instruction Manual HKT (Part 2)
Position the loading ramp
►
►
Pull the cotter pin out of the plug bolt.
►
►
Pull out the plug bolt.
►
►
Position the loading ramp in accordance with
the wheel size of your motorcycle and in line with
the base rail.
►
►
Insert the plug bolt through the axle and align it
with the adjustment holes.
►
►
Insert the cotter pin into the drill-hole of the
plug bolt.
1
2
Folding down the front stop
►
►
Loosen the screws (wing nuts) on both sides.
►
►
Position the loading ramp as far forward as possible.
►
►
Fold down the stop.
►
►
Insert the retaining screws from the inside.
►
►
Firmly tighten the wing nuts with their spring washers.
Tying down goods
2
1
1
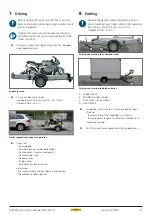
Lashing points
1. Lashing brackets, recessed (4 per side)
2. Lashing strap
6.2 Load securing
1
2
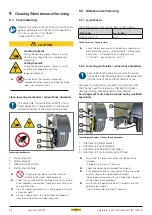
Tied-down motorcycle
1. Lashing strap
2. Motorcycle stand
►
►
Centrally position the motorcycle on the motorcycle stand.
- Where necessary, first adjust the motorcycle stand.
►
►
Use suitable lashing straps to tie down the motorcycle at
the 4 lashing points.
A motorcycle stand may only be retrofitted using
the attachment points provided.
Fitting should only be carried out by a person with
specialised mechanical knowledge and experience
in the use of tools and their inherent risks. We
recommend that you have the motorcycle stand
fitted by a qualified workshop.
Read and observe the assembly instructions.
Operating the motorcycle stand
1
3
4
5
6
2
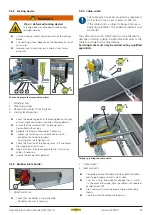
Adjusting the motorcycle stand
1. Front stop, foldable
2. Wing nut / spring washer / retaining screw
3. Base rail
4. Adjustment holes
5. Plug bolt with cotter pin
6. Loading ramp


