background image

12  


Version 2019/01  


Operating Instruction Manual HKT (Part 2)

Lowering process

1

2

4

3

Operating elements

1.  Pump lever
2.  Locking lever (cargo bed)
3.  Insertion openings (top, sides)
4.  Valve wheel

Remove the pump lever from the retainer. 


- Insert it into one of the corresponding openings.

Move the cargo bed slightly upwards until the locking lever  


is released (the mechanical safety lock will be released).

4

3

1

2

Pull on the locking lever without undue force and hold it  


in place.

Gradually open the valve wheel. 


 - The cargo bed will be lowered.  


- You can now release the locking lever.

Lower the cargo bed completely until it rests on the base.

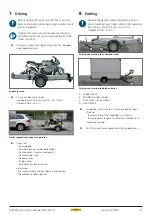
Lowered positions

4 - 6 °

Drive-up angle

1

Cargo bed lowered

1.  Loading ramp

1

Cargo bed lowered

1.  Ramp door, folded down

Summary of Contents for 4000 Series

Page 1: ...MACHT S MÖGLICH Part 2 HKT Lowerable Trailer Trailers up to 3 5 to Operating ins tructions en 4000 series ...

Page 2: ...nformation and warnings Comply with the steps for handling the trailer Non observance of any of the documentation can cause injuries to you and to other persons or can cause material damage Non observance may invalidate your guarantee entitlement Keep this operating instruction manual in a safe place for the entire service life of your trailer It forms part of the product and also serves as a CHEC...

Page 3: ...d securing 10 6 3 Lowering the cargo bed 11 6 4 Operating the number plate holder 13 6 5 Operating the ramp door 14 6 6 Operating the high cover frame 15 6 7 Operating the box body tailgate 16 6 8 Loading the trailer 17 6 9 Lifting the cargo bed 19 6 10 Unloading the trailer 20 7 Driving 21 8 Parking 21 9 Cleaning Maintenance Servicing 22 9 1 Care Cleaning 22 9 2 Maintenance Servicing 22 10Trouble...

Page 4: ...S o braked 4089 Type 1 HKT 132515 S o 4090 Type 1 HKT 152515 S o 4091 Type 1 HKT 182515 S o 4092 Type 1 HKT 132817 S o 4093 Type 1 HKT 152817 S o 4094 Type 1 HKT 182817 S o 4095 Type 1 HKT 133117 S o 4096 Type 1 HKT 153117 S o 4097 Type 1 HKT 183117 S o 1 1 Declaration of Conformity Humbaur GmbH hereby confirms that all relevant EU directives for the registration and safe use of HKT trailers have ...

Page 5: ...he HKT lowerable trailer is available as a braked or unbraked version The HKT lowerable trailer has a fixed loading ramp or a full length ramp door The load is secured to the recessed lashing points using standard lashing straps The HKT lowerable trailer permits a wide range of applications for load capacities of 440 kg 1 425 kg The HKT lowerable trailer can be optionally fitted with the following...

Page 6: ...ng ball 4 Safety cable 5 Drawbar support 6 Hand brake loading ramp 7 V drawbar 8 Pump lever hydraulic 9 Locking lever 10 Hydraulic hand pump 11 Lighting front 12 Rear reflector side 13 Mudguard 14 Wheels tyres axle 15 Spray flap 16 Wheel chock 17 Tail light back 18 Loading ramp 19 Lashing lug 20 Cargo bed 21 Number plate holder 22 Number plate light 17 18 20 21 22 19 HKT from the rear ...

Page 7: ...e ramp lock 25 Automatic jockey wheel 26 Plywood box body 27 Handle 28 Control strip 29 Gas struts 30 Espagnolette bolt lockable 31 Tailgate 32 Lashing rail 33 Lashing bracket movable 34 Snap lock on ramp door 4 5 7 8 12 11 13 14 15 16 25 17 20 21 22 23 34 27 28 29 30 31 32 33 26 2 3 6 HKT braked as a plywood box body ...

Page 8: ...y positioned 1 Motorcycle stand foldable adjustable 1 With toolbox on the drawbar 1 Humbaur toolbox 1 2 With tarpaulin and frame body 1 Full tarpaulin 2 Frame 1 With wheel shock absorbers for 100 km h 1 Wheel shock absorbers 1 2 With cable winch and higher side walls 1 Cable winch fixed 2 Drop sides 350 mm high ...

Page 9: ...oading process with simultaneous lifting lowering of the cargo bed Try not to step onto the cargo bed during the lifting lowering process Take particular care when stepping onto the cargo bed Use Observe the other general safety recommendations in the operating instruction manual Trailers up to 3 5 to General Points Part 1 WARNING 6 Loading and Unloading The HKT lowerable trailer is mainly designe...

Page 10: ... 1 Lashing brackets recessed 4 per side 2 Lashing strap 6 2 Load securing 1 2 Tied down motorcycle 1 Lashing strap 2 Motorcycle stand Centrally position the motorcycle on the motorcycle stand Where necessary first adjust the motorcycle stand Use suitable lashing straps to tie down the motorcycle at the 4 lashing points A motorcycle stand may only be retrofitted using the attachment points provided...

Page 11: ...ween 6 3 Lowering the cargo bed WARNING Lowering of the cargo bed Crushing hazard for feet at rear of trailer when lowering the cargo bed Keep persons away from the hazard area during lowering Preparing the trailer to be lowered The trailer should not be able to slip away during the loading process Place the trailer on solid ground Secure the trailer so that it cannot roll away or couple it to the...

Page 12: ...enings Move the cargo bed slightly upwards until the locking lever is released the mechanical safety lock will be released 4 3 1 2 Pull on the locking lever without undue force and hold it in place Gradually open the valve wheel The cargo bed will be lowered You can now release the locking lever Lower the cargo bed completely until it rests on the base Lowered positions 4 6 Drive up angle 1 Cargo ...

Page 13: ... the number plate holder Unlocking 1 4 3 2 5 Locked Unlocked 1 Number plate holder 2 Bracket 3 Locking lug 4 Lock 5 Cotter pin Pull out the cotter pin Fold down the lock Pull the bracket out of the locking lug Swinging the number plate holder open 1 6 Opened 6 Bolt Carefully open the number plate holder It will rest on a bolt Locking Rotate the number plate holder towards the cargo bed Push the br...

Page 14: ...le 2 Bolt bracket 3 Securing hook 4 Striking plate Push the securing hook down Pull the bolt handle towards you and remove the locking bracket while you do so Hold the ramp wall with one hand and open the lock on the other side CAUTION Ramp door folded down Carefully fold down the ramp door Make sure that your feet are not under the ramp door Folding up locking Fold up ramp door Carefully lift the...

Page 15: ...1 3 2 Frame without high cover 1 Frame 2 Slats wood 3 Stanchion CAUTION Releasing opening the high cover 1 3 2 4 Releasing the high cover at the back 1 Securing the high cover at the back 2 Winding shaft 3 Attachment ring 4 Safety spring Open the number plate holder and swivel it sideways Pull out the securing springs on both sides Carefully release the winding shaft from the attachment rings 3 2 ...

Page 16: ...nsert the winding shaft in the attachment rings and secure the winding shaft using the securing springs 6 7 Operating the box body tailgate WARNING Risk of tipping over When the tailgate is opened the trailer could tip back risk of impact crushing Couple the trailer to the towing vehicle before opening the tailgate or first lower the cargo bed Mind your head It is easy to knock your head on the op...

Page 17: ... the bolt handle and then push it in firmly The bolt handle will automatically lock into the pressure protection mechanism Where necessary use a key to secure the safety lock 6 8 Loading the trailer Make sure that the trailer is secured so that it cannot roll away Make sure that road traffic safety is not impaired when loading and unloading the trailer If necessary use additional signalling device...

Page 18: ...tely replace any cable that has broken individual wires Ensure that your fingers do not get caught in the cable winch when rolling up the cable NOTICE Overloading the cable winch Overloading the cable winch may result in breaking it off or tearing the rope Adhere to the maximum permissible tractive force of the cable winch i e 950 daN or approximately 900 kg Take note of the type label on the cabl...

Page 19: ...k and pulled tight Ensure that the crank is in the parked position and secured with the securing pin Cable rolled up secured Insert the snap hook into the eyelet Slightly tighten the cable Remove the crank from the crank base Place the crank into the parking holder and ensure that it points in the right direction Ensure that the crank has been secured CAUTION 6 9 Lifting the cargo bed WARNING Lift...

Page 20: ...chanically secured by locking bolts 2 1 3 Insert secure the pump lever 1 Drill hole in crossbar 2 Pump lever 3 Safety device cotter pin cable Insert the pump lever into the drill hole and bolt Insert the cotter pin through the securing bolt Close the ramp door number plate holder see Section 6 4 or 6 5 6 10 Unloading the trailer Make sure that the vehicle to be unloaded is secured from rolling awa...

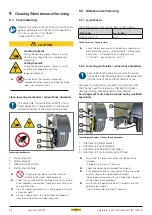
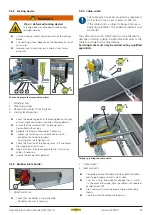
Page 21: ...der the accessories tie down equipment the motorcycle stand the pump lever the high cover the tailgate for box extension are secured The jockey wheel has been tilted up and secured The toolbox has been locked 8 Parking Observe the general safety and warning instruc tions on parking your trailer safely in the operating instruction manual Trailers up to 3 5 to General Points Part 1 1 2 Parking and s...

Page 22: ...t them with corrosive media abrasives CAUTION 9 2 Maintenance Servicing 9 2 1 Tyres Wheels The following tyre sizes can be used on HKT trailers Tyre type pmax in bar 195 50 R 13 C 6 25 Table Tyre size Tyre pressure Check the tyre pressure on all wheels on a regular basis and before long journeys See the table Maintenance instructions in the operating instruction manual Car Trailers General Points ...

Page 23: ...nd lower the cargo bed at least twice Apply a little multi purpose grease to the transmission cables if necessary Grease the locking lever bearings 9 2 4 Number plate holder 1 1 Attachment nut Check that the holder is firmly attached Retighten the nuts if necessary WARNING 9 2 4 Cable winch The cable winch must be inspected by specialised staff at least once a year or every 10 000 km If the cable ...

Page 24: ...hicle Adjust the required height or exchange the towing vehicle for one with a suitable coupling height Cargo bed does not rise up The valve wheel of the hydraulic pump is open Close the valve wheel of the hydraulic pump Lift the cargo bed Mudguards not properly positioned jammed The attachment angle is wrong and the positioning bolt is maladjusted The positioning bolt is deformed Check the positi...

Page 25: ...Operating Instruction Manual HKT Part 2 Version 2019 01 25 ...

Page 26: ...ty is accepted for errors or printing errors All illustrations are representative Deviations and modifications are subject to the model type Subject to change without notice Copying prohibited Printed in Germany Versionm 2019 01 ...

Reviews: