background image

Vibration Alert

Your HUM1200 radio features vibration alerts to notify you of an incoming call. 
To set vibration mode:
1. Press the MENU button until 

Vb , On

or 

OF

and the vibration icons 

(       ) are flashing.

2. Press the Up ( ) or Down ( ) button to select vibration on or off.
3. Press the PTT button to exit the vibration alert mode.

OR Press the menu button to proceed to the next menu item.
OR Press the Compass button once to exit the program mode and 
enter the compass mode.

Note: When receiving an incoming call, the selected alert function will
be activated for about 2 seconds and then stop for 30 seconds.
Any incoming call received during the 30 seconds will not trigger the
alert device. The radio will automatically resume and will be ready for
another alert after 30 seconds.

26

HUM1200  2/11/04  8:27 PM  Page 26

Summary of Contents for HUM1200

Page 1: ...22 Channel With CTCSS GMRS Radio with 10 NOAA Weather Channels Model HUM1200 Before operating your HUM1200 please read this instruction manual completely HUM1200 2 11 04 8 27 PM Page 1...

Page 2: ...HUM1200 2 11 04 8 27 PM Page 2...

Page 3: ...INCHES AWAY FROM THE MOUTH AND THE TRANSCEIVER IS VERTICAL This handheld radio has been tested and meets the FCC RF exposure guidelines when used with the TTI or authorized OEM dealer s accessories s...

Page 4: ...xposure to Radio Frequency Electromagnetic Fields 3KHz to 300 GHz American National Standards Institute C95 3 1992 IEEE Recommended Practice for the Measurement of Potentially Hazardous Electromagneti...

Page 5: ...ly off to one side The information listed above provides the user with the information needed to make him or her aware of RF exposure and what to do to assure that this radio operates within the FCC R...

Page 6: ...usting The Volume 15 Talking To Another Party 15 Compass Button 16 Menu Button 17 Selecting Main Channels 1 22 18 Selecting Tone Code CTCSS Sub Channel 18 Power Hi Low 20 Weather Band Operation 21 Wea...

Page 7: ...r 32 LCD Back Lighting Lamp 32 TX Indicator LED Lamp 32 Auto Power Saver 33 Low Battery Indicator 33 External Microphone Speaker 33 Notes for Better Communication 33 Special Warning 34 Specifications...

Page 8: ...cause harmful interference to radio or television reception which can be determined by turning the equipment off and on the user is encouraged to correct the interference by one or more of the followi...

Page 9: ...her Alert Vibration Alert Received Signal Strength Indicator Selectable Call Signal Key Tone On Off Battery Save Monitor LCD Back Lighting With 4 yellow green LED Low Battery Indicator Roger Beep Tone...

Page 10: ...n Off and Volume Control 3 Up Channel Down Channel 4 Menu Lock Button 5 CALL Button 6 Compass Button 7 Built In Speaker 8 Antenna Fixed Antenna 9 Transmit LED Indicator 10 Built In Microphone 11 LCD S...

Page 11: ...12 Push to Talk PTT Button 13 Monitor Button 14 Battery Door 11 12 13 14 HUM1200 2 11 04 8 27 PM Page 11...

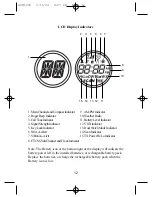
Page 12: ...Mode Indicator 6 NOAA Alert 14 Scan Indicator 7 Vibration Alert 15 TX Power Hi Lo Indicator 8 CTCSS Sub Channel and Clock Indicator Note The Battery icon at the bottom right of the display will indic...

Page 13: ...l down locking tab located at the bottom of the battery compartment and lift the door up to remove the battery cover 2 Insert 4 AA size batteries or rechargeable batteries charge up separately Positio...

Page 14: ...n Off Volume control knob clockwise or counter clockwise to adjust the volume level Talking To Another Party To verbally communicate with another party 1 Press and hold the PTT button to transmit your...

Page 15: ...mes or you may place the radio on the palm of one of your hands parallel to the ground and turn it in a circle at least two 2 times with your hand 3 Press the COMPASS button again 4 a If compass calib...

Page 16: ...t hand side of the LCD display 2 To exit Compass Mode and return to Standby Mode press and release the Compass button Menu Button This button is used to select various feature settings in your HUM1200...

Page 17: ...RS Radio To select the channel Press the Up or Down button to select the desired channel Selecting Tone Code CTCSS Sub Channel This feature allows you to utilize the coded squelch tones 1 38 within on...

Page 18: ...Press the Up or Down button to select the desired sub channel 4 Press the Menu button to proceed to the next item setting OR Press the PTT button once to set the sub channel and exit from the CTCSS se...

Page 19: ...pressing the Up or Down button 3 Press the Menu button to proceed to next item setting OR Press the PTT button once to set the Transmit Power Level and exit from the Transmit Power selection mode OR P...

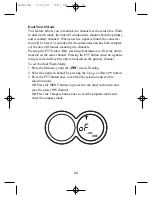
Page 20: ...be in the weather chan nel mode Press the Menu button until icon WX is flashing to enter the selection mode To change the channel 1 Press and release the Up or Down button to move to higher or lower m...

Page 21: ...elease the MENU button until is flashing on the LCD screen 2 Press the Up or Down button to turn Alert on or off 3 Press the PTT Button once for confirmation of your choice OR press the MENU button to...

Page 22: ...of the hour setting 4 Press the Up or Down button to set the minutes 5 Press MENU for confirmation of the minutes setting 6 Press the Up or Down button to set the AM PM 7 Press MENU for confirmation o...

Page 23: ...n until the VOX icon is flashing on the LCD screen 2 Press the Up or Down button to select VOX off or from 1 to 5 to select VOX level sensitivity The higher the number the higher the sensitivity 3 To...

Page 24: ...will set the unit to transmit on the same channel Pressing the PTT button when no signal is being received will set the unit to transmit on the primary channel To set the Dual Watch Mode 1 Press the...

Page 25: ...he 22 channels to find the active channel When an active channel is found conversation will be heard If the unit does not locate an active signal and you would like to transmit press the PTT button to...

Page 26: ...ion alert mode OR Press the menu button to proceed to the next menu item OR Press the Compass button once to exit the program mode and enter the compass mode Note When receiving an incoming call the s...

Page 27: ...on until CA appears on the LCD screen 2 Press the Up or Down button to select your desired call tone 3 Press the MENU button to proceed to the next item in the menu OR press PTT button once to exit th...

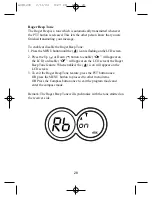
Page 28: ...the Up or Down button to enable On will appear on the LCD or disable OF will appear on the LCD screen the Roger Beep Tone feature When enabled the icon will appear on the LCD screen 3 To exit the Rog...

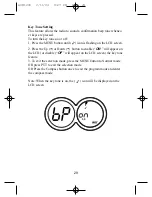
Page 29: ...p or Down button to enable ON will appear on the LCD or disable OF will appear on the LCD screen the key tone feature 3 To exit the selection mode press the MENU button to Normal mode OR press PTT to...

Page 30: ...NU button To activate Key Lock 1 Press and hold the MENU button for 2 seconds The key Lock icon will appear on the LCD screen and the Key Lock will be activated 2 To unlock the Key Lock function press...

Page 31: ...1200 radio has a feature that checks for a weak signal in the current channel 1 Press the Monitor button momentarily LCD backlight will turn on 2 To return to normal operation release the Monitor butt...

Page 32: ...am inside battery compartment External Microphone Speaker Your HUM1200 radio has an external microphone jack that enables you to connect an external microphone in order to free your hands for other ta...

Page 33: ...utput of this transceiver Its output is designed to meet the legal limits set by the FCC 4 Do not use this device or change the batteries in a potentially explosive atmosphere since sparks in such are...

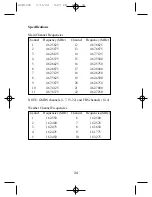
Page 34: ...462 6875 17 462 6000 7 462 7125 18 462 6250 8 467 5625 19 462 6500 9 467 5875 20 462 6750 10 467 6125 21 462 7000 11 467 6375 22 462 7250 NOTE GMRS channels 1 7 15 22 and FRS channels 8 14 Weather Cha...

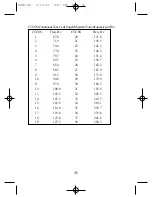
Page 35: ...3 74 4 22 141 3 4 77 0 23 146 2 5 79 7 24 151 4 6 82 5 25 156 7 7 85 4 26 162 2 8 88 5 27 167 9 9 91 5 28 173 8 10 94 8 29 179 9 11 97 4 30 186 2 12 100 0 31 192 8 13 103 5 32 203 5 14 107 2 33 210 7...

Page 36: ...7475 N Glen Harbor Blvd Glendale AZ85307 Be sure to include your return address proof of purchase a daytime phone number 10 00 for postage and handling and a brief explanation of your difficulties NO...

Page 37: ...ate of manufacture To obtain warranty service return the defective product to the following address Conair Consumer Electronics 7475 N Glen Harbor Blvd Glendale AZ 85307 together with your sales slip...

Page 38: ...where it was pur chased or B to another retail store which sells Conair Consumer Electronics prod ucts of the same type The retail store shall then decide to either repair the product refer the consum...

Page 39: ...HUM1200 2 11 04 8 27 PM Page 39...

Page 40: ...to your questions regarding operation Missing parts or installation call the CONAIR CONSUMER ELECTRONICS RETAIL SALES HELP LINE AT 1 888 875 8658 Monday Friday 8 30a m 9 00p m EST Saturday 8 30a m 12...

Reviews: